 12 Course Bundle $79 ($500 value) 12 Course Bundle $79 ($500 value)
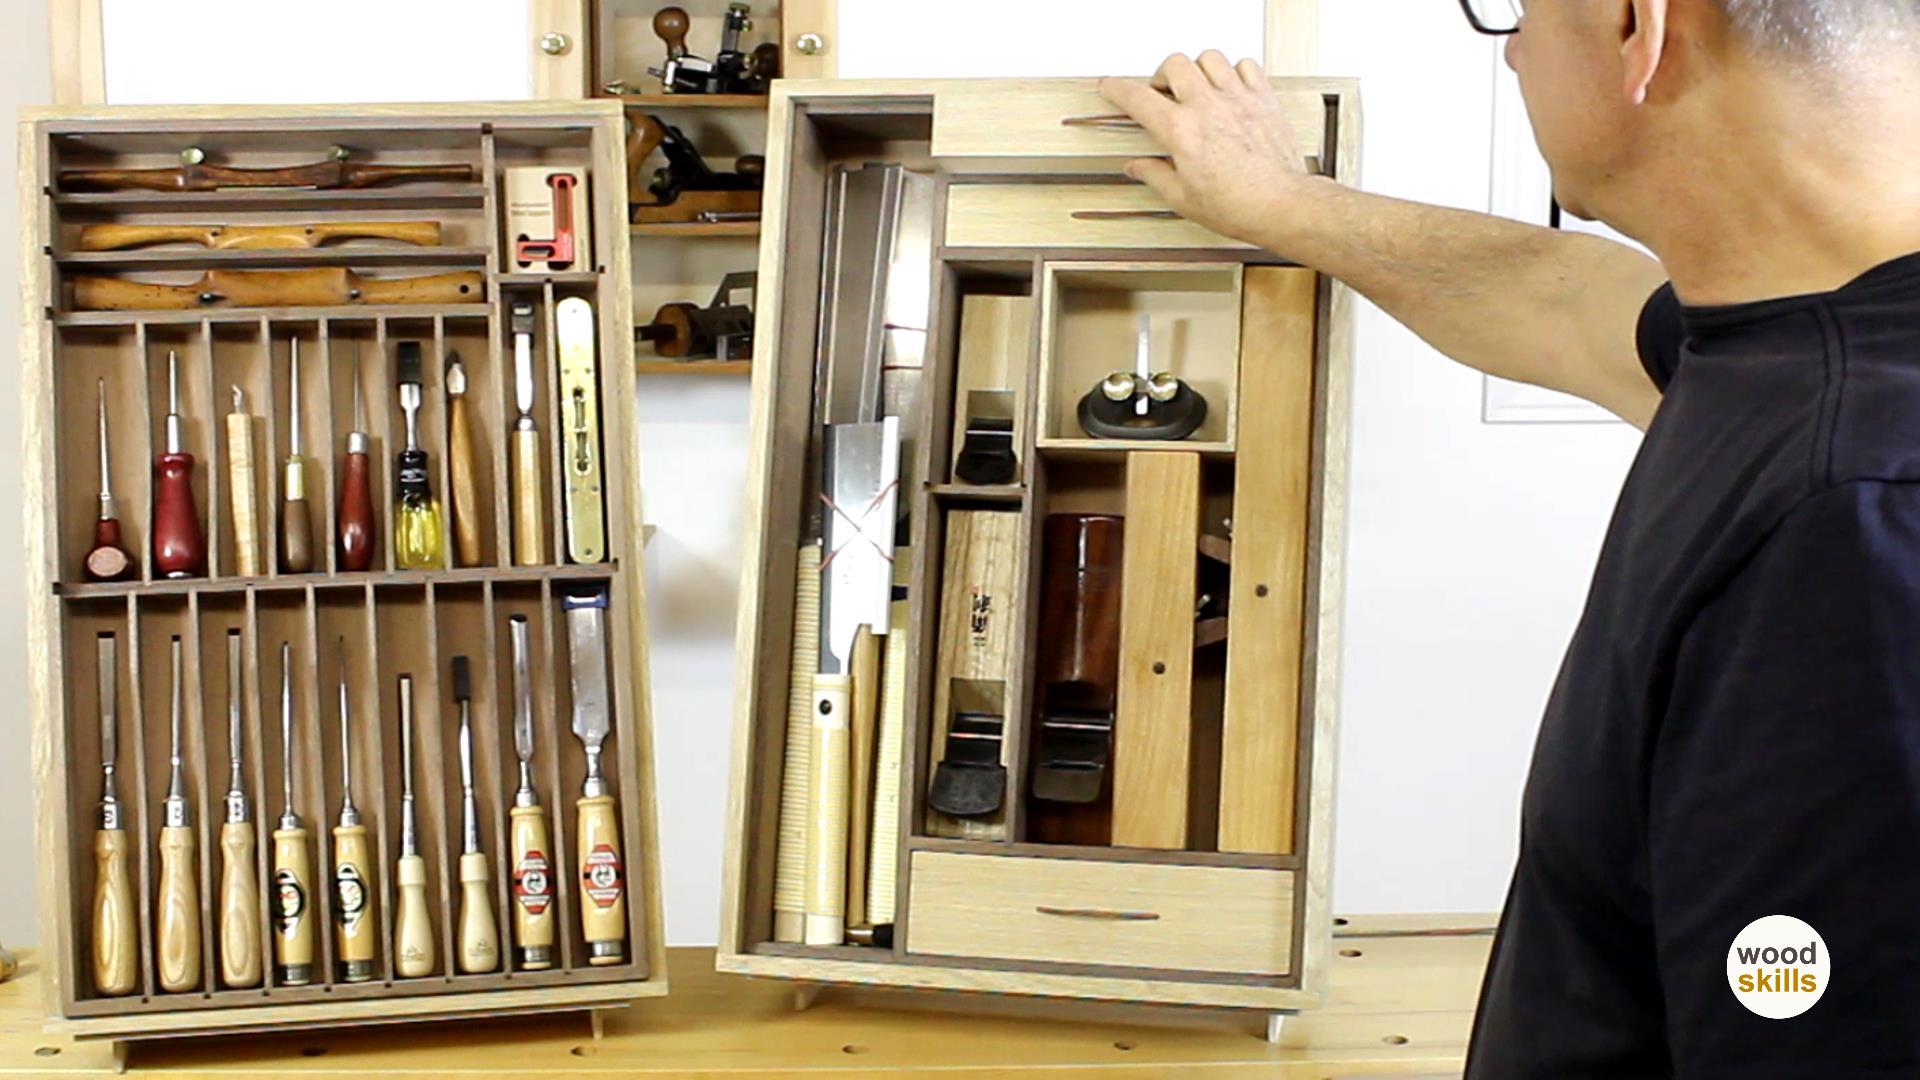
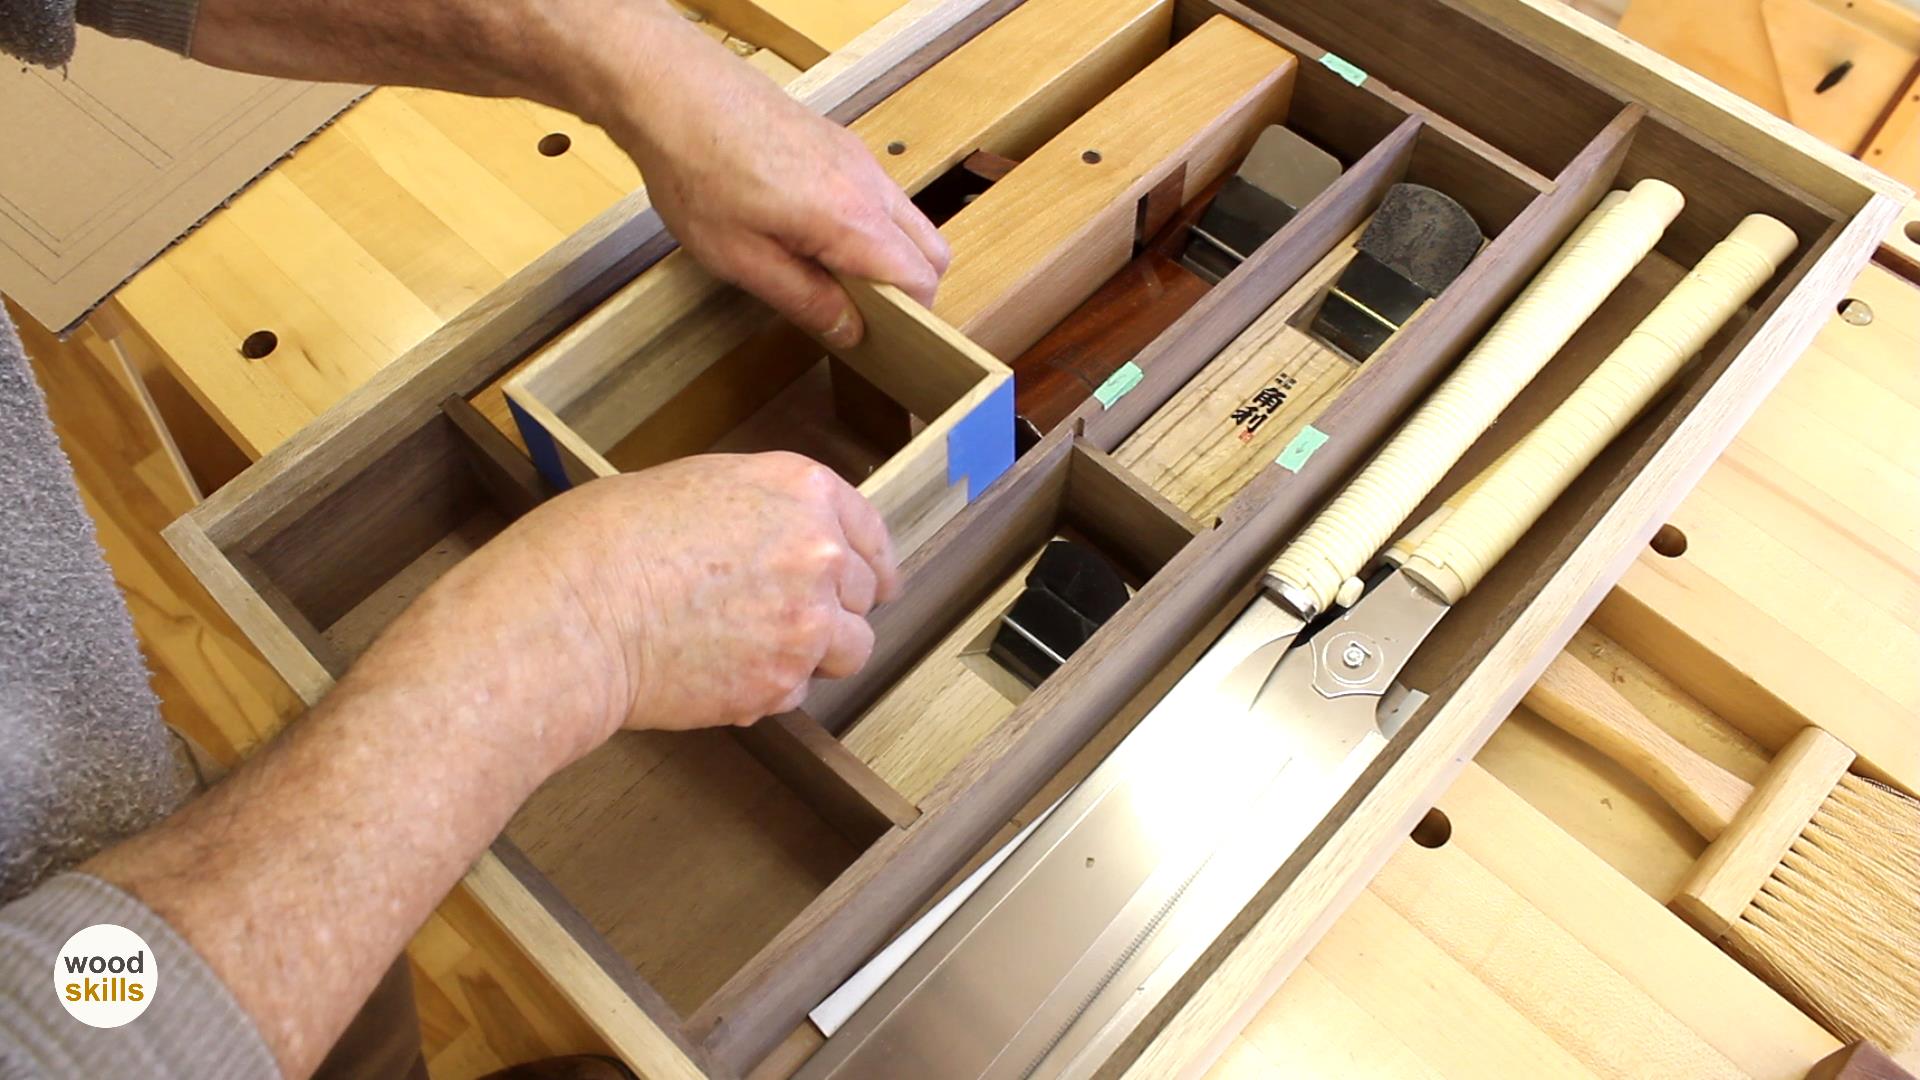
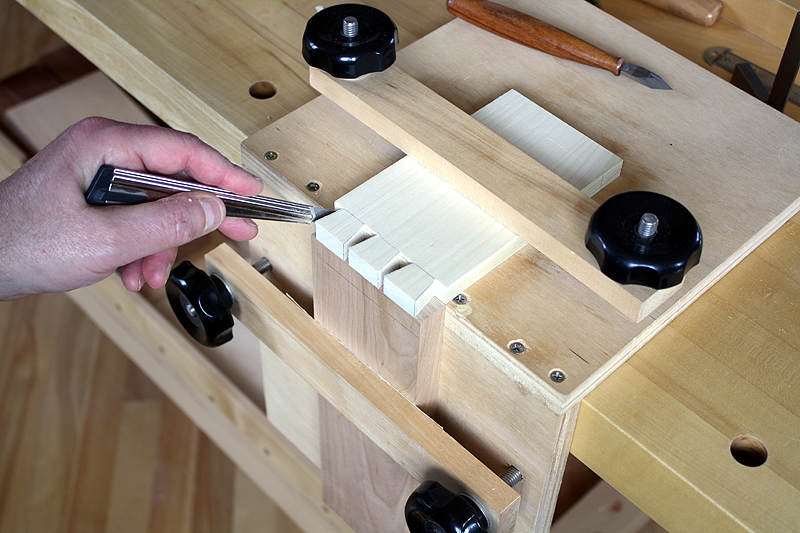
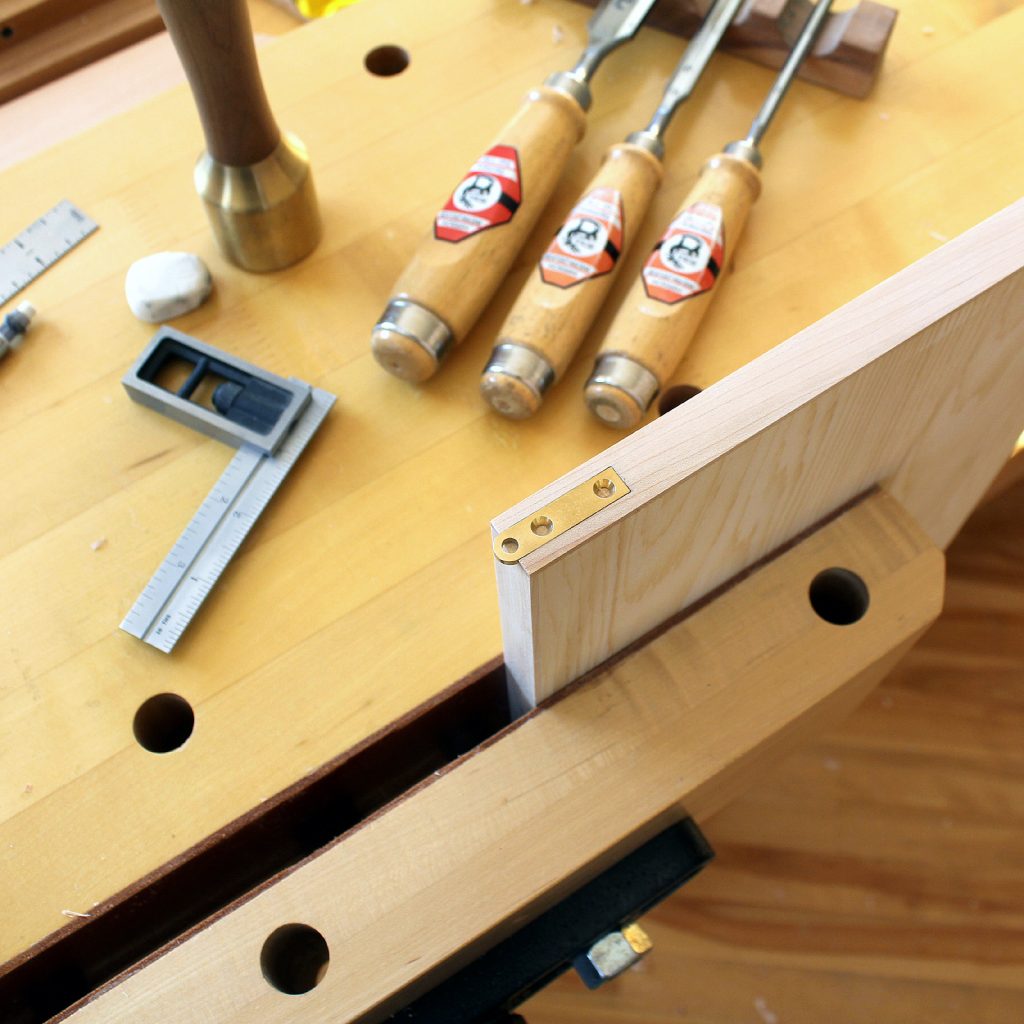
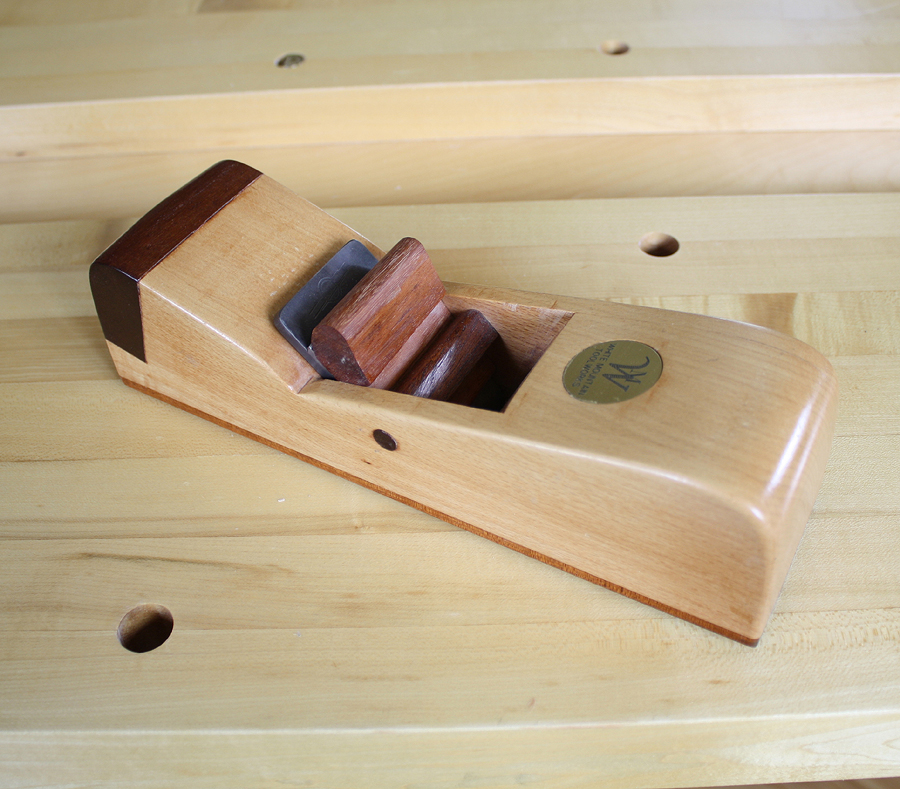
In this course, learn how to create a Portable Hand Tool Case using a combination of power tools and hand tools. Over 3 hours of detailed video instruction describe how to create the hand tool case. Includes a short course in creating dovetails. The tool case has integrated stands to keep the two halves up while working at a workbench. Tips + techniques are provided for creating + fitting drawers, using hand tools + machines, creating dovetails. Detailed, printable CAD diagrams included. Follow along and build your own Hand Tool Case. You are guided through the build process from a board to the final Hand Tool Case. I share techniques and processes to create and precisely fit drawers in their compartments and how to locate + install the tool dividers.
Watch the process of how I lay out a series of hand tools to determine the best layout for the dividers in the hand tool case. Discover how to create dovetail joinery to use in your next projects. The build, plans and course are based on skills developed in a functioning furniture making studio. My build techniques, processes, tips and techniques will benefit you in your future projects.
Includes detailed, printable CAD drawings with measurements
Over 3 hours of video instruction in 12 modules and 13 videos

Detailed, colored, printable CAD diagrams of all components with precise measurements
Over 3 hours of detailed, comprehensive video instruction. Follow the plan and diagrams to build your own Portable Hand Tool Case
Includes Start Woodworking (eBook)
How to layout and dimension wood
Design concepts of a Portable Hand Tool Case
How to design a Hand Tool Case for your own tools
How to create strong, precise dovetail joinery
How to precisely fit parts together in a project
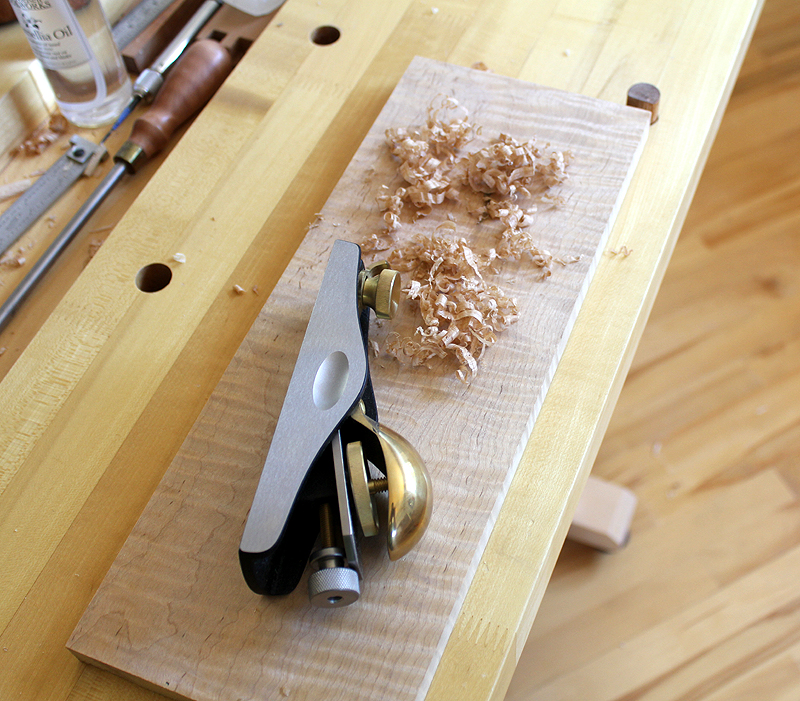
How to effectively use small hand planes in your furniture projects
Learn a trouble-free method to assemble a case
Learn how to create a rabbet joint for drawers and back panels
Learn techniques to accurately line up components in a project
How to use a shooting board
How to use a bench hook
How to make drawers in exact dimensions
Learn techniques to piston fit drawers in their compartment
START WOODWORKING (eBook, 115 pgs., $15) included with this course

Purchase Hand Tool Case with (3+ hrs. of videos) and plans for $40

Norman maintains a blog of ongoing projects in his studio: Pirollo Design Blog as well as having written and published over six books in recent years. Books, magazines where authors furniture, work methods and philosophy have been featured:
Quiet Woodworking (New Art Press)
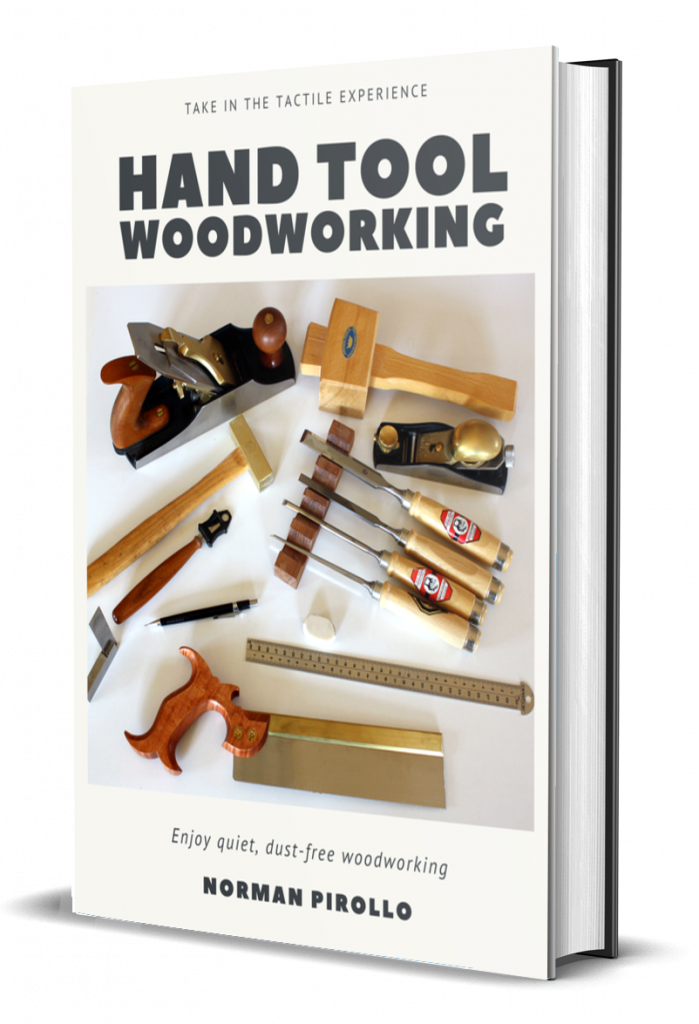
Hand Tool Woodworking (New Art Press)
Start Woodworking (New Art Press)
Craftisian Interview (Norman Pirollo)
HackSpace Magazine – Make With Wood April 2020
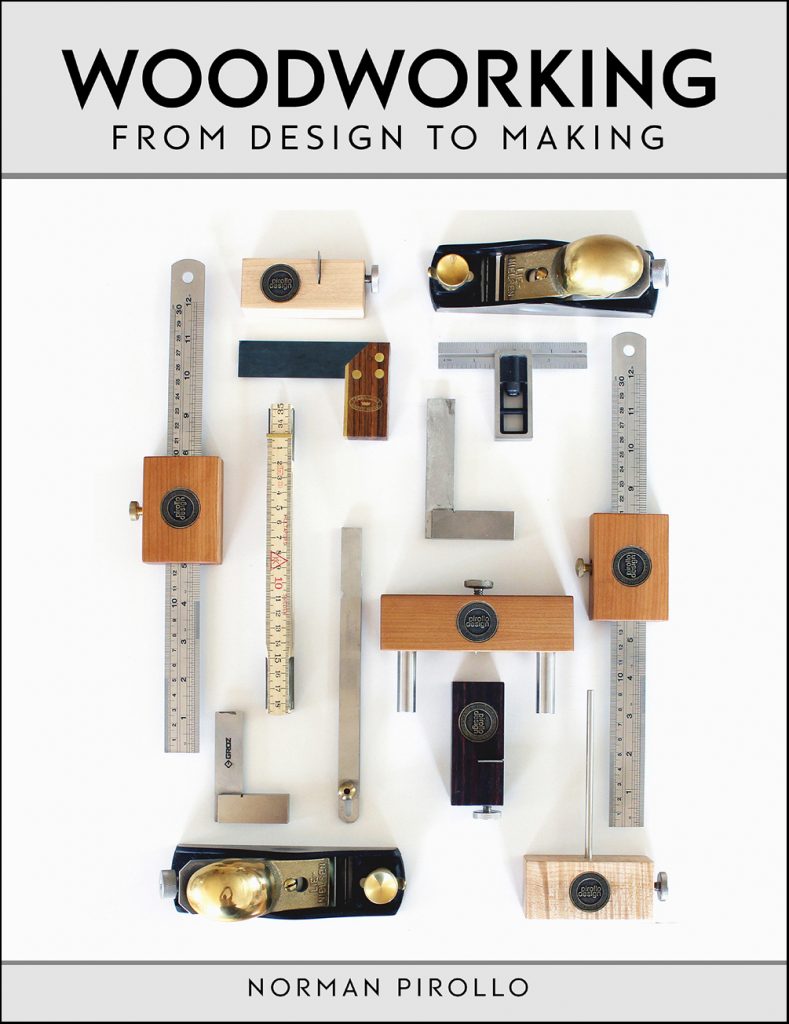
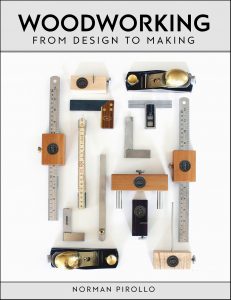
Woodworking: From Design To Making (New Art Press)
The Wood Artist: Creating Art Through Wood (New Art Press)
From Hi-Tech to Lo-Tech: A Woodworker’s Journey (NAP)
Start Your Own Woodworking Business (New Art Press)
Rooted: Contemporary Studio Furniture (Schiffer Publishing)
IDS15 (Studio North)
IDS14 (Studio North)
Canadian Woodworking magazine Jan. 2015
Our Homes magazine Fall 2014
IDS14 (Studio North)
NICHE Magazine Winter 2013
Fine Woodworking Magazine – 4 Bench Jigs for Handplanes
Fine Woodworking Magazine – Essential Shopmade Jigs
Woodwork magazine
Wood Art Today 2 (Schiffer Books)
500 Cabinets ( Lark Books)
Studio Furniture: Today’s Leading Woodworkers (Schiffer)
Canadian Interiors Design Source Guide
Ottawa Life magazine (Profile,work) 2012
Panoram Italia magazine
Our Homes magazine
Craft Journal
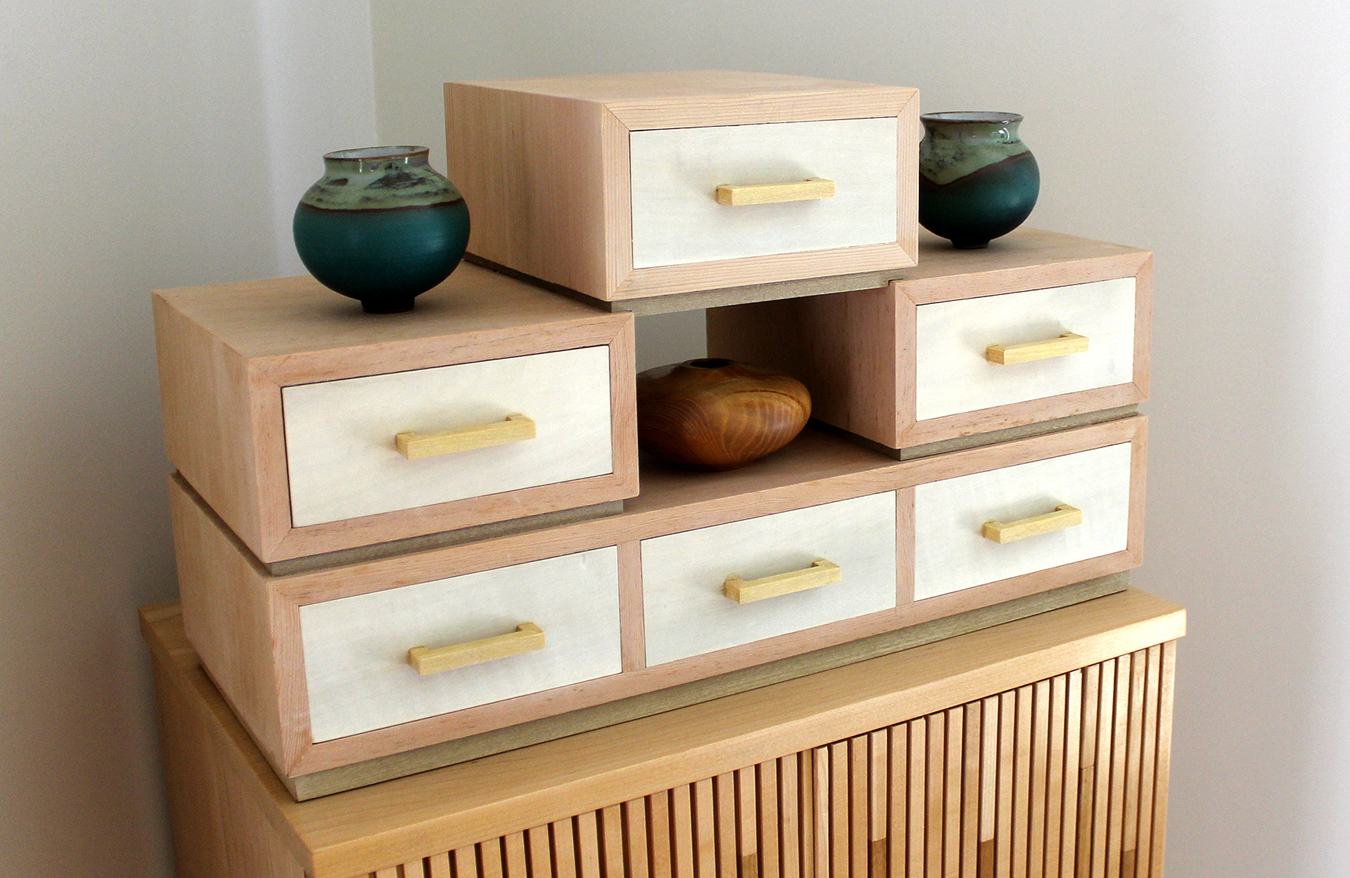
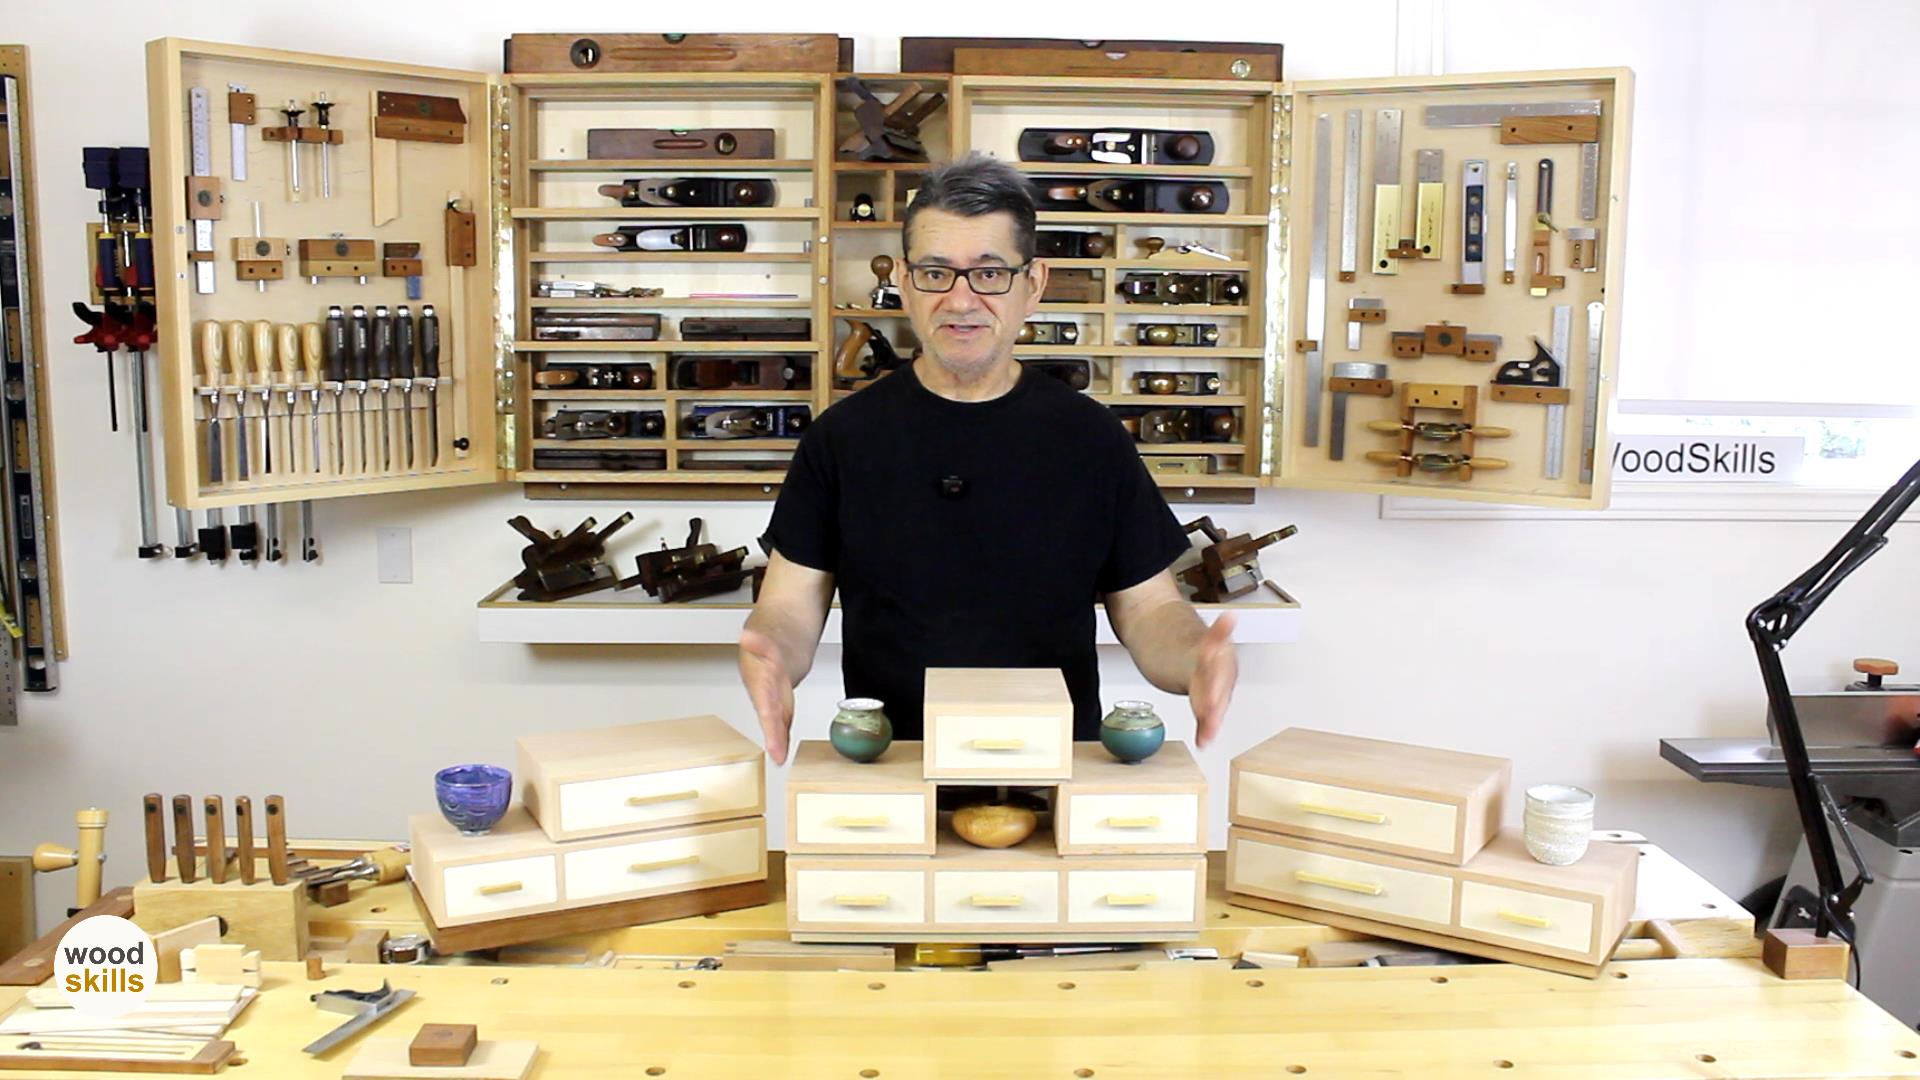
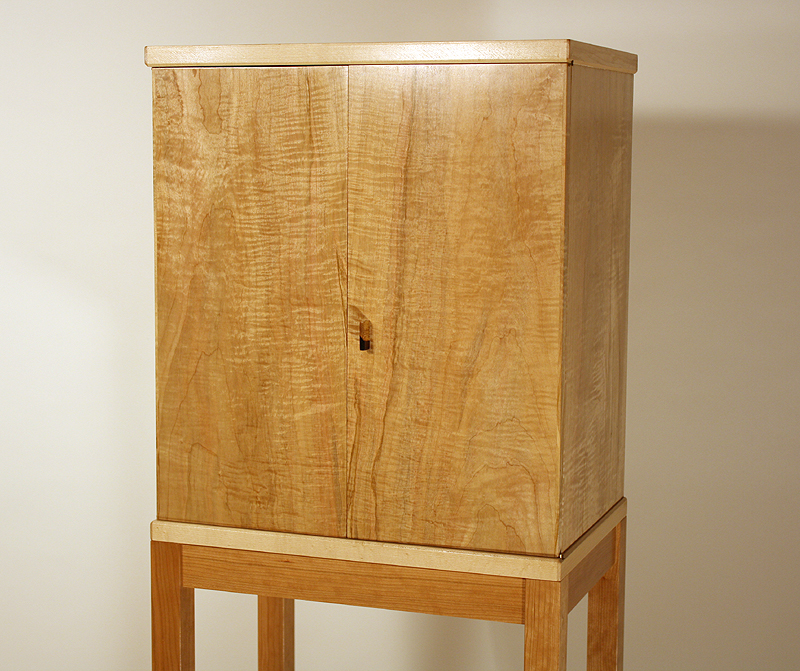
In this course, learn how to create a contemporary-styled 3-level Tea Cabinet using a combination of power tools and hand tools. (13 hours of comprehensive video instruction). You are guided through the build process from a board to the final Tea Cabinet. I share techniques and processes to create and precisely fit drawers in their compartments. The Tea Cabinet design with emphasis on wood selection is discussed.
Watch how I lay out a board and cut sequence for a waterfall effect in the Tea Cabinet sides, tops and bottoms. Discover how to easily create case miter joinery to use in your next projects. The build, plans and course are based on skills developed in a functioning furniture making studio. My build techniques, processes, tips and techniques will benefit you in your future projects.
Includes detailed, printable CAD drawings with measurements
Over 13 hours of video instruction in 10 modules and 52 videos

Detailed, colored, printable CAD diagrams of all components with precise measurements
Over 13 hours of detailed, comprehensive video instruction. Follow the plan and diagrams to build your own contemporary Tea Cabinet
Includes Start Woodworking (eBook)
How to select and prepare wood
Design concepts of a 3-level Tea Cabinet
Learn to apply waterfall grain orientation techniques
How to create strong, precise case miter joinery
How to create sliding tenons in mortises
How to effectively use small hand planes in your furniture projects
Learn a trouble-free method to assemble a case
Learn how to create a rabbet joint for drawers and back panels
Learn techniques to accurately line up components in a project
Create your own custom drawer pulls
How to use a shooting board
How to use a miter shooting board
How to use a bench hook
How to make drawers in exact dimensions
Learn techniques to piston fit drawers in a case
START WOODWORKING (eBook, 115 pgs., $15) included with this course
Purchase Tea Cabinet Course with (13 hrs.,52 videos) and plans for $50
Norman maintains a blog of ongoing projects in his studio: Pirollo Design Blog as well as having written and published over six books in recent years. Books, magazines where authors furniture, work methods and philosophy have been featured:
Quiet Woodworking (New Art Press)
Hand Tool Woodworking (New Art Press)
Start Woodworking (New Art Press)
Craftisian Interview (Norman Pirollo)
HackSpace Magazine – Make With Wood April 2020
Woodworking: From Design To Making (New Art Press)
The Wood Artist: Creating Art Through Wood (New Art Press)
From Hi-Tech to Lo-Tech: A Woodworker’s Journey (NAP)
Start Your Own Woodworking Business (New Art Press)
Rooted: Contemporary Studio Furniture (Schiffer Publishing)
IDS15 (Studio North)
IDS14 (Studio North)
Canadian Woodworking magazine Jan. 2015
Our Homes magazine Fall 2014
IDS14 (Studio North)
NICHE Magazine Winter 2013
Fine Woodworking Magazine – 4 Bench Jigs for Handplanes
Fine Woodworking Magazine – Essential Shopmade Jigs
Woodwork magazine
Wood Art Today 2 (Schiffer Books)
500 Cabinets ( Lark Books)
Studio Furniture: Today’s Leading Woodworkers (Schiffer)
Canadian Interiors Design Source Guide
Ottawa Life magazine (Profile,work) 2012
Panoram Italia magazine
Our Homes magazine
Craft Journal
I will be presenting a virtual furniture design workshop over two consecutive weekends, Sunday Sept. 22 & Sept. 29, 2024. Each session is 2 hours long. In the first session I touch on the history of furniture design and describe the process of designing furniture from concept or idea to drawings and a scale representation of the furniture. The Furniture Design Workshop is provided through Pocosin School of Fine Craft. Learn furniture design with a professional furniture maker and woodworker. This workshop will make furniture design less intimidating. First part of the workshop is demonstration with an introduction to sketching and drawing.

Students then sketch, draw and mock-up a furniture piece to be discussed in the second half of the workshop along with remaining topics. Develop your own furniture style and voice. The information filled workshop is presented live from the Pirollo Design studio.
The following design topics are presented in the workshop:
History of Furniture
Furniture Design Concepts
Sketching, Drawing
Mockups
Developing A Style
Material Selection
Prototypes
Batch Mode Concepts
CAD
Cost: $145 US
Register at: Furniture Design Workshop
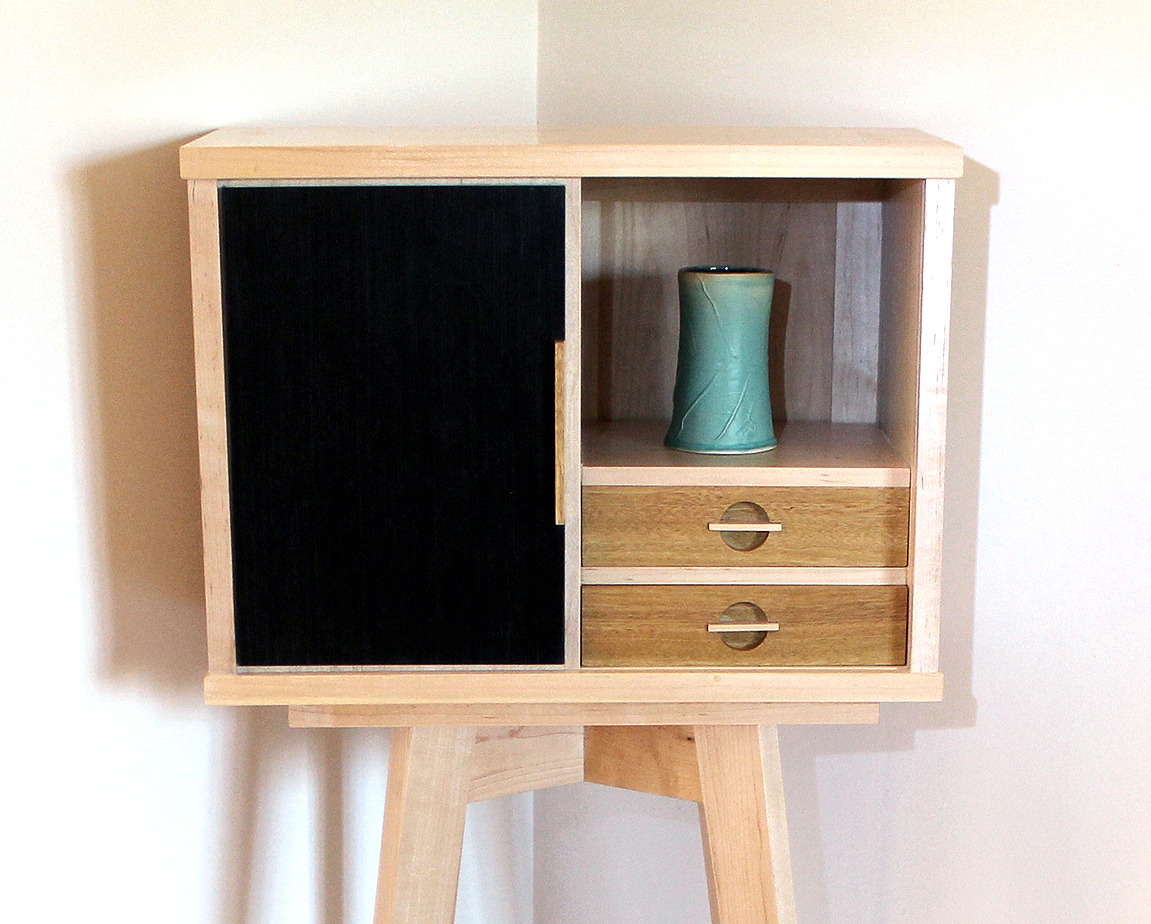
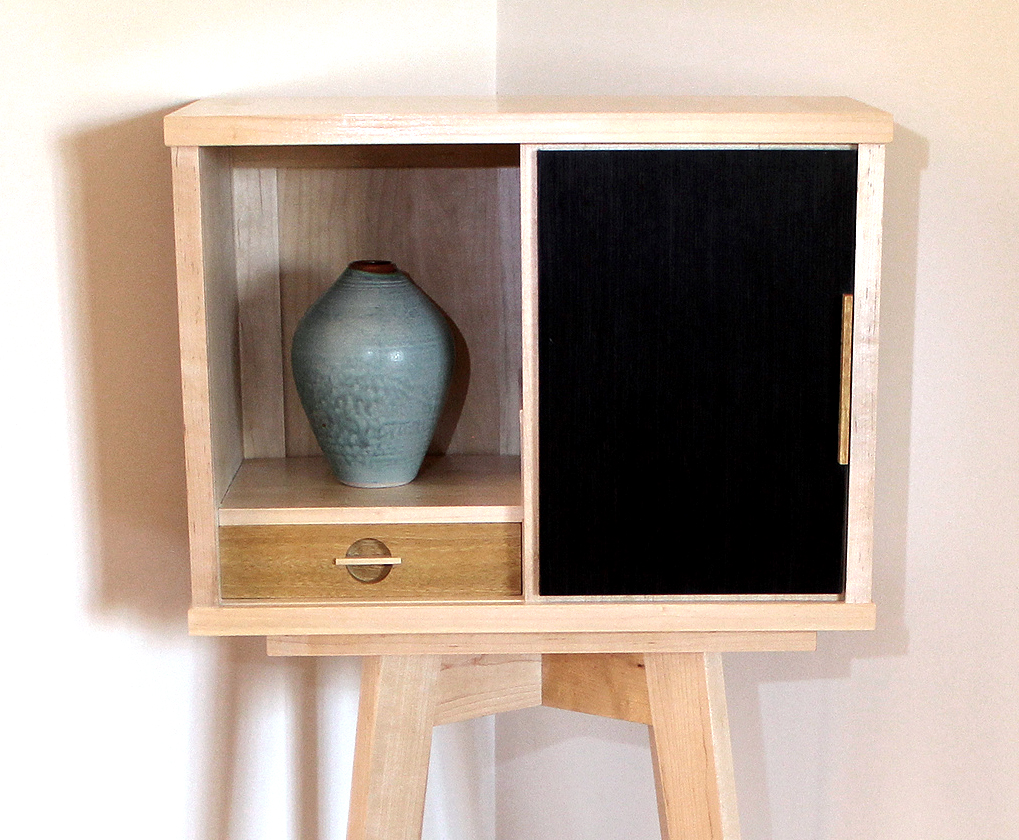
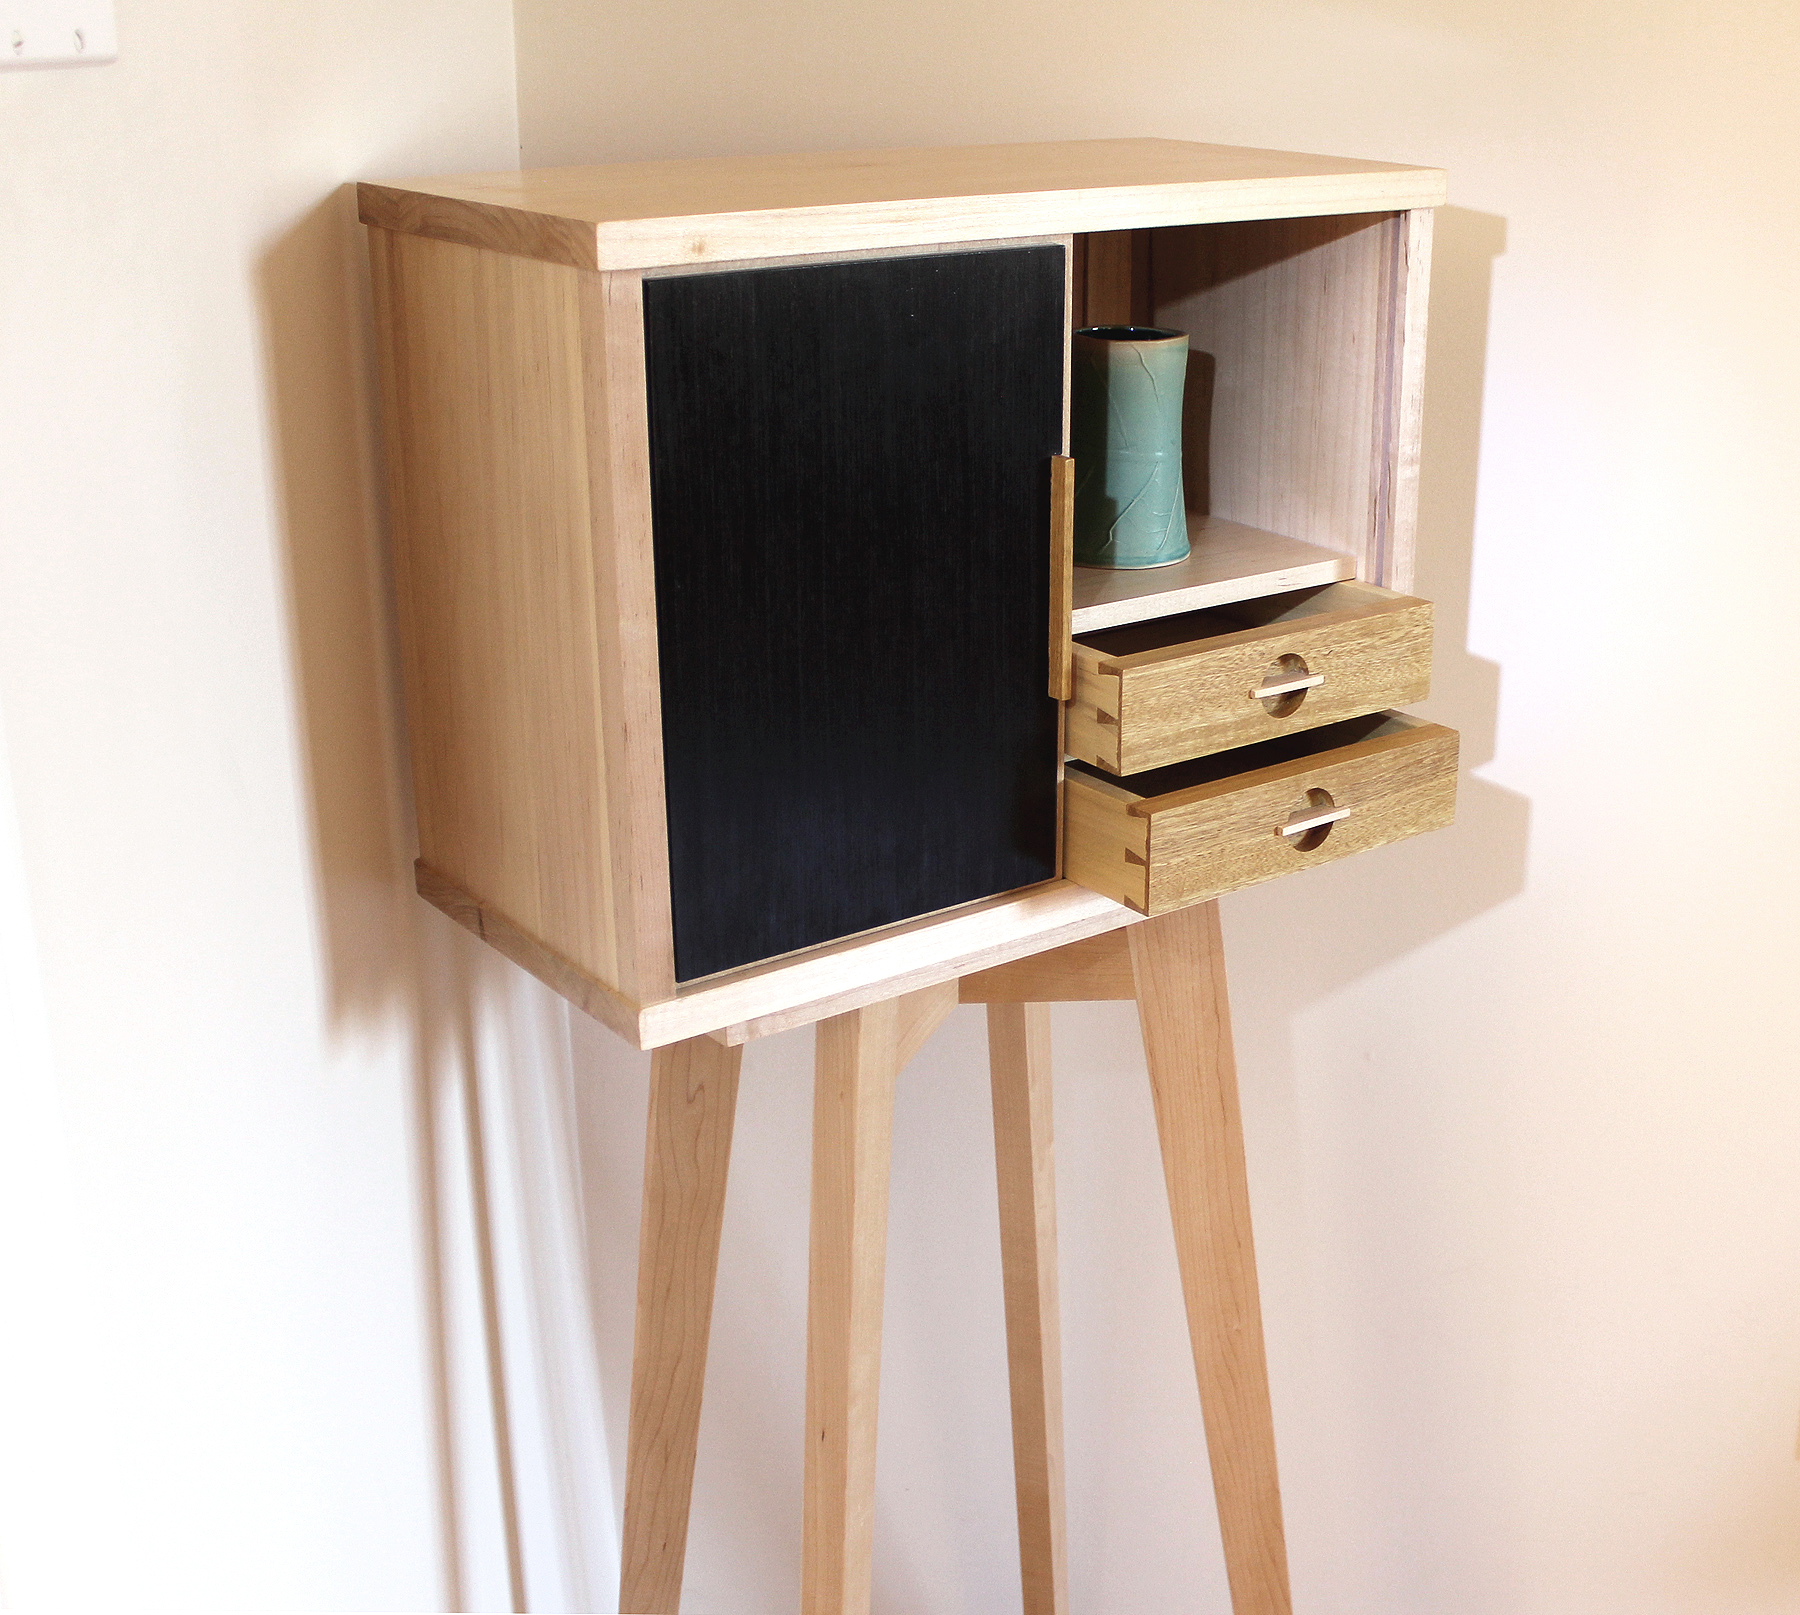
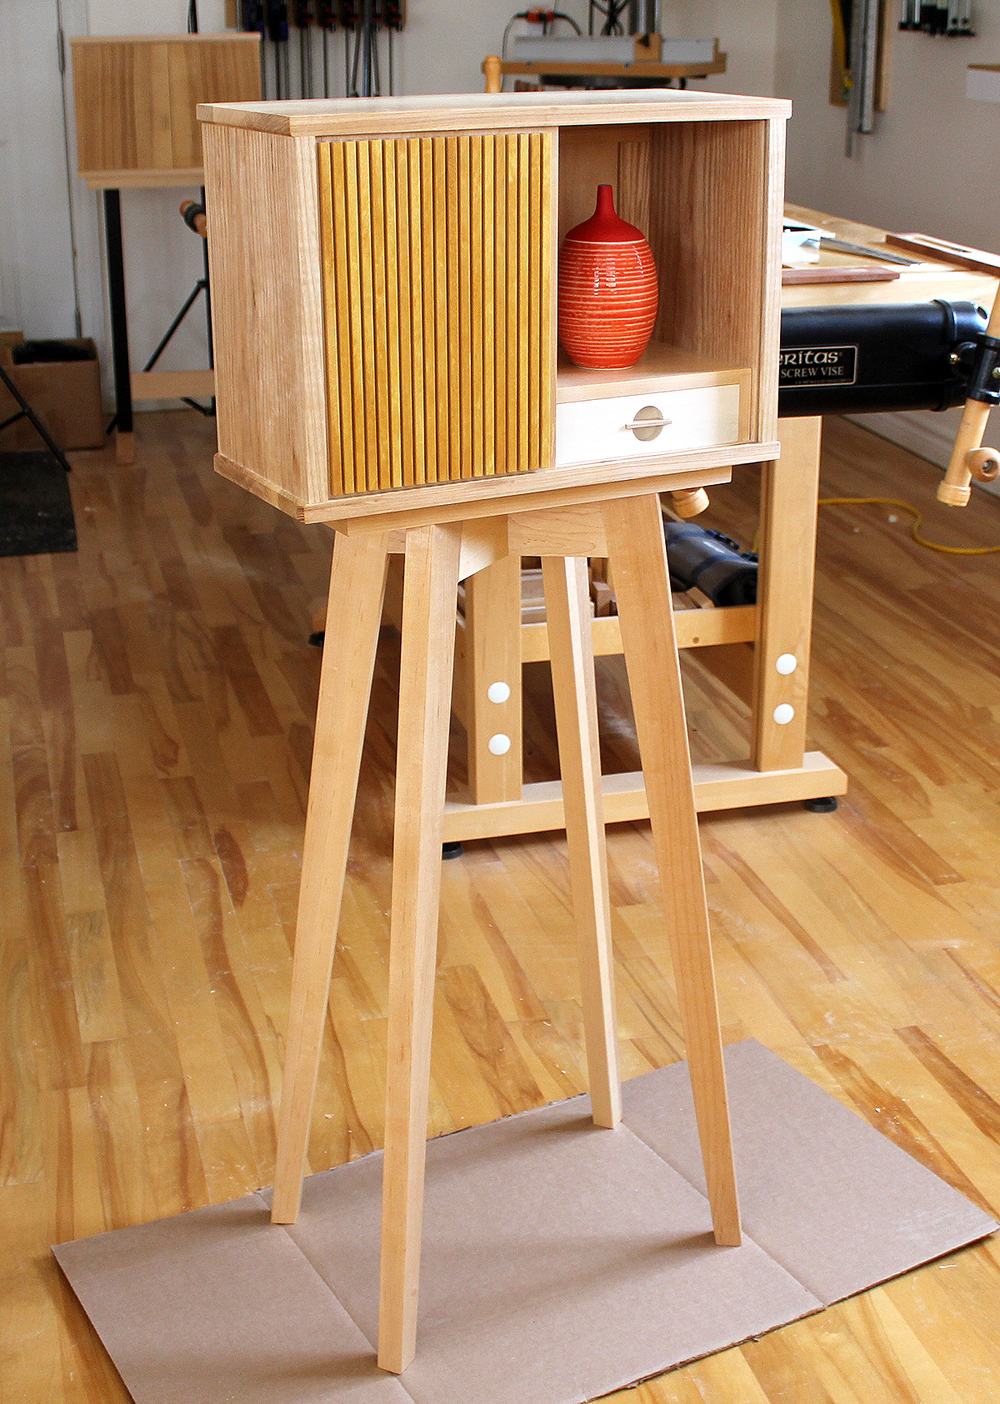
Display cabinet on custom splayed leg stand to introduce stability in a compact form. Designed to display art and decorative pieces. Sliding, contrasting color veneered door. Interior of asymmetrically arranged dovetailed drawers. Sliding door veneer is a graphite color to contrast with the lighter cabinet and drawer woods. Drawer fronts of Pau Amarello. A timeless cabinet design on uniquely arranged stand using natural, domestic woods. Sliding door with Pau Amarello pull provides access to either side of the cabinet drawers and compartments. Display cabinet introduces a subtle, contemporary aesthetic. Natural shellac finish provides protection yet maintains a tactile wood surface.
I will be participating in the Hamilton Woodworking Show this October. My sessions will revolve around hand tools. The sessions will be virtual and occur over the 2-day period of October 21,22 of 2023. I will provide an introduction to the various hand tools used in woodworking. Since I use hand tools extensively in my furniture making, the hand tools I use most will be introduced and discussed. It isn’t necessary to begin hand tool woodworking with a complete set of tools as I will describe. A few critical hand tools will get you going. After some exposure to hand tools, you can then determine other hand tools you need for the type of woodworking you create. Join me on Saturday, Sunday October 21, 22 from 10-11AM at the Hamilton Woodworking Show woodshows.com


As a longtime member of the Furniture Society, I am honored to the featured member this week. The furniture Society revolves around a large group of furniture makers. The makers often contribute their time, expertise and knowledge to advance the artisanal furniture movement. The large membership consists of seasoned furniture maker and up and coming makers who share the same passion for furniture making and sharing their knowledge. You can view my work (portfolio) at the Furniture Society web site as well as portfolios of other furniture makers, some of which you might be familiar with.
In the Furniture Society own words…
“The Furniture Society is a nonprofit, educational organization founded in 1996. The Furniture Society is the premier non-profit organization representing, promoting, and connecting furniture makers, designers, collectors, curators, educators and manufacturers from around the world.
Overseen by a dedicated Board of Trustees and an Executive Director, The Furniture Society works to realize its mission through educational programs, publications, exhibitions and exhibition support, recognition of excellence in the field, program partnerships, educational grants, workshop partnerships, and annual conferences. With members from across the United States and Canada, as well as numerous other countries, The Furniture Society represents a broad cross-section of furniture makers, museum and gallery professionals, scholars, journalists, and others involved with the field of furniture.”
To advance the art of furniture making by inspiring creativity, promoting excellence and fostering an understanding of this art and its place in society.

Do you find social media to be overwhelming? Do you want to explore how social media can increase your woodworking sales? Norman Pirollo, successful owner of White Mountain Design, WoodSkills, Refined Edge Design and Pirollo Design; guides you through effectively using social media to market your woodworking business. Learn from a woodworker and furniture maker that successfully uses social media marketing in his business. Norman has discovered how social media can successfully drive and funnel clients to your business. This course will fast track your knowledge of social media specifically for woodworking and furniture making.
Norman shares his expertise in this information-packed 3 hour course. You will gain the information necessary to begin marketing your woodworking business through social media. Leverage social media to increase exposure of your business and drive sales through your web site or where you market your woodworking products. Upon completion of the course, you can easily set up your social media platforms to begin marketing your woodworking to a much wider audience and specific woodworking related niches. Social media exposure is increasingly becoming a force in business marketing. Don’t be left out and give your competitors the upper hand. Embrace the power of social media in your business!
Social Media Course topics include:

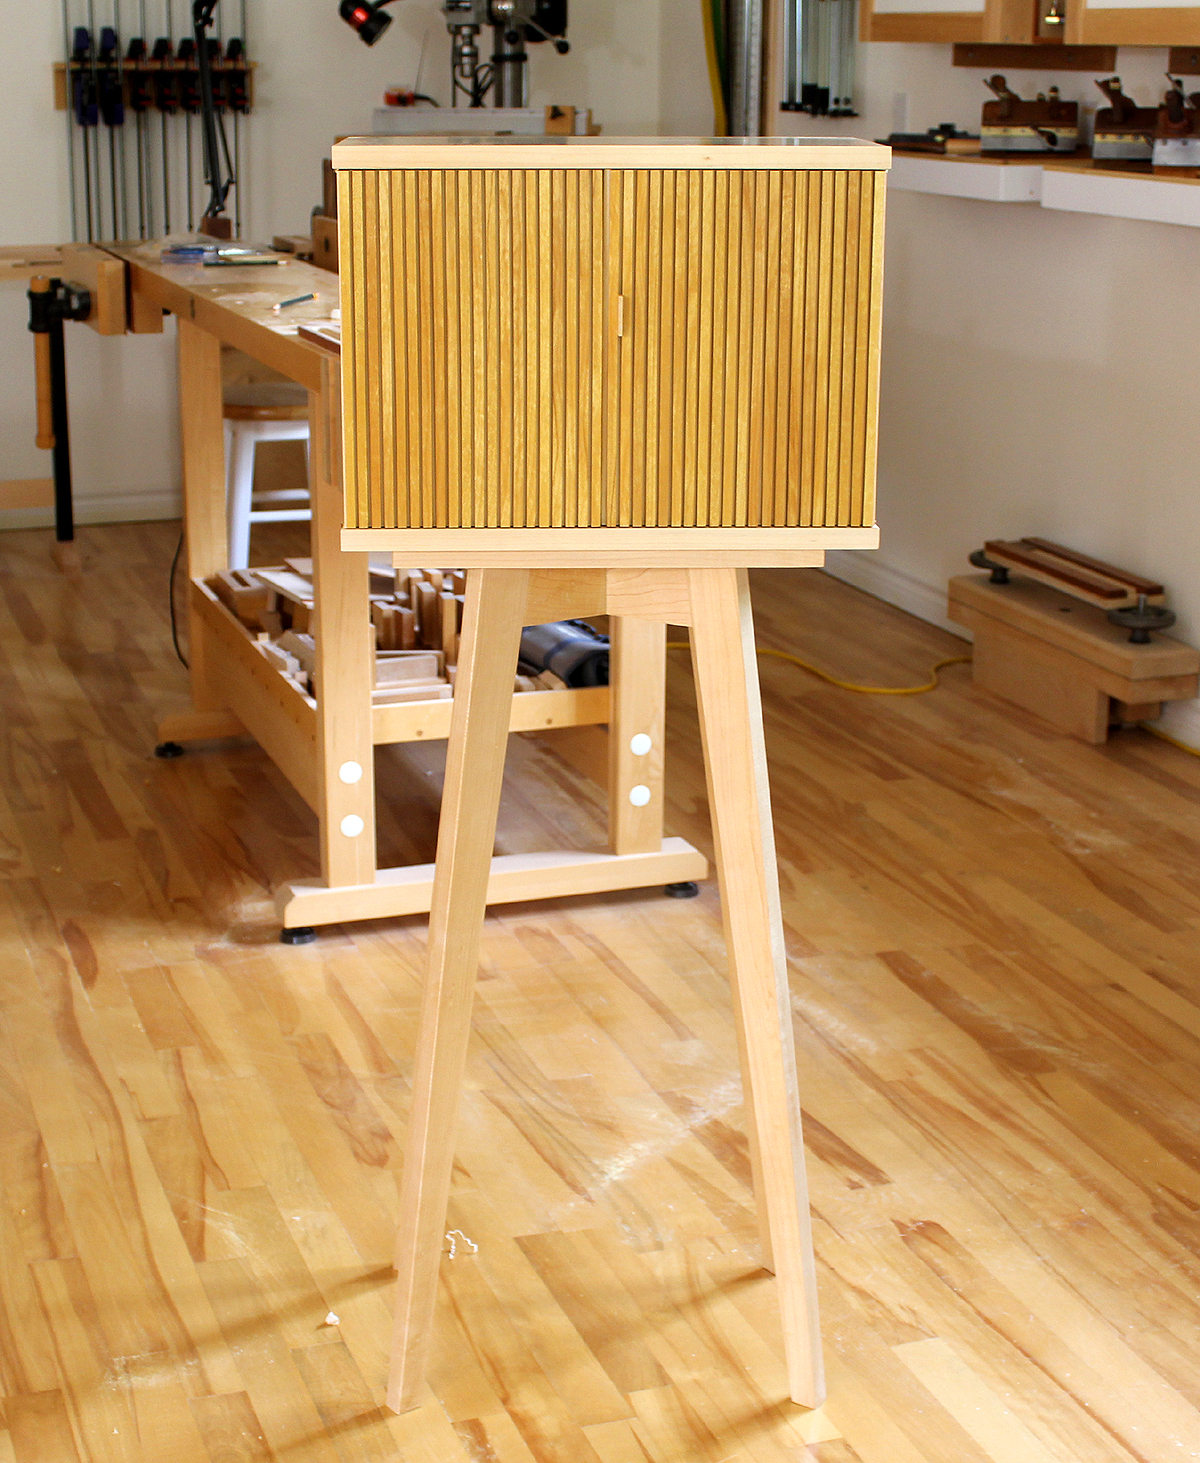
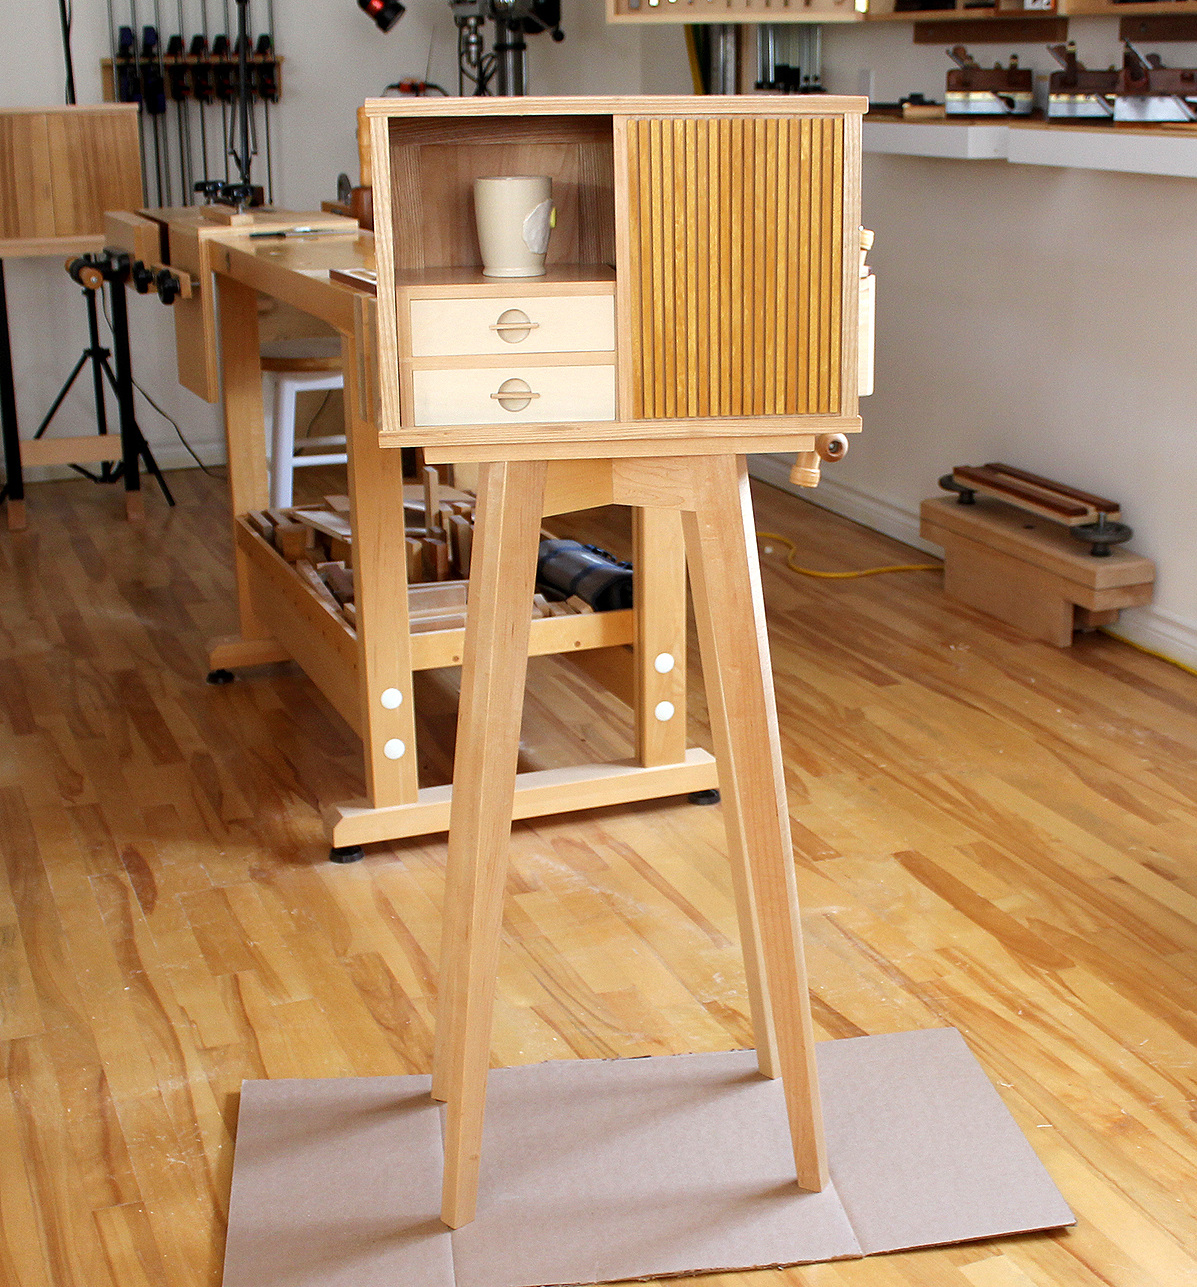
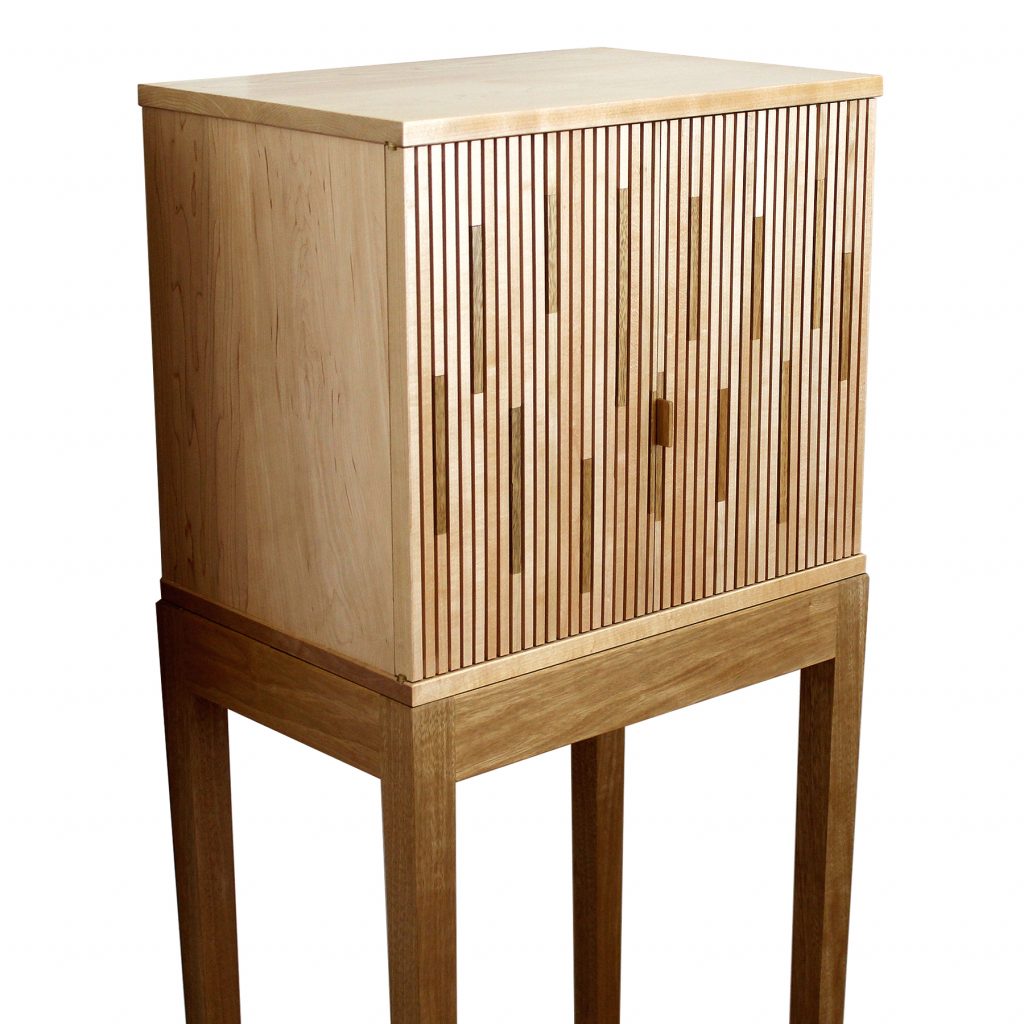
 Display cabinet on custom splayed leg stand to introduce stability in a compact form. Designed to display art and decorative pieces. Tambour styled doors. Interior of asymmetrically arranged dovetailed drawers. Tambours are composed of Pau Amarello; a deep yellow colored wood to contrast with light maple cabinet. Drawer fronts of Black cherry. A timeless design of a cabinet on uniquely arranged stand using natural, domestic woods. Individual hinged doors provide access to either side of the cabinet drawers and compartments. Display cabinet introduces a subtle, contemporary aesthetic. Natural shellac finish provides protection yet maintains a tactile wood surface.
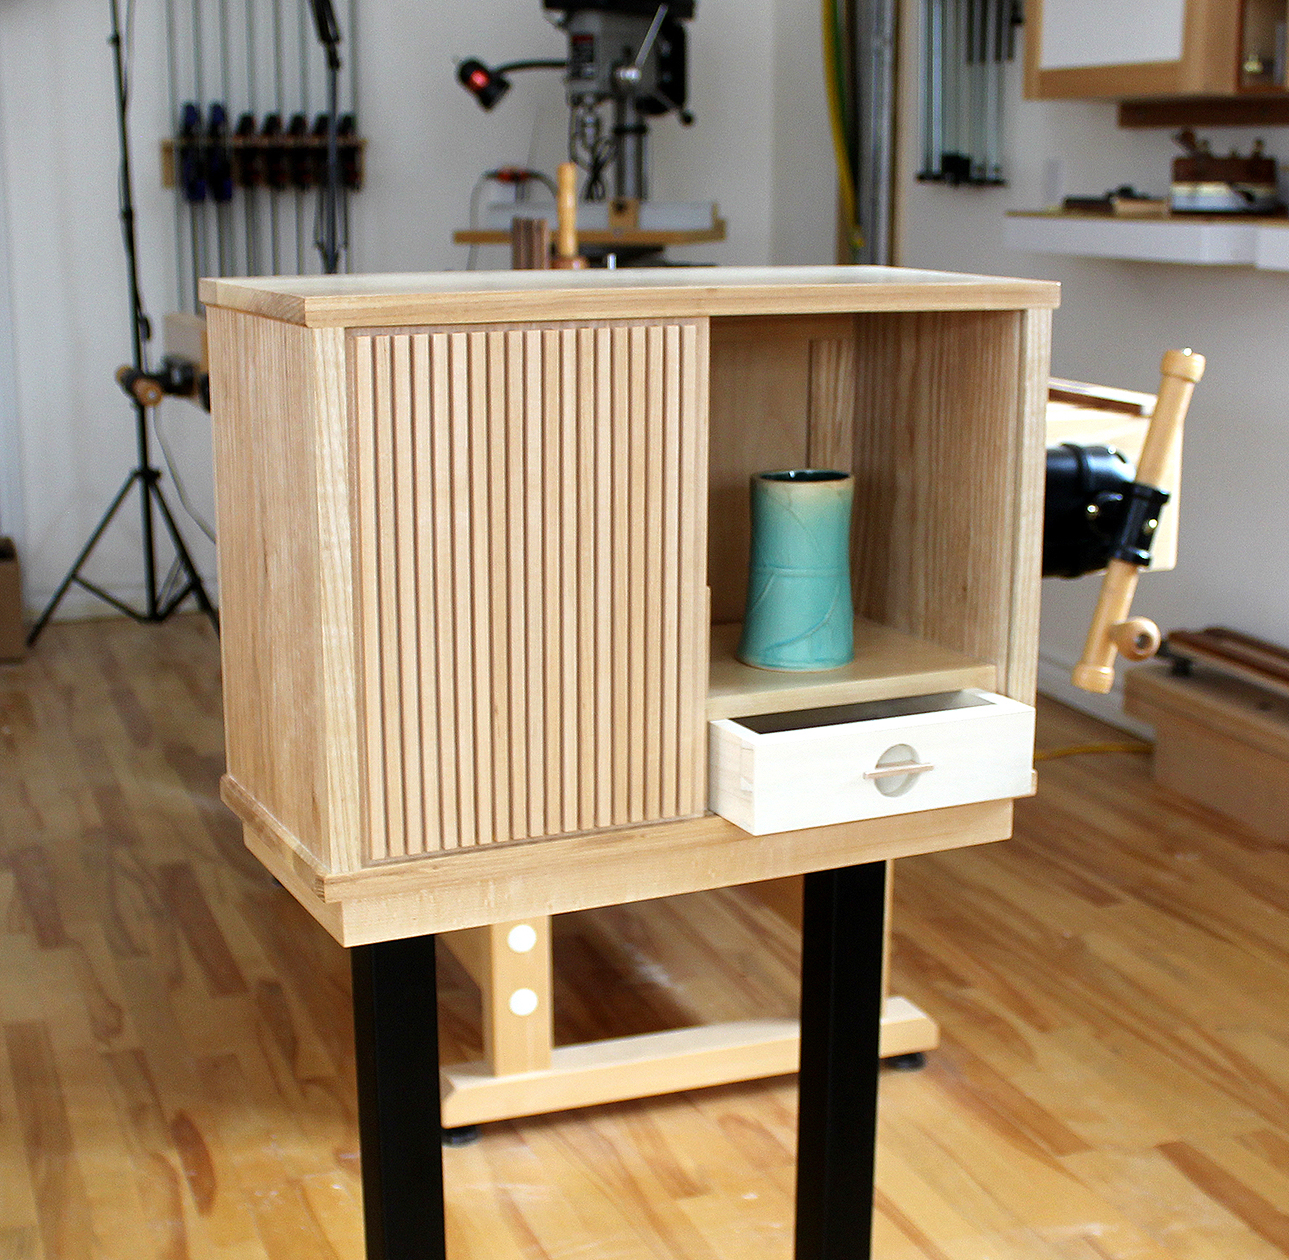
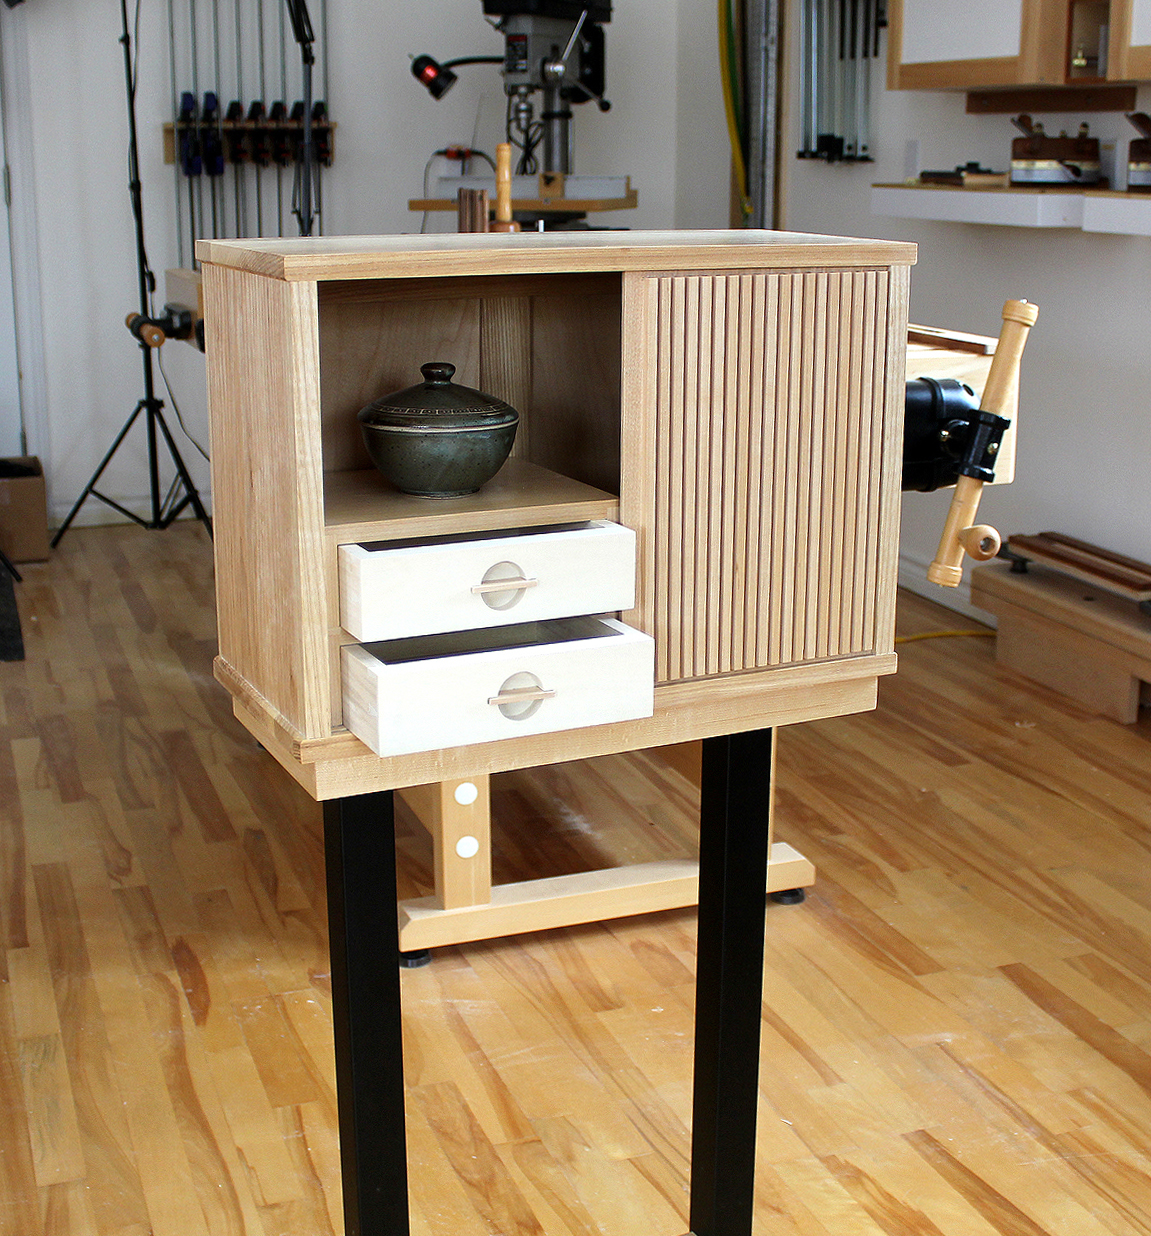
Display cabinet mounted on custom fabricated metal stand. Designed to display art and decorative pieces. Tambour sliding door with asymmetrically arranged dovetailed drawers. Drawer fronts of pure white holly. Timeless design of a cabinet on stand using natural, domestic woods. Sliding door provides access to either side of the cabinet drawers and compartments. Combines wood and metal for a contemporary, subtle aesthetic. Natural shellac finish.
Display cabinet mounted on custom splayed leg stand to introduce stability. Designed to display art and decorative pieces. Tambour sliding door with asymmetrically arranged dovetailed drawers. Drawer fronts of pure white holly. Timeless design of a cabinet on unique stand using natural, domestic woods. Sliding door provides access to either side of the cabinet drawers and compartments. Display cabinet introduces a subtle, contemporary aesthetic. Natural shellac finish to provide protection yet maintain a tactile wood surface.
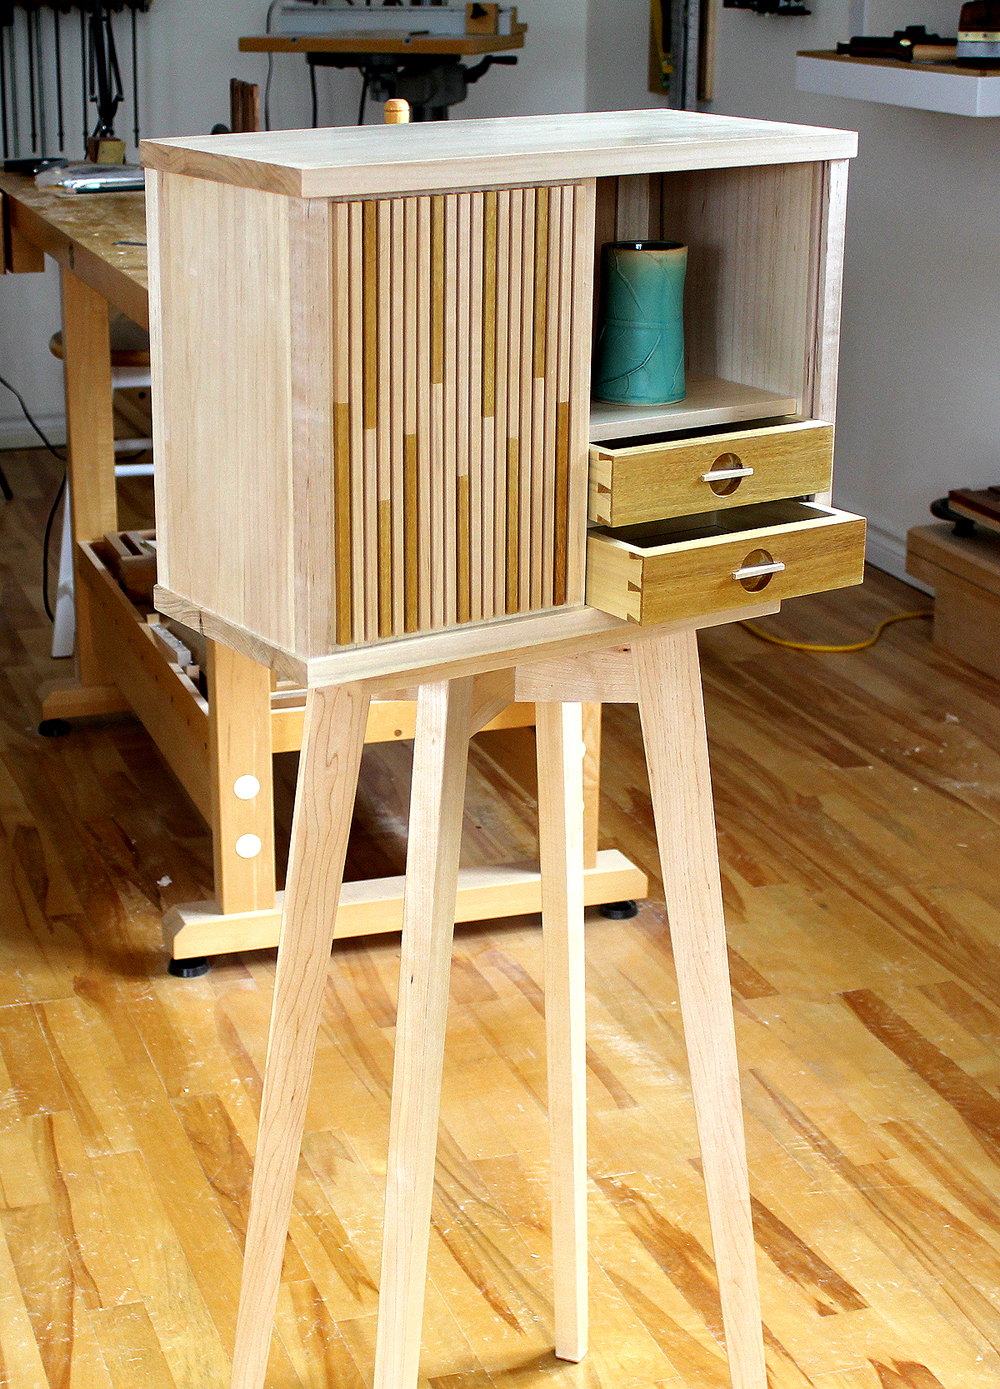
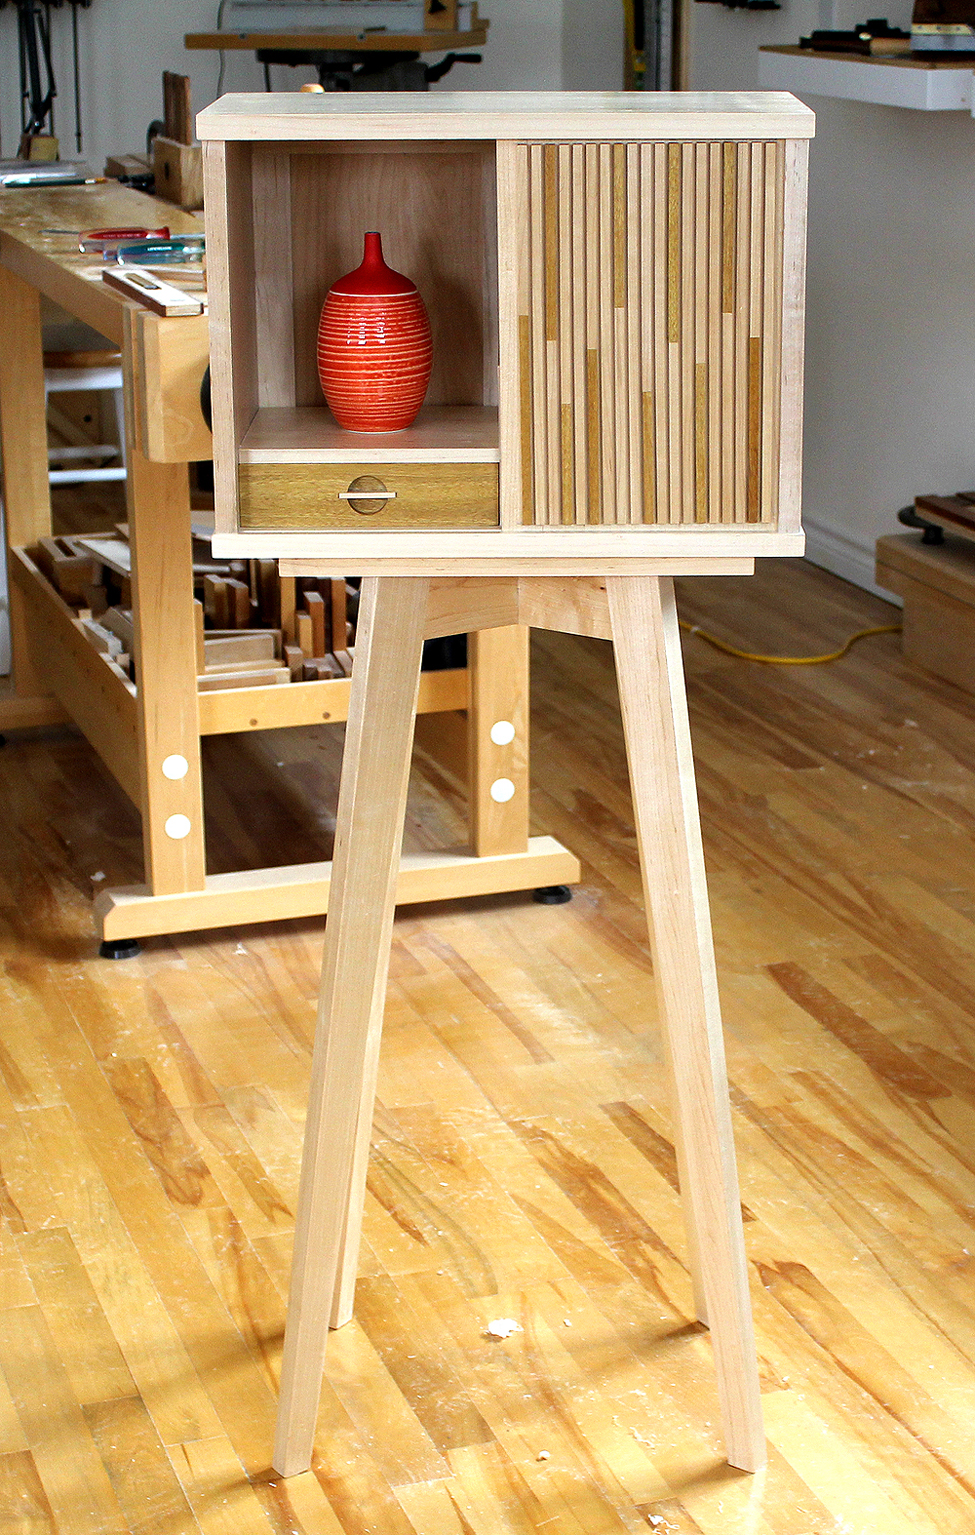
Display cabinet mounted on custom splayed leg stand to introduce stability. Designed to display art and decorative pieces. Tambour sliding door with uniquely arranged tambour pattern. Asymmetrically arranged dovetailed drawers. Drawer fronts of black pau amarello. Timeless design of a cabinet on unique stand using natural, domestic woods. Sliding door provides access to either side of the cabinet drawers and compartments. Display cabinet introduces a subtle, contemporary aesthetic. Natural shellac finish to provide protection yet maintain a tactile wood surface.
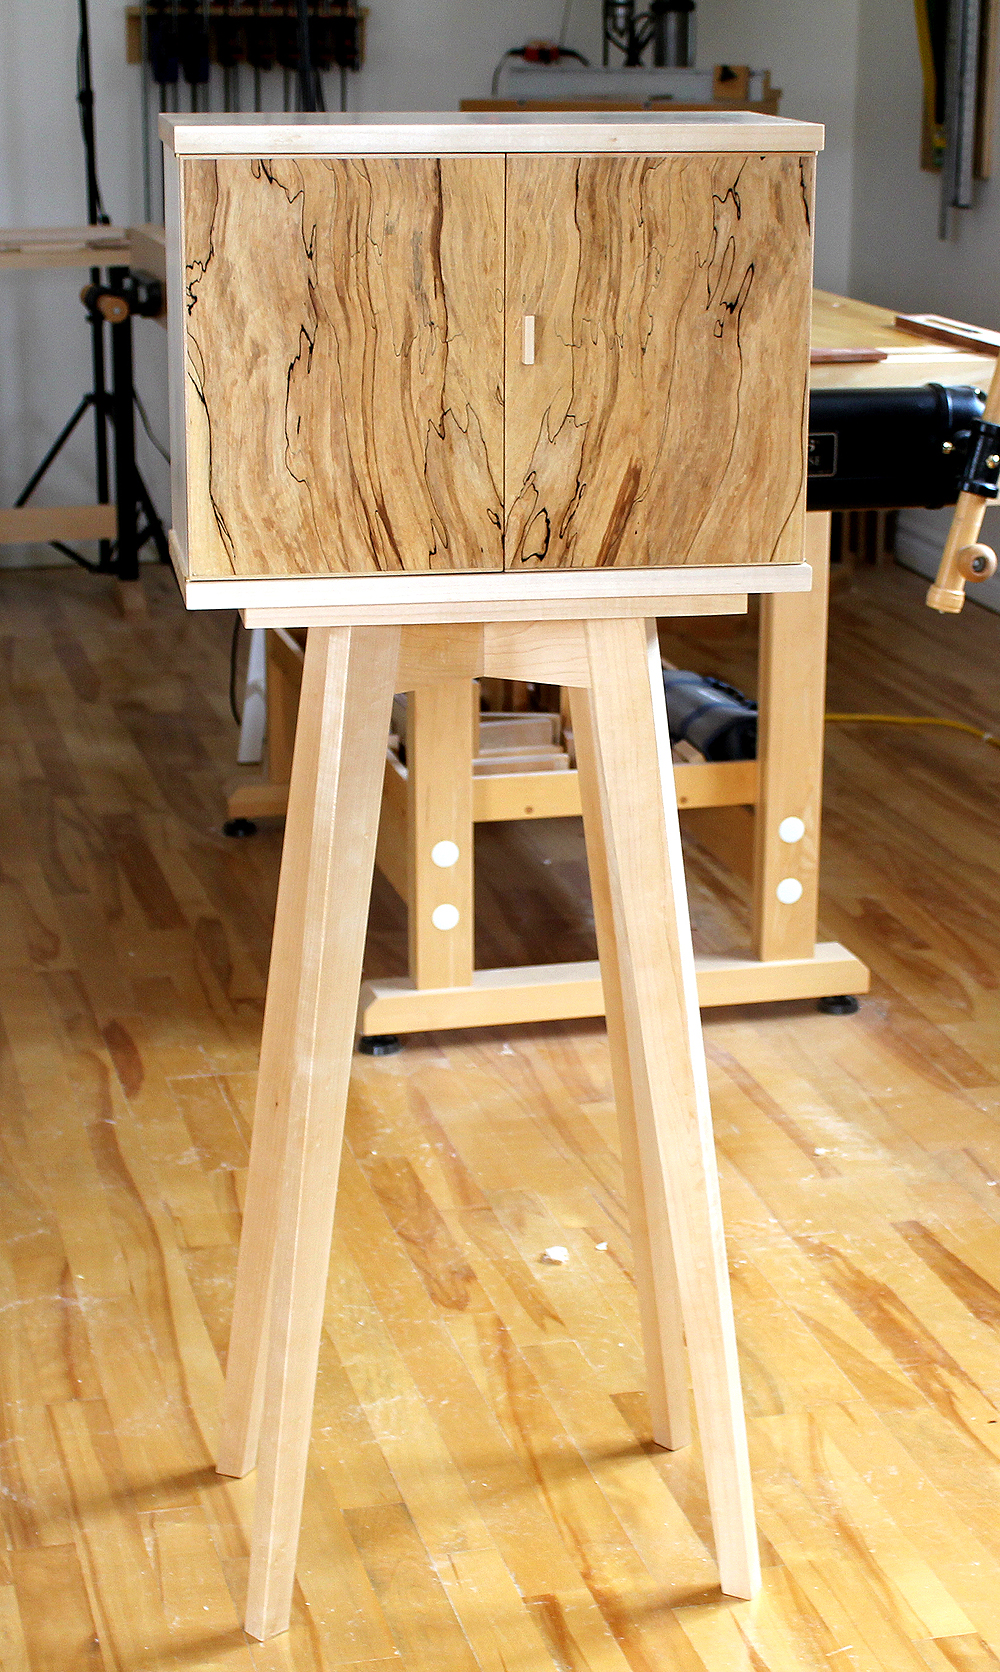
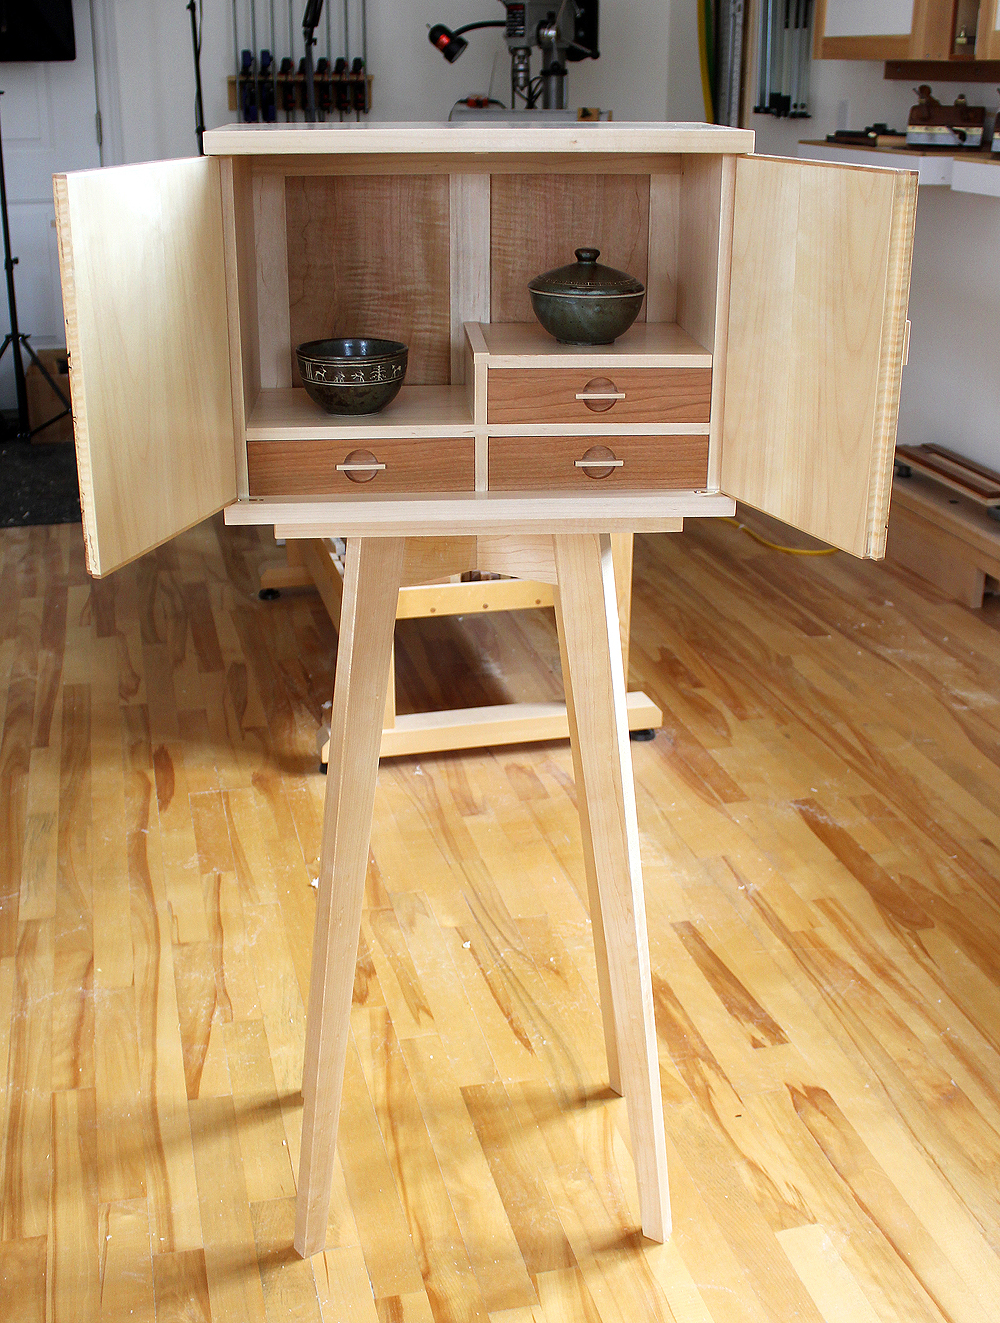
Display cabinet mounted on custom splayed leg stand to introduce stability. Designed to display art and decorative pieces. Bookmatched, spalted maple doors with uniquely arranged graphics. Asymmetrically arranged dovetailed drawers. Drawer fronts of black cherry. Sliding door provides access to either side of the cabinet drawers and compartments. Timeless design of a cabinet on unique stand using natural, domestic woods. Display cabinet introduces a subtle, contemporary aesthetic. Natural shellac finish to provide protection yet maintain a tactile wood surface.
This past year has been busy. I have recently completed a new book. The premise of the book is the dichotomy of hand tool woodworking in a modern world. I write about how hand tools should be a part of woodworking. Hand tools provide a quiet, dust-free shop environment conducive to better quality craftsmanship. The book emphasizes this, and I write about introducing efficiency with hand tools through bench appliances and jigs. With regular use, hand tools provide similar performance results to using machines. We naturally develop techniques to efficiently use hand tools through their use.
I discuss how we need to maintain a tradition of working with hand tools and more so in today’s environment where technology permeates our lives. Hand to eye coordination and tactile feedback are two benefits of using hand tools in woodworking. I make a compelling argument for introducing hand tools into woodworking. There has been a resurgence and revival in recent years of using hand tools over machines and this is a positive sign. People are at least aware that machines are there simply for expediency and are ideally suited to production environments.
The book is an interesting read for both established woodworkers and for those starting at woodworking. Book is available as an eBook in the BOOKS tab of the www.woodskills.com site or Print version through Amazon.
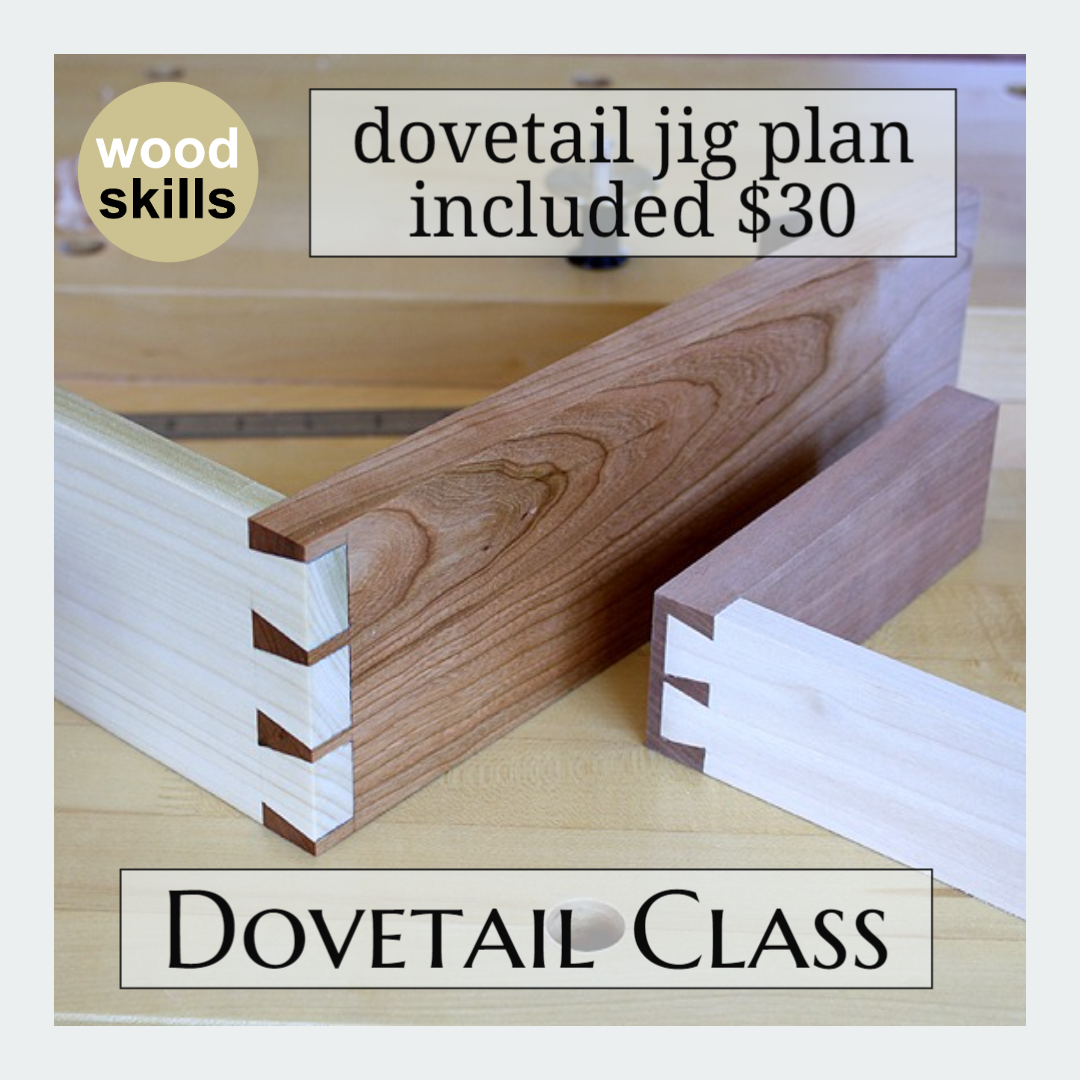
The Dovetail Class includes step by step sequences on how to create through-dovetails and half-blind dovetails. Watch and learn as I guide you through the process of creating a handmade drawer using half-blind dovetails. The dovetailed components created in the class are used to create a small drawer. The process of creating handmade drawer grooves is described. The drawer is then assembled and drawer back installed to create a completed drawer. Following my class will simplify the dovetail process and motivate you to create dovetail joinery. Lectures on Interlocking Joints, Hand Tools and Chisels included with class.
The dovetail joint is very often associated with quality woodworking. It is both a structurally strong and aesthetically pleasing form of joinery. Dovetail joinery is often used in case construction and for drawer construction, specifically drawer fronts as it is a very strong, interlocking joint. The hand cut dovetail offers unparalleled beauty so any dovetail layout is possible. Although dovetail jig plans are available to create dovetail joinery, most if not all of these dovetail jigs involve powered tools.
START WOODWORKING (eBook, 115 pgs., $15) included with this course
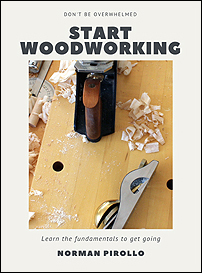
Start woodworking today! This 115 pg. eBook provides an introduction to woodworking and the tools necessary to begin woodworking. Woodworking is a broad subject but the eBook explains the essentials. An inexpensive first set of tools is introduced and how to use them. Woodworking terminology is described along with important concepts to guide you through woodworking.
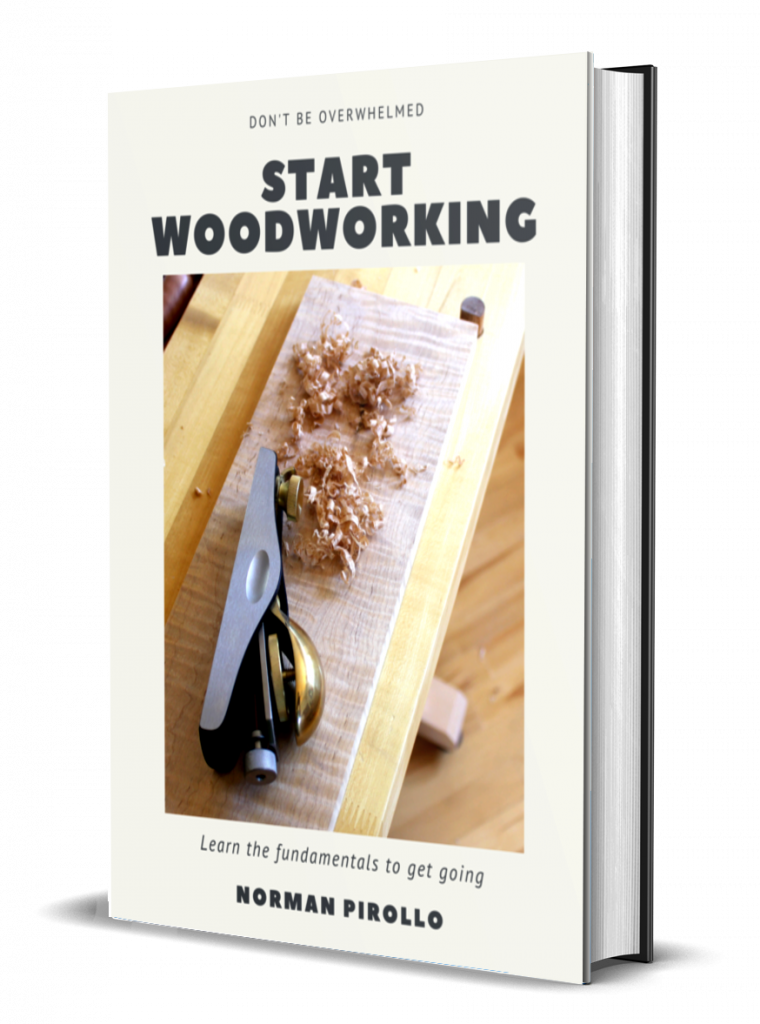
$15 value with purchase of most online courses and classes
![]()

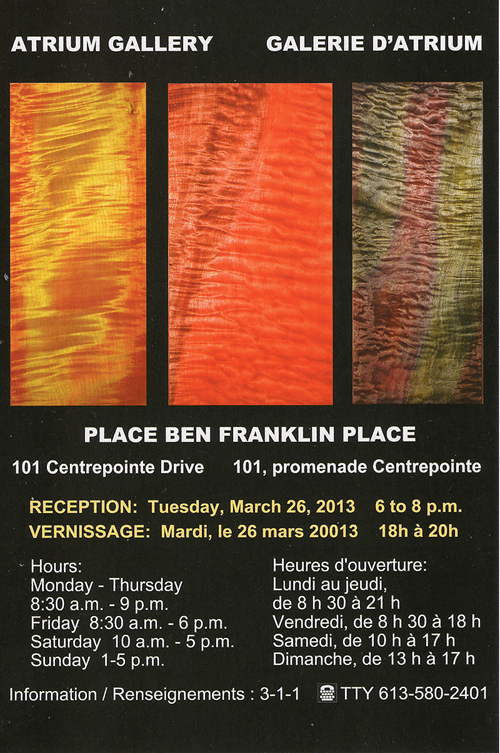
My first solo exhibition of figured wood art. I explored wood as a vibrant, colorful form of art. The series was composed of unusual, atypical woods with intense figure and chatoyance. The exhibition was open to the public over a four week period. Opening night was well attended with many favorable comments.

Maple display cabinet with book-matched figured beech veneered doors, Black Limba drawers and stand. Both symmetry and asymmetry exhibited in figured wood doors. Spalted maple drawer pulls. Solid brass knife hinges. Cabinet has a large component of hand work and fitting involved. The interior is partitioned into three drawers and a shelf to hold art objects, sculptures or objects of value. The doors are book-matched to feature exciting flame graphics to accentuate the unique grain pattern of the figured beech wood. Surfaces are hand scraped and formed. The drawers are assembled using dovetail joinery. Meticulous attention provided to detail and finishing. The wood is its natural color. The cabinet is finished with multiple coats of thinned shellac, polished and waxed.
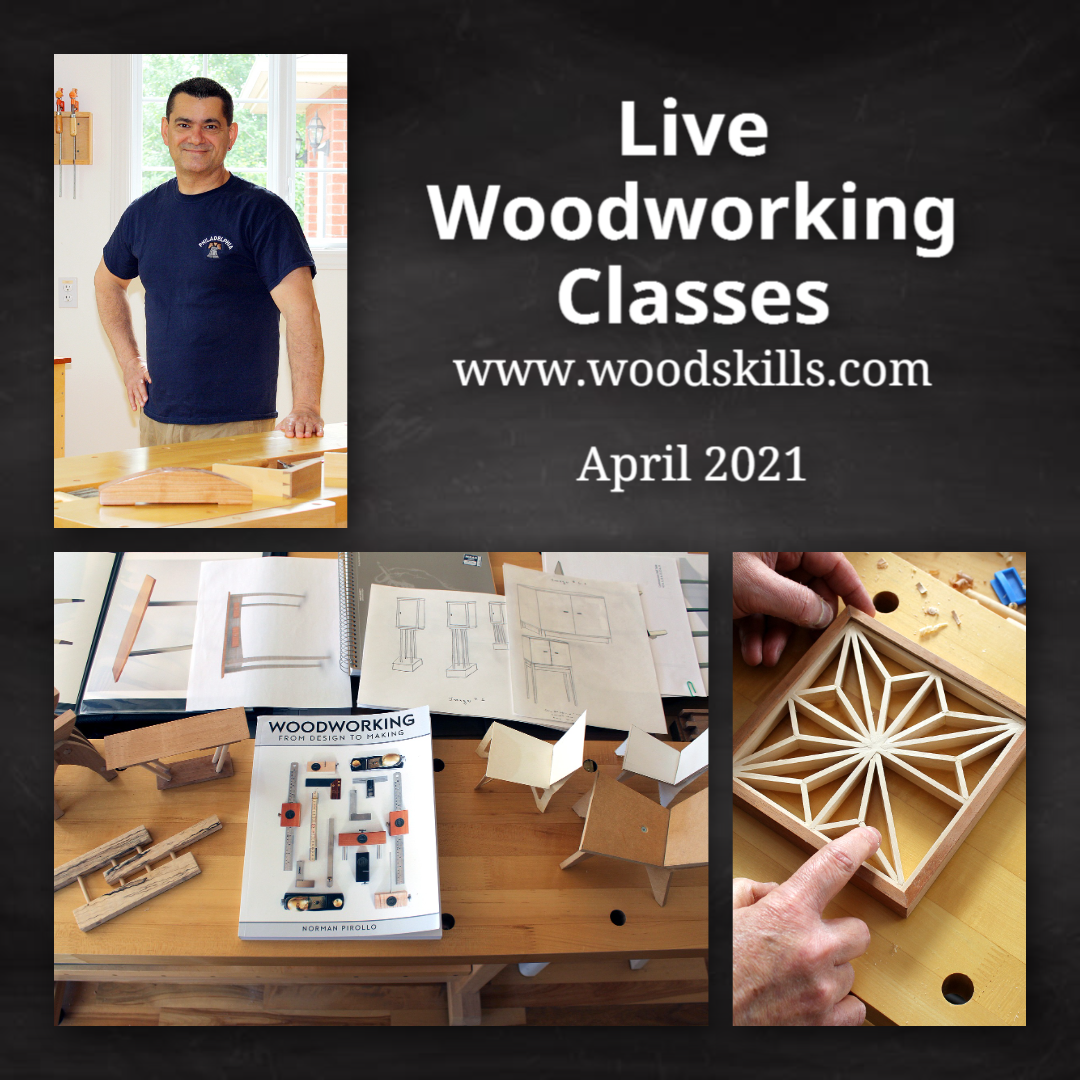 A series of virtual classes delivered live from the Pirollo Design furniture studio. Link will bring you to the WoodSkills site for more information + registration. Opportunity to interact and ask questions during class. Live class registration $30 Classes on following topics:
Kumiko Class
Furniture Design Class
Start Woodworking Business Class
Woodworking Design To Making
Discover how hand tools will improve your woodworking! This 130 pg. (eBook) provides an introduction to common hand tools and the techniques to use them. Embrace a new quieter, dust-free form of woodworking. The hand tools described are the tools used in my furniture making. Several workbench techniques and bench appliances to make your woodworking more efficient are discussed. The following topics are presented in the book. You will have a good understanding of which hand tools to purchase or acquire when starting.
Hand Tool Overview
Saws and Techniques
Chisels and Techniques
Hand Planes and Techniques
Sharpening
Workbench Techniques
The Shooting Board
The Bench Hook
The Dovetail Jig
Conclusion
![]()
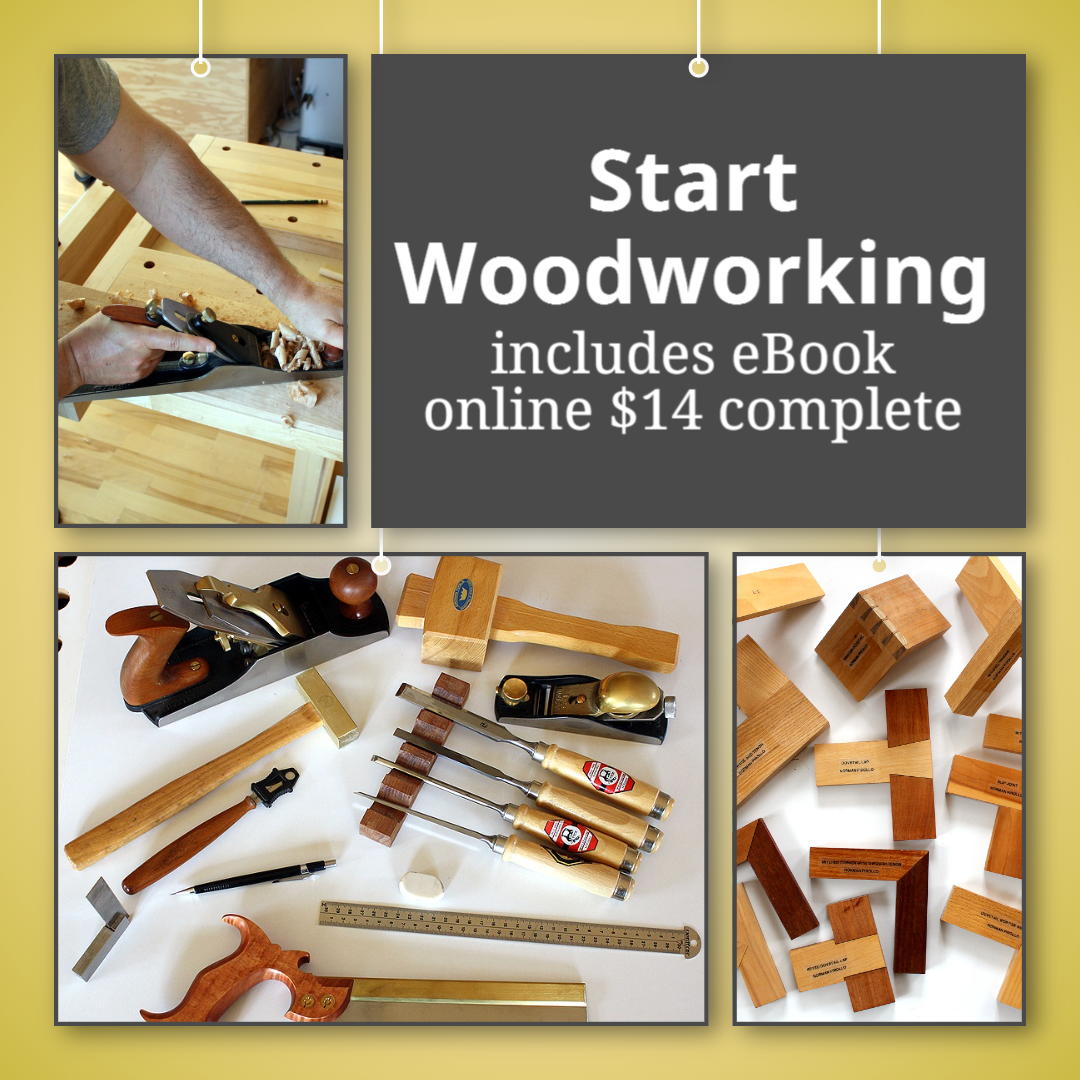
Start woodworking today! This eBook + videos (3) provide an introduction to woodworking and the tools necessary to begin woodworking. Woodworking is a broad subject but this eBook and videos explain the essentials. An inexpensive first set of tools is introduced and how to use them. Woodworking terminology is described along with important concepts to guide you through woodworking.
A relatively simple woodworking project is included. The project involves building a tool you will use in your future woodworking projects! Woodworking is an excellent outlet to channel your creativity. This Introductory course will motivate you to start your woodworking journey and build your first project!
After completing the eBook course, invest in the WoodSkills comprehensive Woodworking Course to further your woodworking education and continue your woodworking journey.
Start Woodworking $14
Norman maintains a blog of ongoing projects in his studio at Pirollo Design Blog as well as having written and published four books in the past year. Some of the books and magazines where authors furniture, work methods and philosophy have been featured:
Craftisian Interview (Norman Pirollo)
HackSpace Magazine – Make With Wood April 2020
Woodworking: From Design To Making (New Art Press)
The Wood Artist: Creating Art Through Wood (New Art Press)
From Hi-Tech to Lo-Tech: A Woodworker’s Journey (NAP)
Start Your Own Woodworking Business (New Art Press)
Rooted: Contemporary Studio Furniture (Schiffer)
IDS15 (Studio North)
Canadian Woodworking magazine Jan. 2015
Our Homes magazine Fall 2014
IDS14 (Studio North)
NICHE Magazine Winter 2013
Fine Woodworking Magazine 4 Bench Jigs for Handplanes
Fine Woodworking Magazine Essential Shopmade Jigs
Woodwork magazine
Wood Art Today 2 (Schiffer Books)
500 Cabinets ( Lark Books)
Studio Furniture: Today’s Leading Woodworkers (Schiffer)
Canadian Interiors Design Source Guide
Ottawa Life magazine (Profile,work) 2012
Panoram Italia magazine
Our Homes magazine
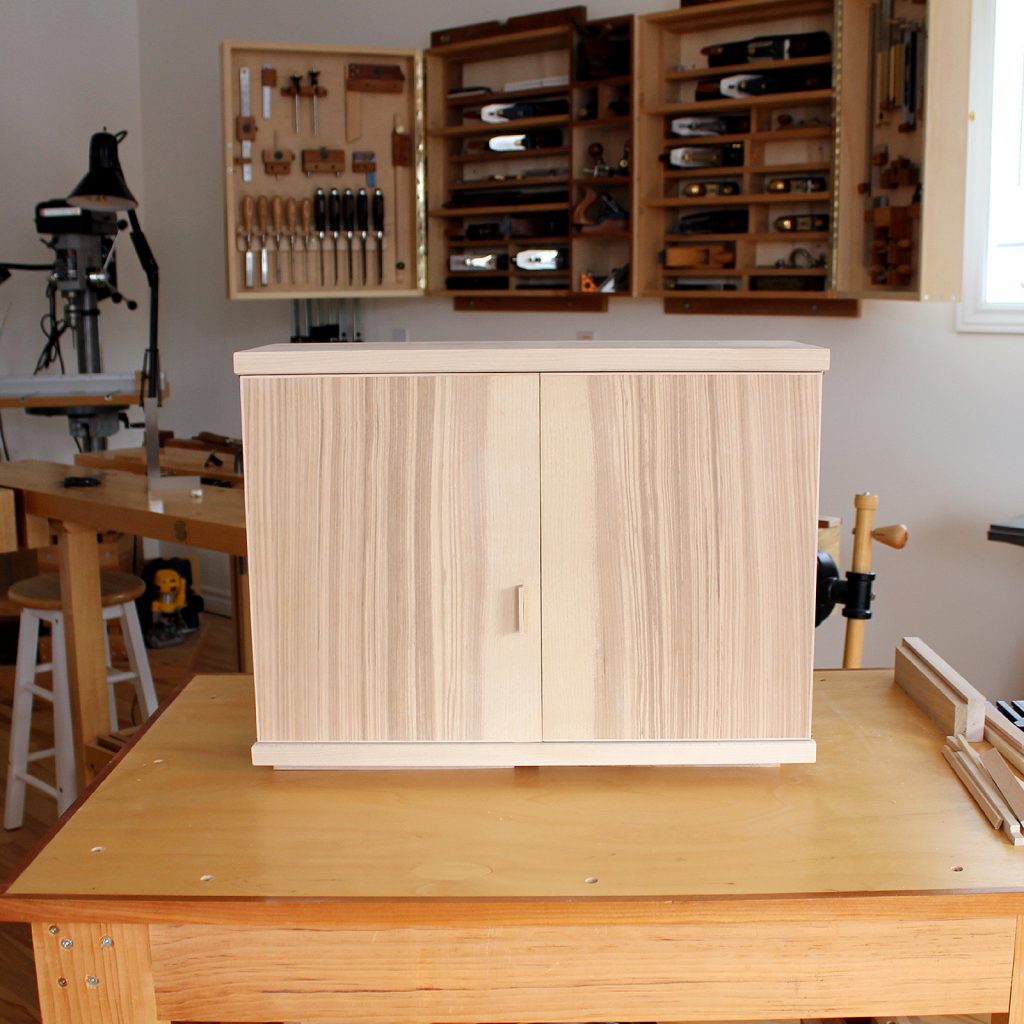
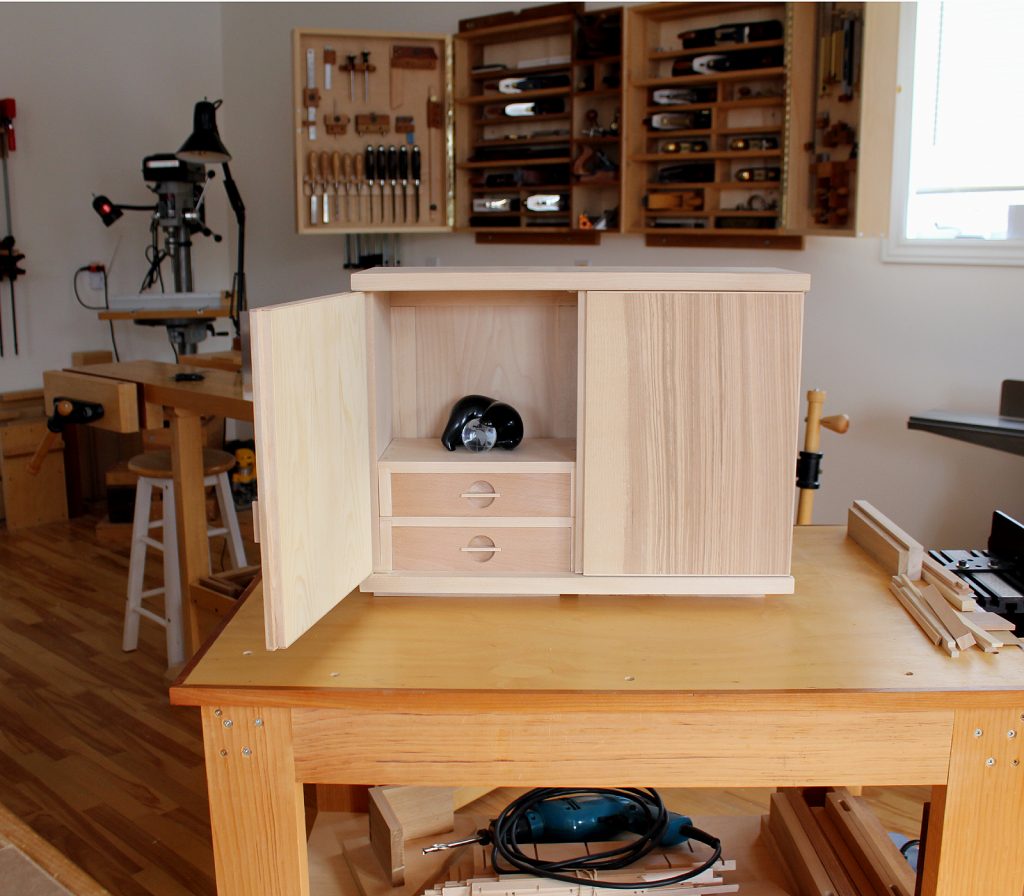
My latest furniture piece revolves around a Zebrano board and the interesting graphics it exhibits. I had been saving this particular board for a while and was keen on using it in a piece of furniture. The thought came to me to incorporate it as door panels in a small cabinet. As with any figured board, there is usually a limitation in how much yield we can extract from it. The dimensions of the board also contribute to the size of veneers that can be gained from dimensioning and resawing. So, after these steps I was left with two book-matched shop-sawn veneers to use as door panels built up over a substrate. I maximized the size to use the full extent of the Zebrano veneers and included similar sized veneer sheets for the back of the substrate. As a best practice, I apply veneers to both sides of a substrate to ensure the panel will not cup in either direction. Veneers applied to both sides create equilibrium and dimensional stability. The substrates have hardwood lipping all around and Zebrano veneers and backing veneers as seen below.
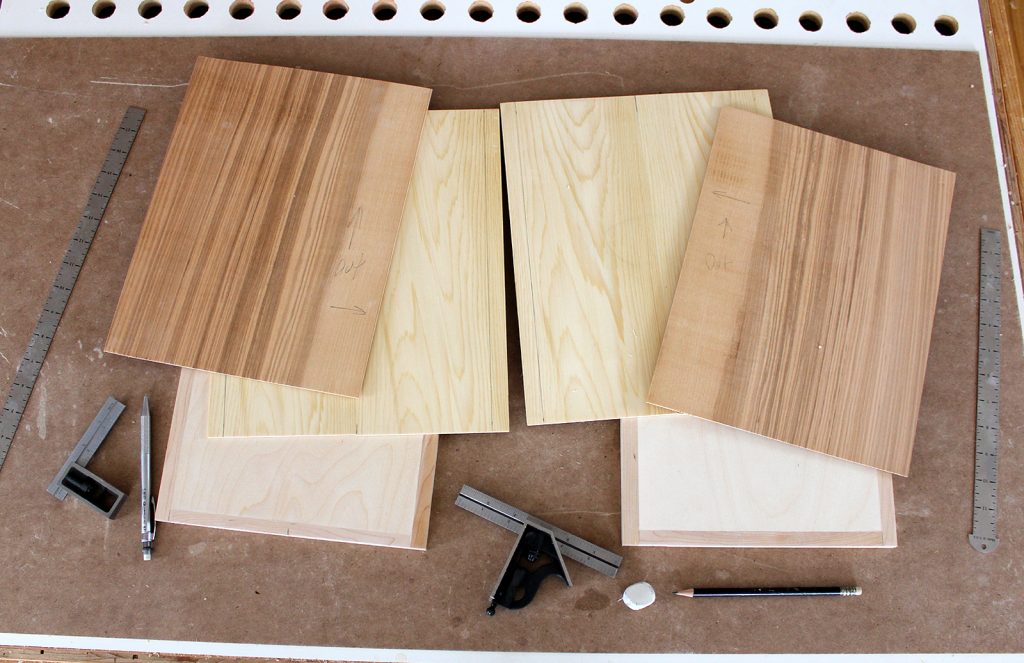
The build began with case construction followed by a back panel and ultimately the doors were constructed. There are several intermediary steps involved. I usually create the case and then use the door openings to determine the final dimensions of the doors. I had already created the substrates as above and veneered the front and back veneers to form two slightly oversize door panels.
The cabinet is to be wall-mounted so it is smaller than standalone cabinets I typically make. This involves lightening the components forming the cabinet. The cabinet is hung using a metal French cleat system. I attach the French cleat to studs in the wall through drywall.
The mortises for the knife hinges are created in both door panels as well as the case. This step involves careful shimming of the door to ensure the reveal is correct all around. Another interesting element in the design are the drawer pulls. Since the cabinet is not deep, I wanted to maximize the drawer depth. Conventional pulls would lose close to one inch. Instead, recessed pulls are ideally suited to shallow drawers. The completed cabinet shown below shown before finishing. The finish will be multiple coats of thinned super blonde shellac.
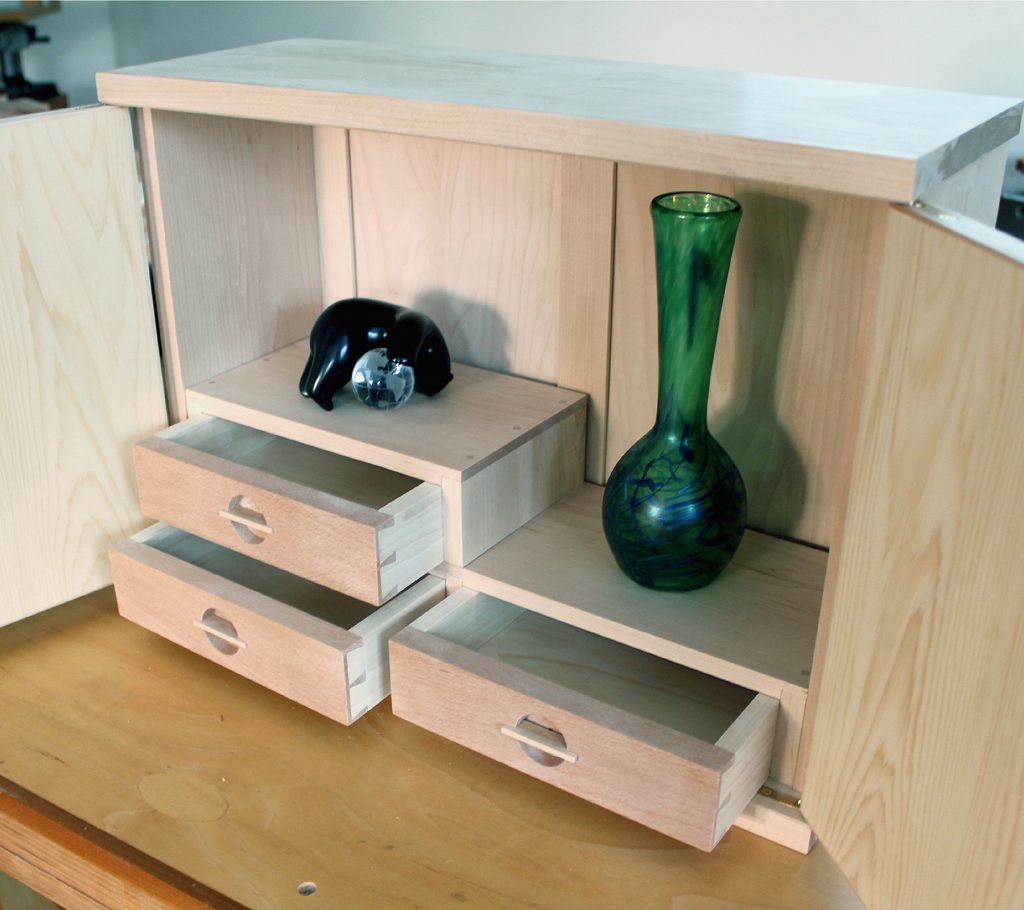 Also interesting are the dovetailed drawer fronts. I was striving for a wood tone not as dark as cherry and not light, just sufficient to provide some contrast to the maple. The wood originates from leftover European Beech offcuts used in a cabinet made in 2008 that was featured in the forward of the “500 Cabinets” book.
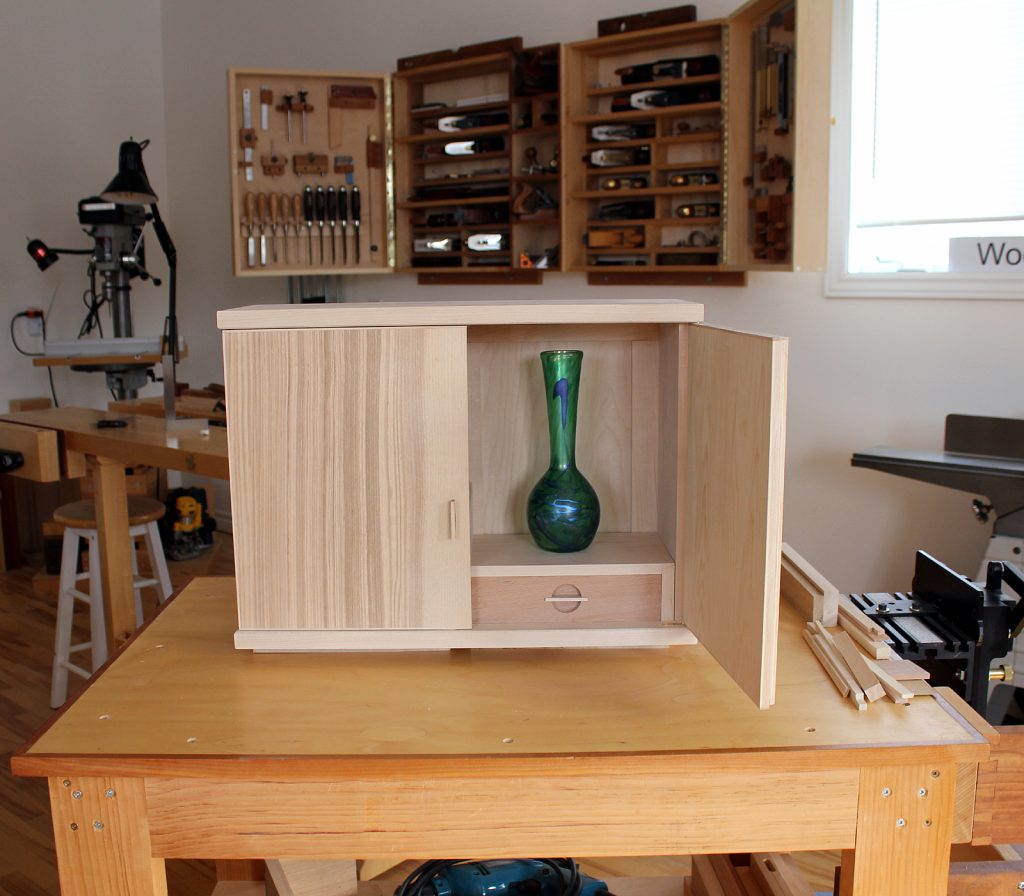
The doors overlay each other through a lip and rabbet. Since the focus of this cabinet are the book-matched door panels, I spent extra time getting the graphic orientation correct. Normally, I install a single door pull on the right hand door. To keep the graphics symmetric, the door pull was instead installed on the left hand door. This change also slightly offset the center of the doors to the right. The modification worked and the door graphics are balanced!
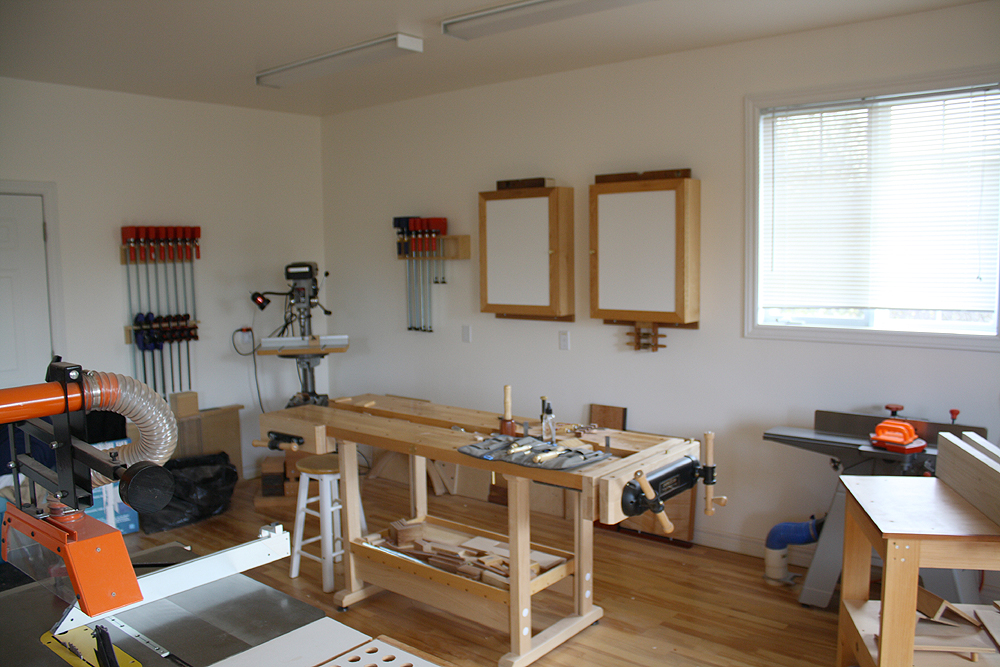
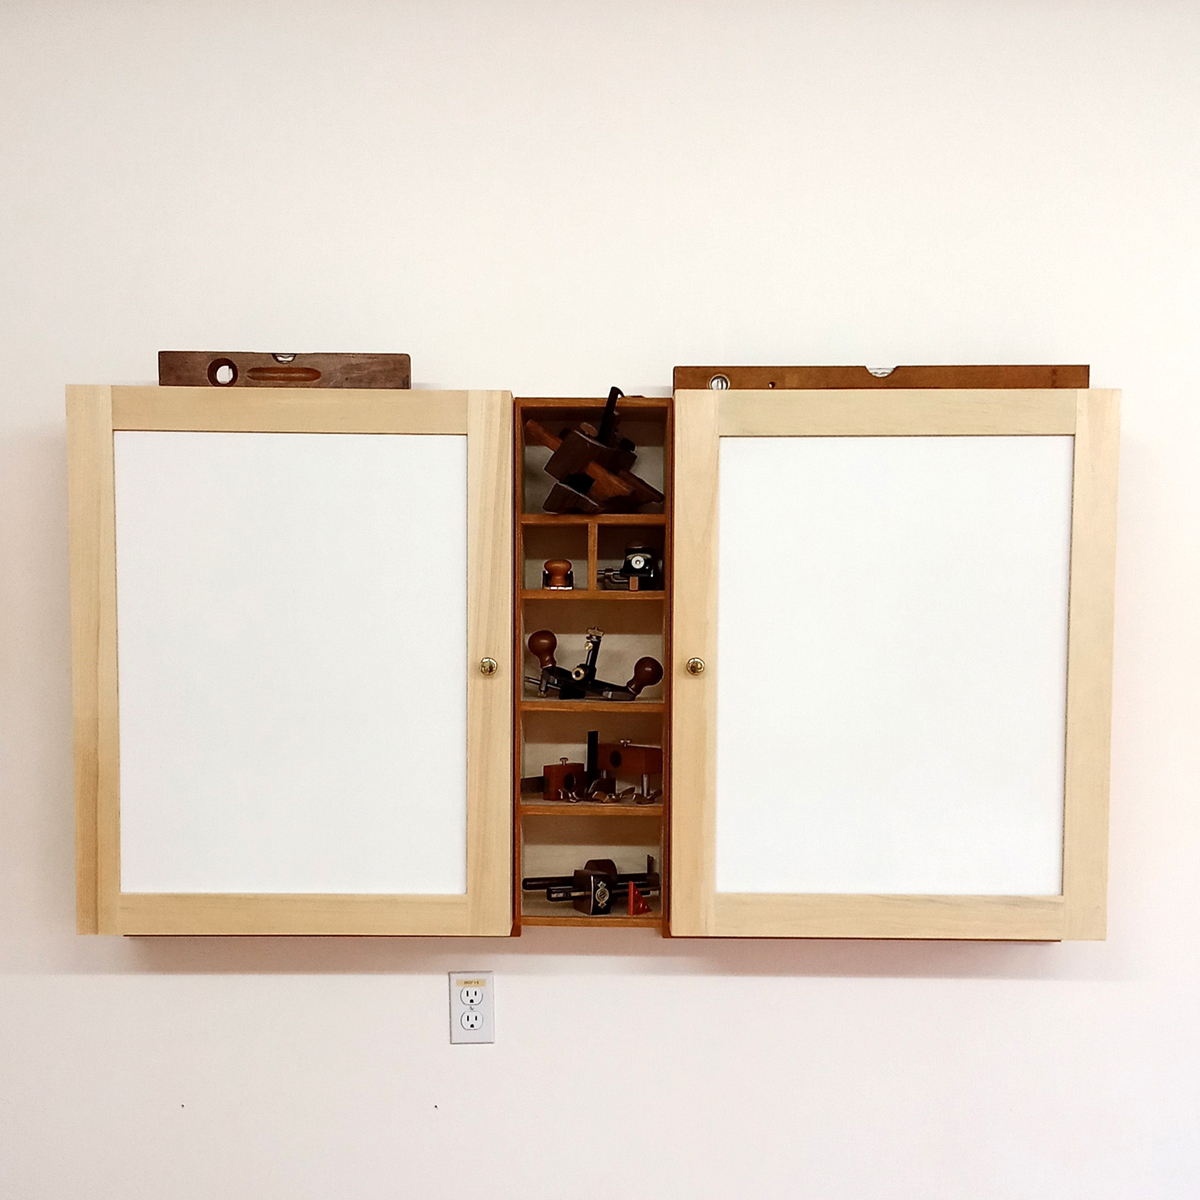
Several years ago when setting up my new workshop, I built a pair of hand plane cabinets. The cabinets were designed to house hand planes exclusively. At the time, I had relatively few other tools so the design was appropriate. It did cross my mind to have deep doors to keep other measuring and marking tools, but I was just setting up shop and this could wait. Instead, I opted for simple frame and panel doors.
The premise was to keep dust away from hand planes in the cabinets. A feature of the original doors were dry erase front panels. These panels served me well over the years as I could maintain a list of steps in a furniture build and check them off during a build. Earlier images below show frame and panel doors with dry erase panels. The door frames were oak.
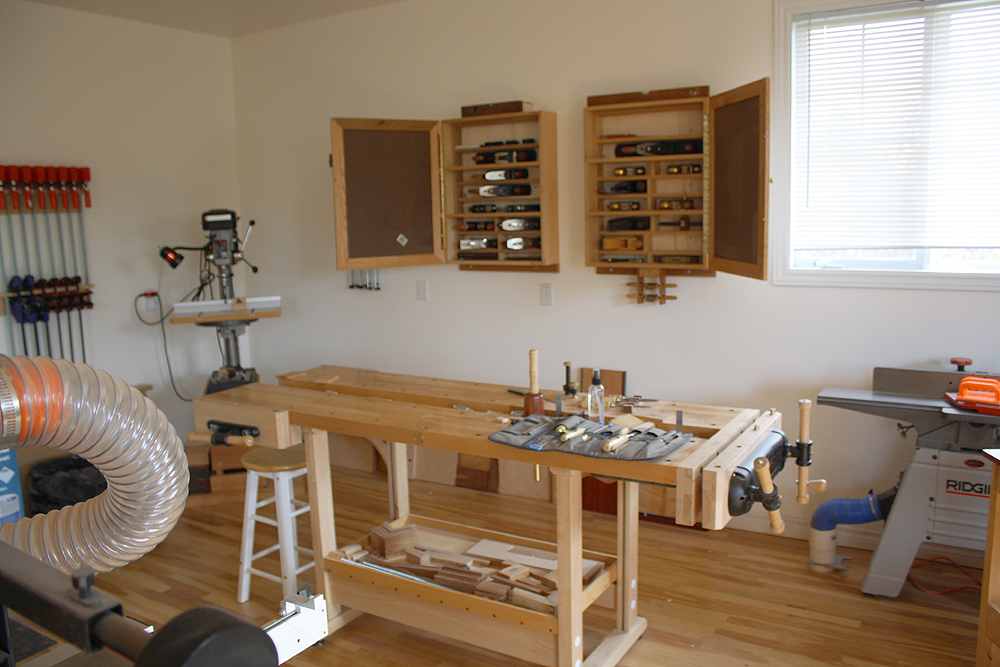
Fast forward to December 2020. Over they intervening years, I acquired a good selection of measuring and marking tools. Since I had little dedicated space to store these tools, I would leave them on my workbenches. The problem with this approach is the tools sometimes get buried under work in progress. So it became an endless search for the tool I needed. Sometimes I would instantly spot it, other times it became a time-consuming chore to find the tool. This began to slow me down as well as frustrate me. I had to do something and revisited an earlier plan to build up the hand plane cabinets with deep doors. As well as adding the new, deeper doors, I added a center section to house new hand plane additions. This section was custom as it had to fit perfectly between the existing pair of hand plane cabinets.
The new, deep doors would be strong yet light. I also wanted to incorporate the existing dry erase panel into each door. Another criteria was not too deep a door to maintain the work space to the workbench directly ahead. A few days later and with some ingenuity I had the new doors built. The original doors were disassembled to retrieve the dry erase panels (re-purposing). The new door dimensions were identical to the old frame and panel doors aside from the increased depth. I also allowed an extra thickness behind the dry erase panel to attach tool holders. I had just completed a furniture project so this new shop addition was a nice, short project that only took 3-4 days to complete. It was an enjoyable build and used cherry offcuts I had accumulated over the years. New door images below.
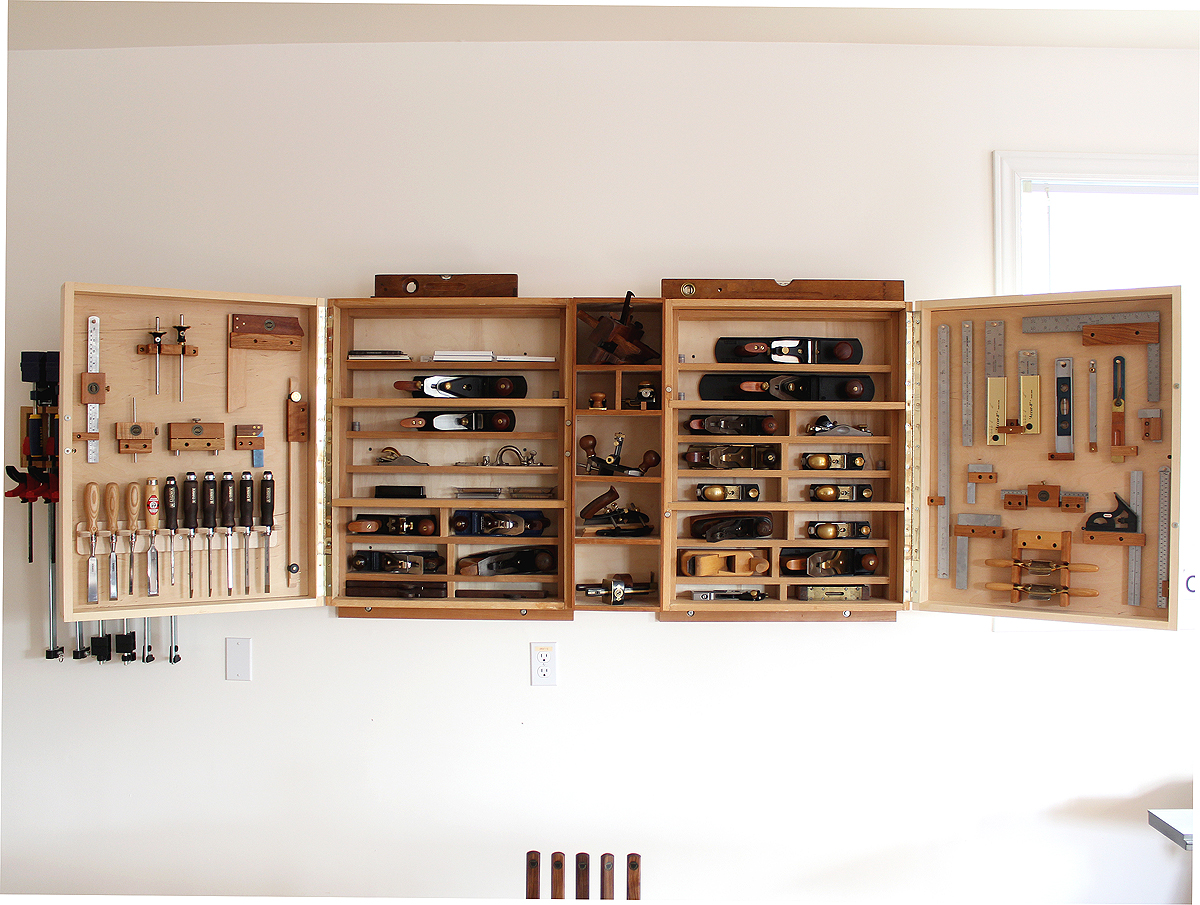
The individual tool holders are created from cherry offcuts I had lying around. This part was actually fun, coming up with clever ideas to hold each of the tools. A couple of detail images follow.
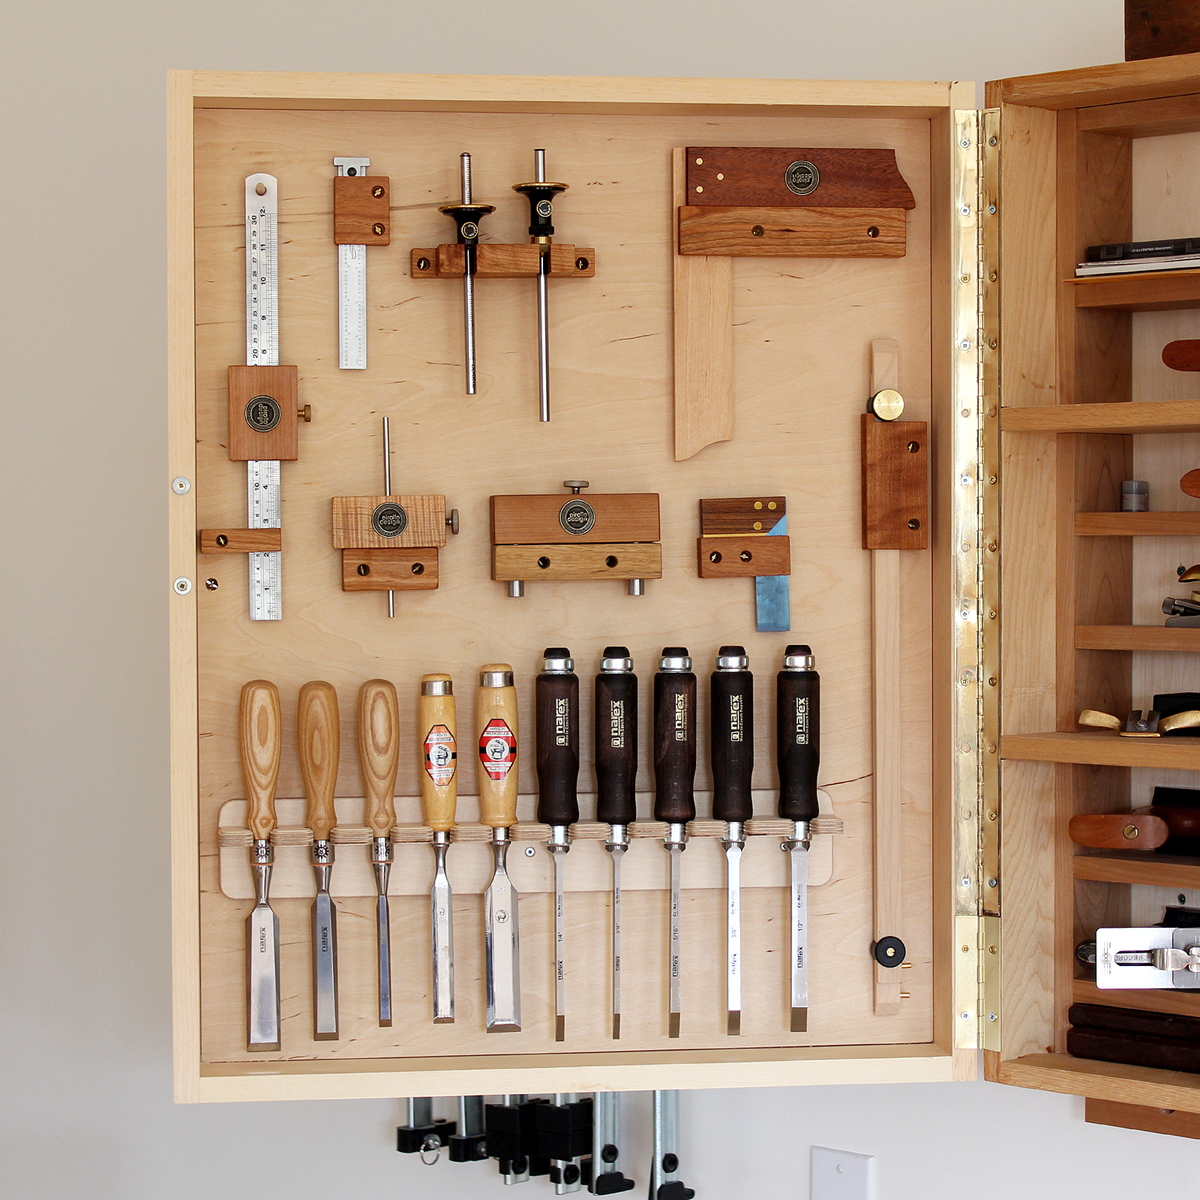
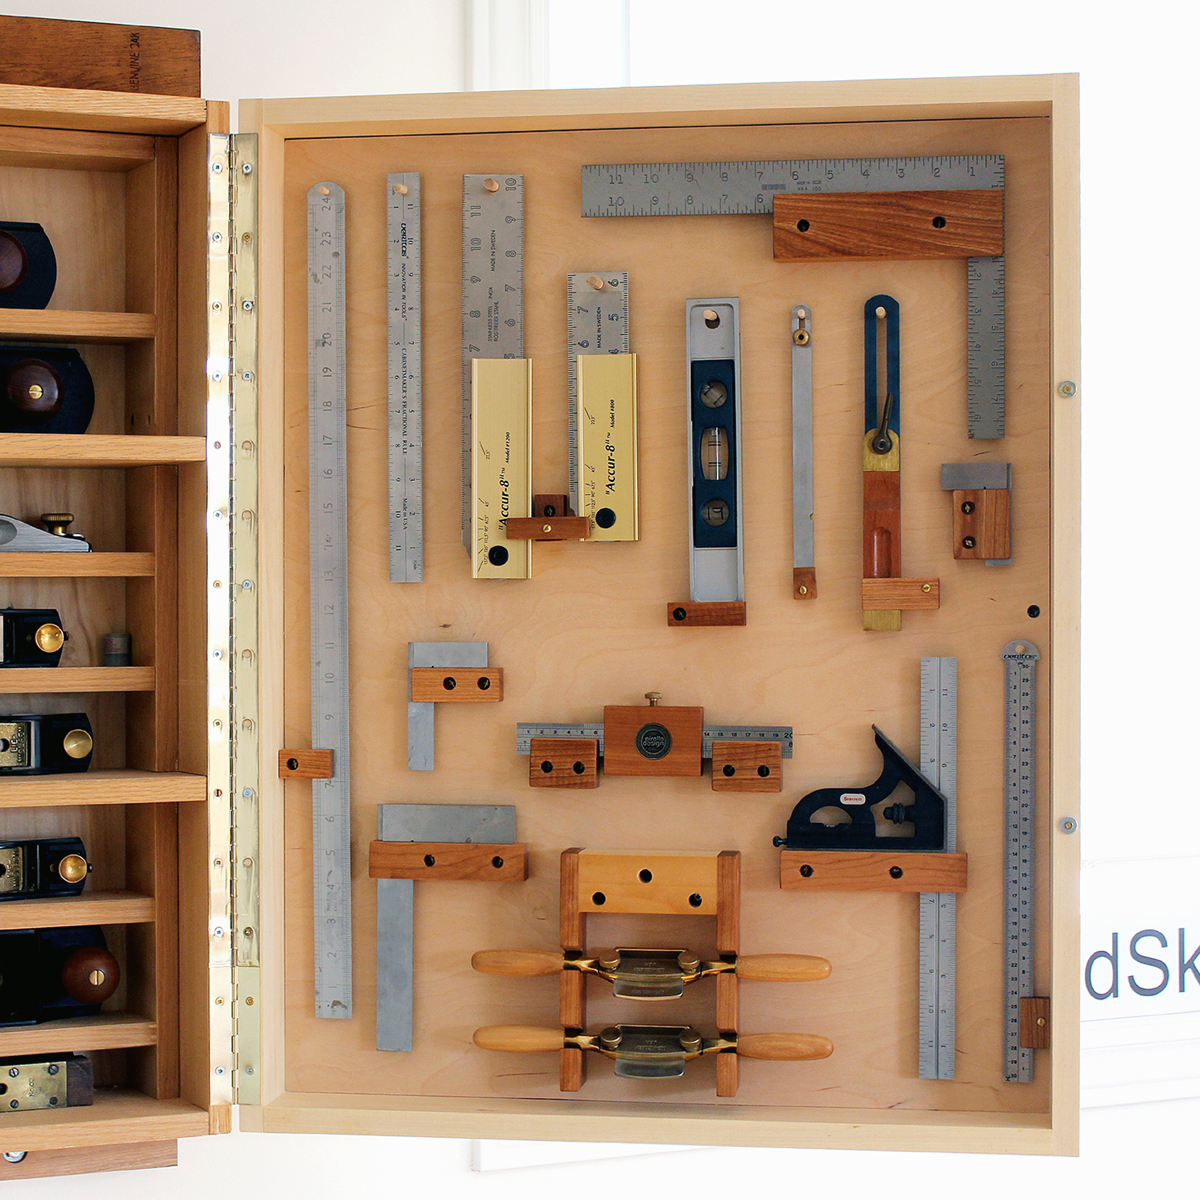
The exteriors of the new doors are shown below. The dry erase panels are carried over from the original oak frame and panel doors. As well, the small brass pulls and the piano hinges are carried over from the original cabinets. I am very pleased with this hand tool cabinet upgrade! A short video of the new hand tool cabinets available at WoodSkills
Discover how hand tools create a quiet, peaceful, dust free woodworking experience. Read about the dichotomy of hand tool woodworking in a modern world. Attain a more fulfilling, better quality of craftsmanship. Improve your hand to eye coordination and gain tactile feedback. I delve into how my furniture pieces are created using hand tools. Find out why you should introduce hand tools to your woodworking.

![]()
Norman maintains a blog of ongoing projects in his studio: Blog (woodskills.com) as well as having written and published three books in the past year. Books, magazines where authors furniture, work methods and philosophy have been featured:
Quiet Woodworking (New Art Press)
Hand Tool Woodworking (New Art Press)
Start Woodworking (New Art Press)
Craftisian Interview (Norman Pirollo)
HackSpace Magazine – Make With Wood April 2020
Woodworking: From Design To Making (New Art Press)
Woodworking With Hand Tools 2018 (Fine Woodworking)
The Wood Artist: Creating Art Through Wood (New Art Press)
From Hi-Tech to Lo-Tech: A Woodworker’s Journey (NAP)
Start Your Own Woodworking Business (New Art Press)
Rooted: Contemporary Studio Furniture (Schiffer Publishing)
IDS15 (Studio North)
IDS14 (Studio North)
Canadian Woodworking magazine Jan. 2015
Our Homes magazine Fall 2014
IDS14 (Studio North)
NICHE Magazine Winter 2013
Fine Woodworking Magazine – 4 Bench Jigs for Handplanes
Fine Woodworking Magazine – Essential Shopmade Jigs
Woodwork magazine
Wood Art Today 2 (Schiffer Books)
500 Cabinets ( Lark Books)
Studio Furniture: Today’s Leading Woodworkers (Schiffer)
Canadian Interiors Design Source Guide
Ottawa Life magazine (Profile,work) 2012
Panoram Italia magazine
Our Homes magazine
Craft Journal
Woodworker’s Journal (2006)
 Norman Pirollo, successful founder of White Mountain Design, White Mountain Toolworks, Refined Edge Design, WoodSkills and Pirollo Design, guides you through the process of starting and setting up your own woodworking business. Learn from an experienced business person in this field. Norman provides the necessary expertise and answers questions about starting your own woodworking business in this information packed course.
– Woodworking Business Course is Downloaded
– over 3 full hours long
– 23 video modules describe steps to start your own woodworking business
– modules can be followed in any order and stopped or repeated at any time
– 23 modules included in single price
– Woodworking Business Certificate available upon completion
The video modules include critical topics on starting a woodworking business. Each module guides you through the learning and development process of the business skills you are seeking. Start Your Own Woodworking Business Course is derived from over 20 years of woodworking business and furniture making expertise.
Course Overview (short, lo-res) can be viewed below.
Norman Pirollo, successful founder of White Mountain Design, White Mountain Toolworks, Refined Edge Design, WoodSkills and Pirollo Design, guides you through the process of starting and setting up your own woodworking business. Learn from an experienced business person in this field. Norman provides the necessary expertise and answers questions about starting your own woodworking business in this information packed course. The course features separate modules on these topics:
01. Introduction
02. Is self-employment for you?
03. Converting a hobby to a business
04. Important questions to ask yourself
05. Do you know your joinery
06. What about finishing skills
07. How much time & deadlines
08. Part time vs. Full time?
09. Creating a niche
10. Legal stuff & business plan
11. What machinery do you need
12. What hand tools do you need
13. How much space do you need
14. Developing a product
15. Finding a market
16. Creating a portfolio
17. Internet marketing
18. Work-life balance
19. Working on commission
20. Expanding your business
21. Expanding present location
22. Technology in woodworking
23. Conclusion
The authors furniture and wood art are featured in various international books and magazines. His furniture and wood art have won awards both in furniture and art shows. The unique, studio furniture which Norman designs and creates can be seen at: Pirollo Design and at The Refined Edge blog. Norman is also the founder of White Mountain Design, maker of fine jewelry boxes, humidors and wood hand planes since 1996.
Norman maintains a blog of ongoing projects in his studio at: www.pirollodesign.com as well as having written and published four books in the past years. Some of the books and magazines which the authors furniture, work methods and philosophy have been featured in:
Craftisian Interview (Norman Pirollo)
HackSpace Magazine – Make With Wood April 2020
Woodworking: From Design To Making (New Art Press)
The Wood Artist: Creating Art Through Wood (New Art Press)
From Hi-Tech to Lo-Tech: A Woodworker’s Journey (NAP)
Start Your Own Woodworking Business (New Art Press)
Rooted: Contemporary Studio Furniture (Schiffer Publishing)
IDS15 (Studio North)
IDS14 (Studio North)
Canadian Woodworking magazine Jan. 2015
Our Homes magazine Fall 2014
IDS14 (Studio North)
NICHE Magazine Winter 2013
Fine Woodworking Magazine – 4 Bench Jigs for Handplanes
Fine Woodworking Magazine – Essential Shopmade Jigs
Woodwork magazine
Wood Art Today 2 (Schiffer Books)
500 Cabinets ( Lark Books)
Studio Furniture: Today’s Leading Woodworkers (Schiffer)
Canadian Interiors Design Source Guide
Ottawa Life magazine (Profile, work) 2012
Panoram Italia magazine
Our Homes magazine
Craft Journal
Jonathan Cirgesi of Chicago, Illinois says this about Business Course
“I found out a lot I didn’t know about starting a woodworking business”
Kevin Drevik says “FYI, liked your course on setting up a woodworking business. Glad I purchased it!”
START WOODWORKING (eBook, 115 pgs., $15) included with this course
Start Your Own Woodworking Business Course includes 23 HD modules for $40
During this pandemic, I invested time in developing a versatile design for a standalone display cabinet. The cabinet on stand has essentially the same dimensions in each of the following iterations. What is different however, is the focal point of the cabinets, referring to the doors. When I lay eyes on a cabinet on stand, I am drawn to the aesthetic of the cabinet and cabinet doors. Proportions of the cabinet and overall design are next, and selection of woods is last. So why not develop a series of cabinets with pleasing proportions and afterwards create a different set of doors for each version? Although the “pleasing proportions” component is subjective, I did ask a few people for their opinion of the design and proportions and it was overwhelmingly positive. The choice of woods for the cabinet case and stand was already selected and domestic hardwoods used, Maple and Alaska Cedar. The wood for the stand was selected to be complementary to maple. The stand is not a dark wood, but a slightly darker, richer color than maple with subtle streaks of black. (Black Limba). So with the design, proportions, and woods selected, I was free to invoke my creativity in designing the doors.
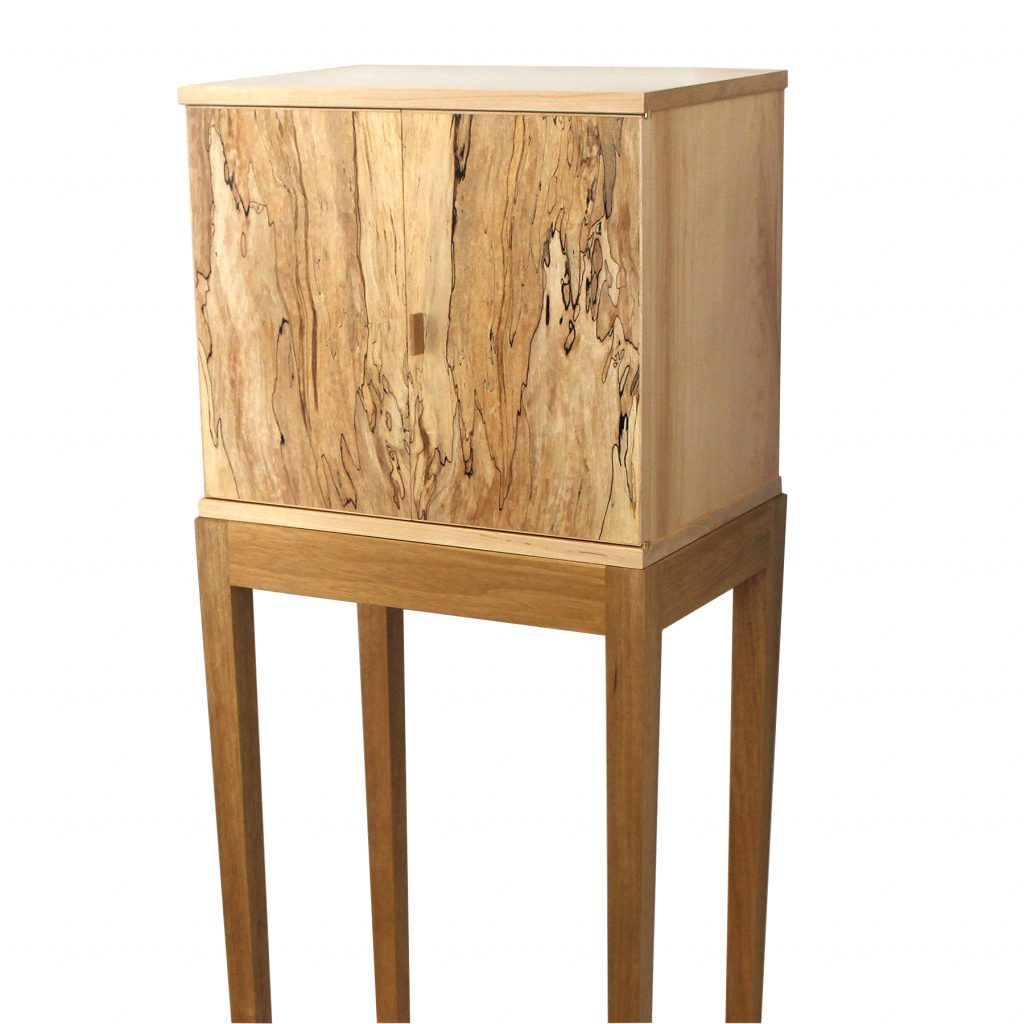
The first photo is a standalone cabinet version with book-matched Spalted Maple doors. The doors are veneered using maple as the inside veneer. The lighter maple is consistent with the case interior and brightens the interior as well. Spalted Maple veneers were hand-picked and meticulously prepared before applying to the substrate. Spalted maple is relatively brittle so this took time and care.
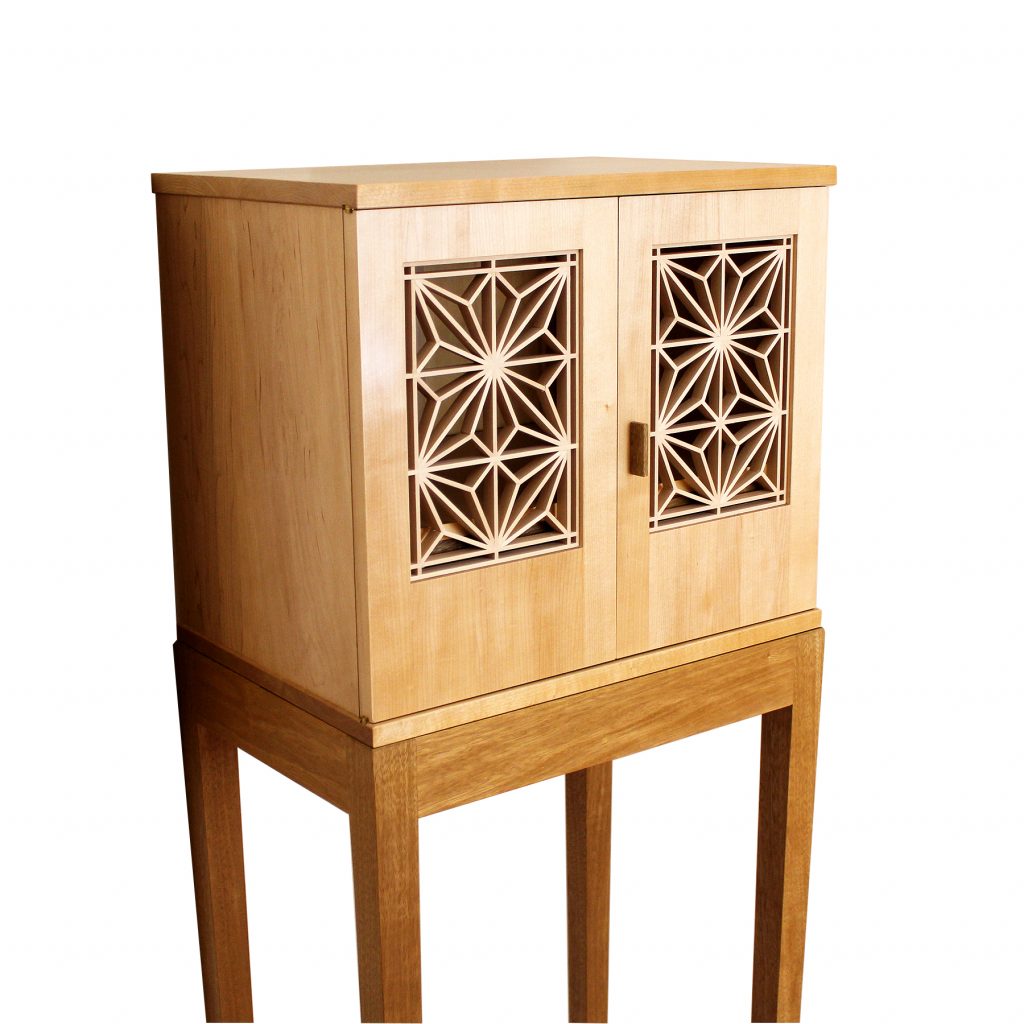
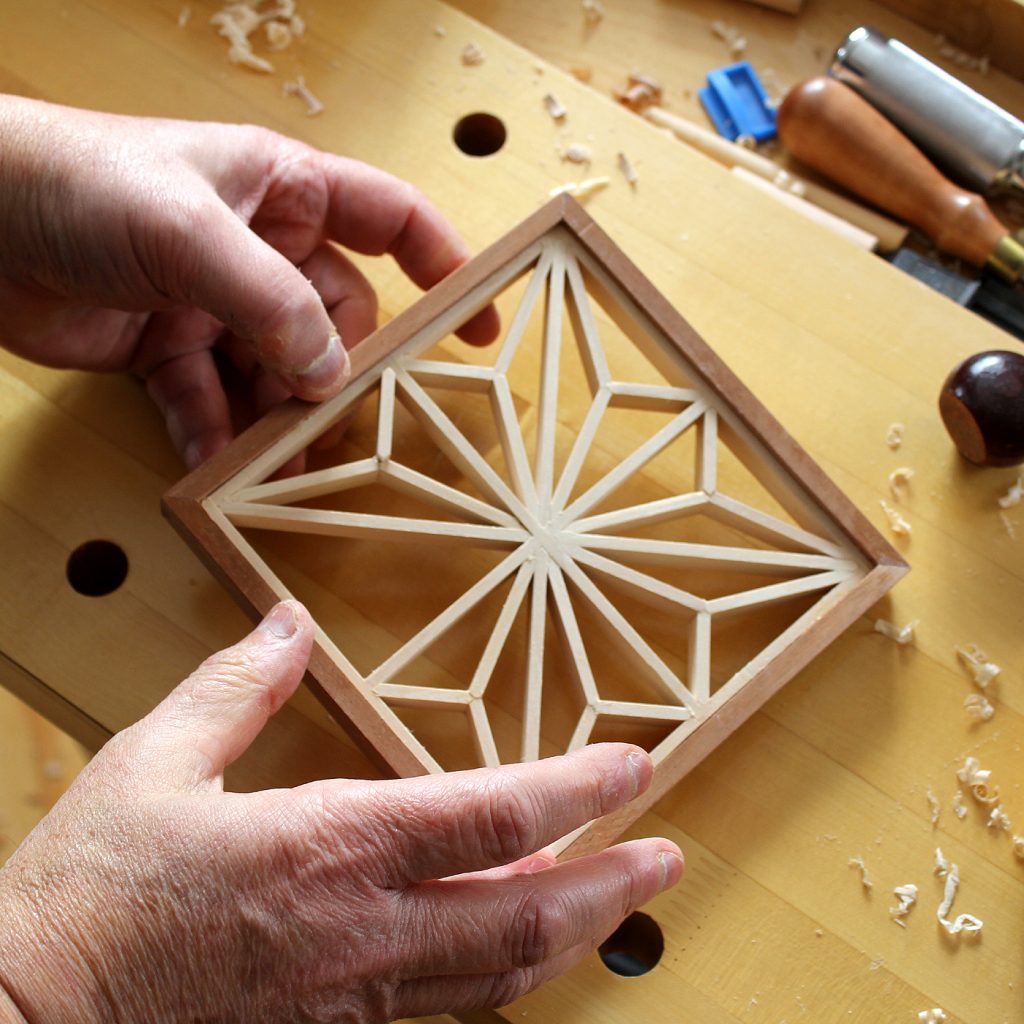
The second photo is a standalone cabinet version with inset Kumiko panels in maple doors. The Kumiko panels feature the popular asa-no-ha pattern or motif. I already had success using Kumiko panels in standalone cabinets, so why not create a Kumiko version. The Kumiko panel was custom designed to work with the dimensions of the door panels. The light basswood elements forming the Kumiko panels contrast well with the surrounding maple.
The third version is a twist on tambours. Tambours slide along tracks and are typically used in cabinets, credenzas or sideboards. The tambour concept was modified to instead be fixed in this new set of doors. Since this was a one-off design, tambour strips were individually created and glued to a hardwood substrate. I did develop an alignment jig to ensure the tambour spacing was uniform across the two doors. The design was a challenge and the effort was successful. Feedback so far is very positive!
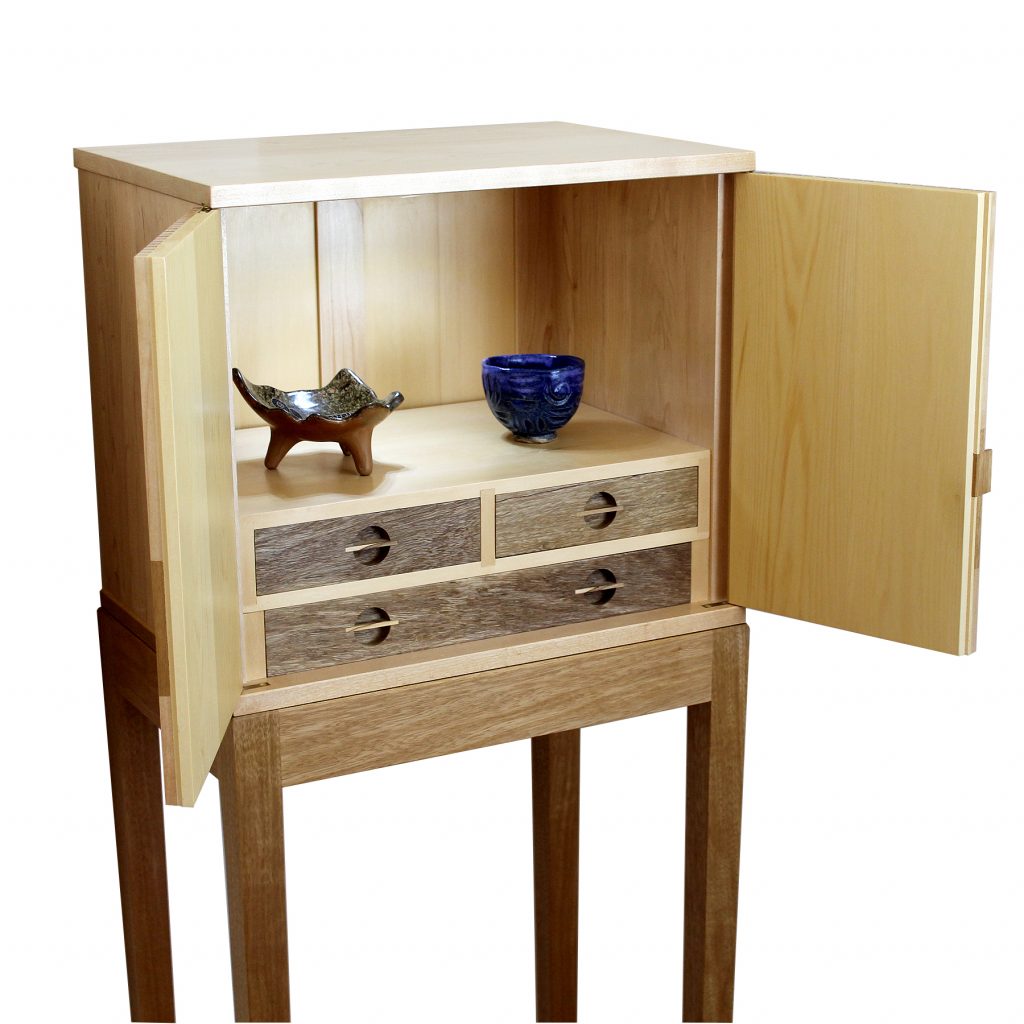
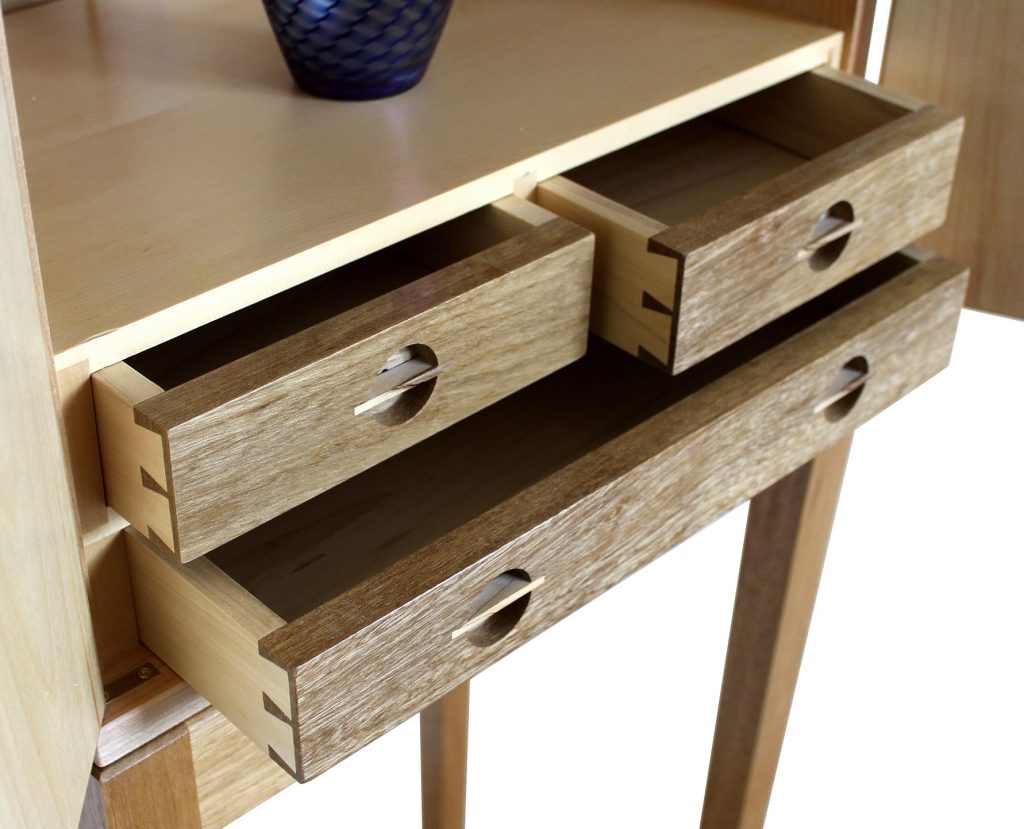
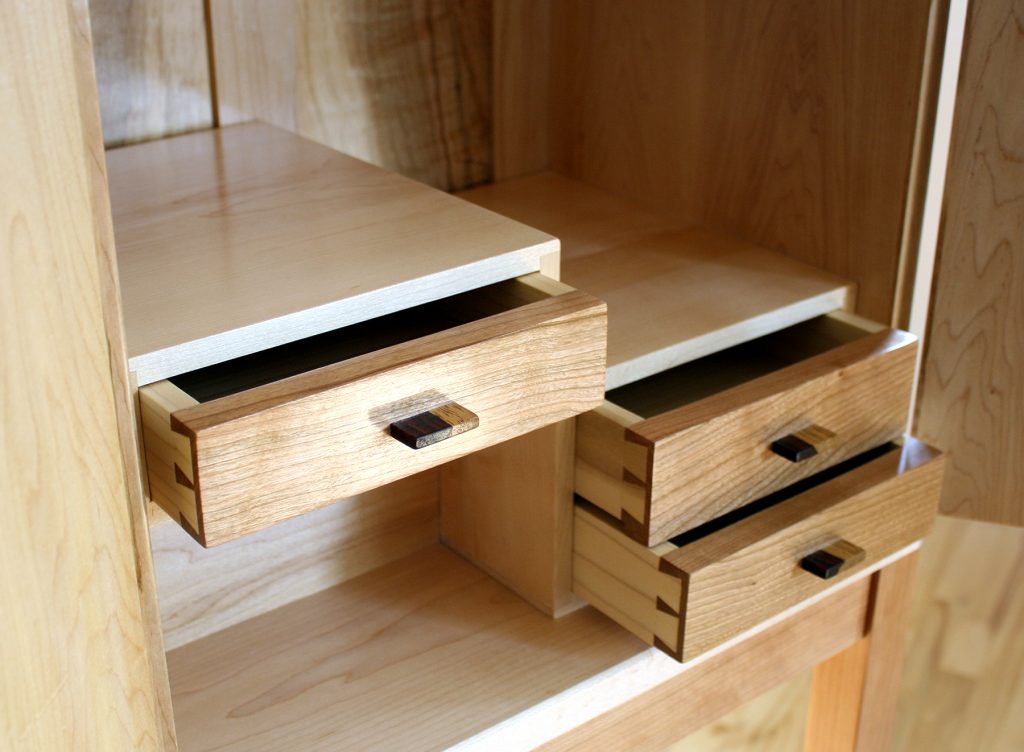
Included above is a photo of the cabinet interiors. The interior is consistent for each version of the cabinet. Stacked, dovetailed drawers define the lower part of the interior and serve as a platform of art objects or decorative and valuable sculptural pieces. The drawers are individually fitted and have recessed pulls to maximize their depth and provide an unique and interesting aesthetic. The back panel is composed of a maple frame with panels of lighter Alaska Cedar.
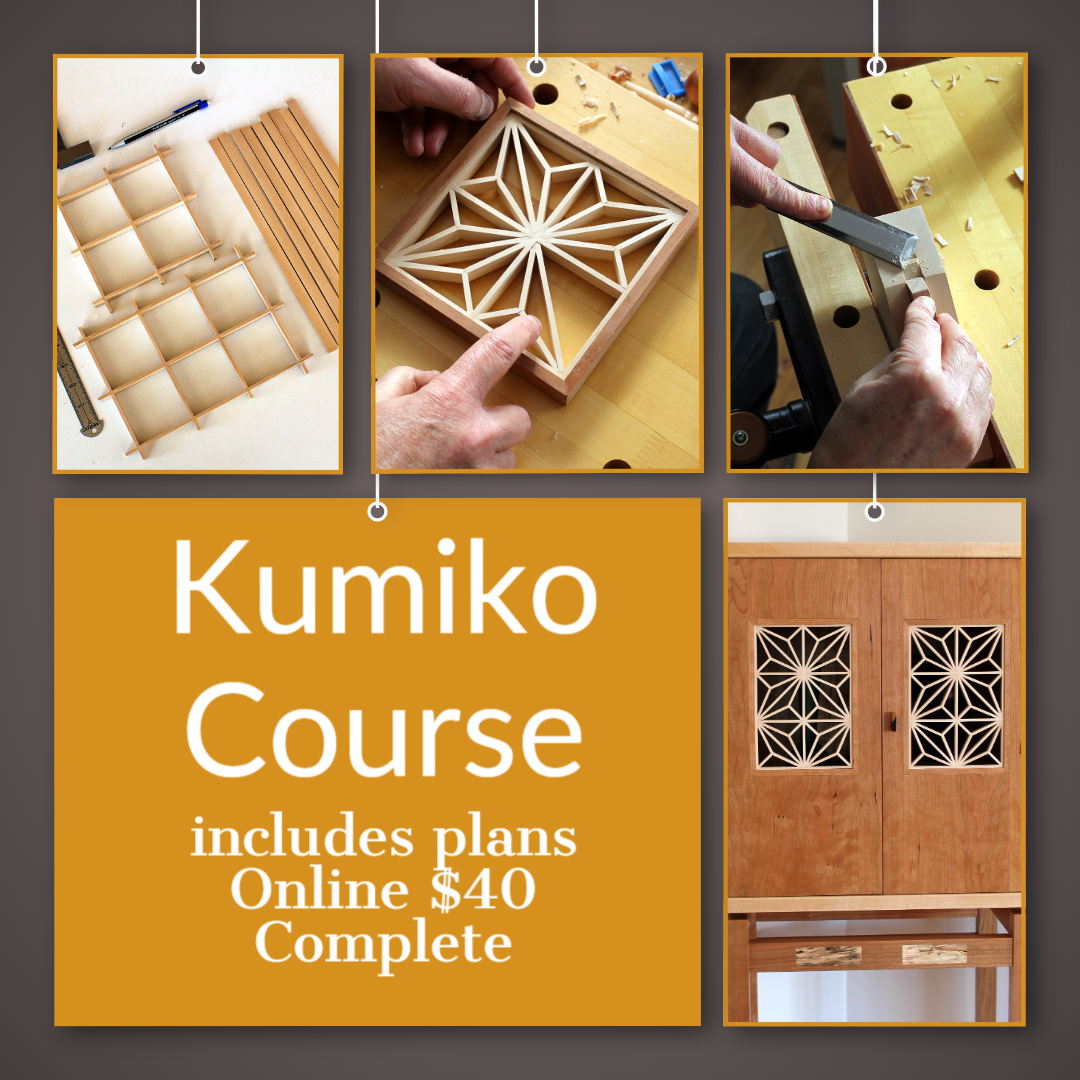
Create your own Kumiko panels! Online Kumiko Course now available.
https://woodskills.com/collections/courses
Maple display cabinet with fixed tambour doors. Doors have a unique tambour aesthetic consisting of strips of Maple and Black Limba applied to a hardwood maple substrate. Black Limba drawers and stand. Spalted maple drawer pulls. Solid brass knife hinges. The cabinet has a large component of hand work and fitting involved. The interior is partitioned into three drawers and a shelf to hold art objects, sculptures or objects of value. Interior is artificially illuminated. The interior woods are light-colored to accentuate art and decorative objects. Surfaces are hand scraped and formed. The drawers are assembled using dovetail joinery. Meticulous attention provided to detail and finishing. The wood is its natural color. Finished with multiple coats of thinned shellac, polished and waxed.
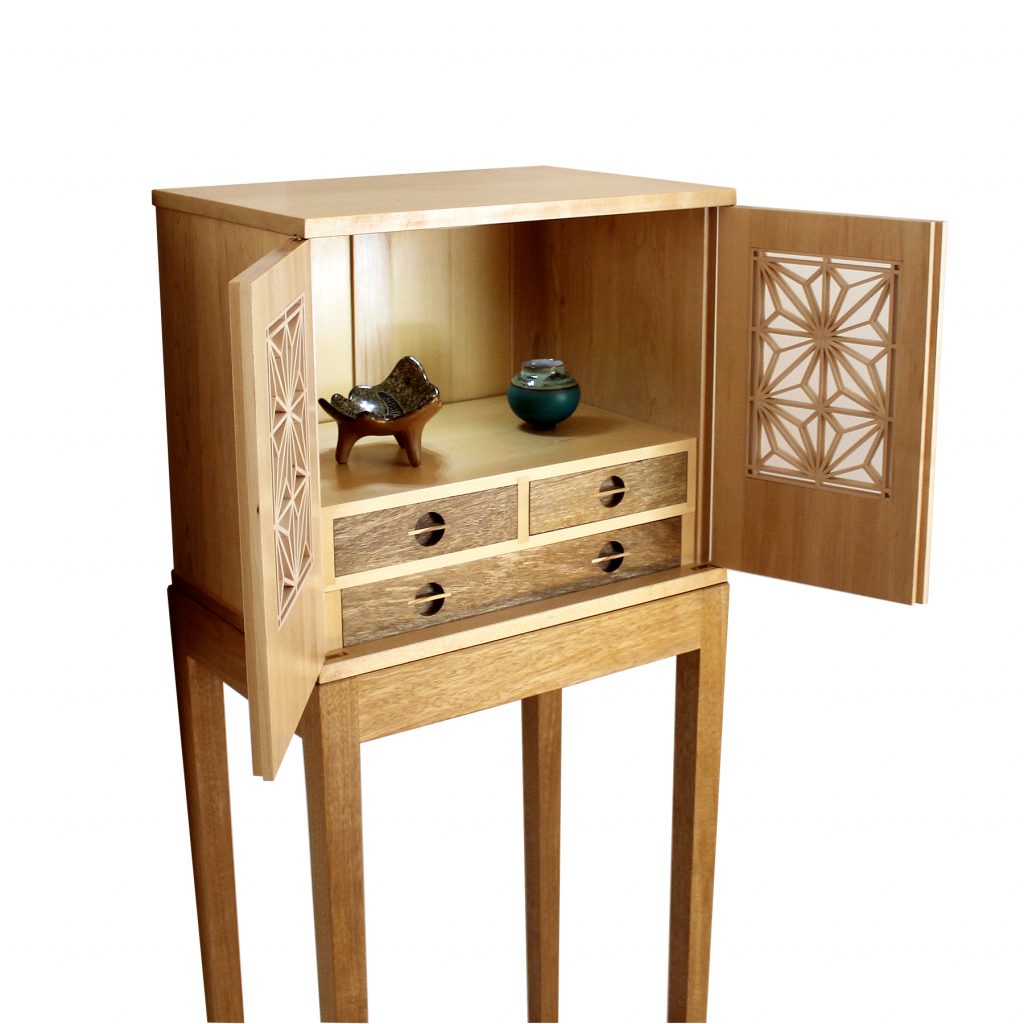
Maple display cabinet with inset Kumiko panels in doors. Black Limba drawers and stand. Spalted maple drawer pulls. Solid brass knife hinges. The cabinet has a large component of hand work and fitting involved. The interior is partitioned into three drawers and a shelf to hold art objects, sculptures or objects of value. Doors have inset custom-fitted Kumiko panels with the asa-no-ha motif to create a unique aesthetic. Light enters and exits the cabinet. Interior is artificially illuminated. The interior woods are light-colored to accentuate art and decorative objects. Surfaces are hand scraped and formed. The drawers are assembled using dovetail joinery. Meticulous attention provided to detail and finishing. The wood is its natural color. Finished with multiple coats of thinned shellac, polished and waxed.
 Maple display cabinet with book-matched spalted maple veneered doors, Black Limba drawers and stand. Spalted maple drawer pulls. Solid brass knife hinges. The cabinet has a large component of hand work and fitting involved. The interior is partitioned into three drawers and a shelf to hold art objects, sculptures or objects of value. The doors have been book-matched in the form of interesting flame graphics to accentuate the unique grain pattern of the spalted maple wood used. Surfaces are hand scraped and formed. The drawers are assembled using dovetail joinery. Meticulous attention provided to detail and finishing. The wood is its natural color. The cabinet is finished with multiple coats of thinned shellac, polished and waxed.
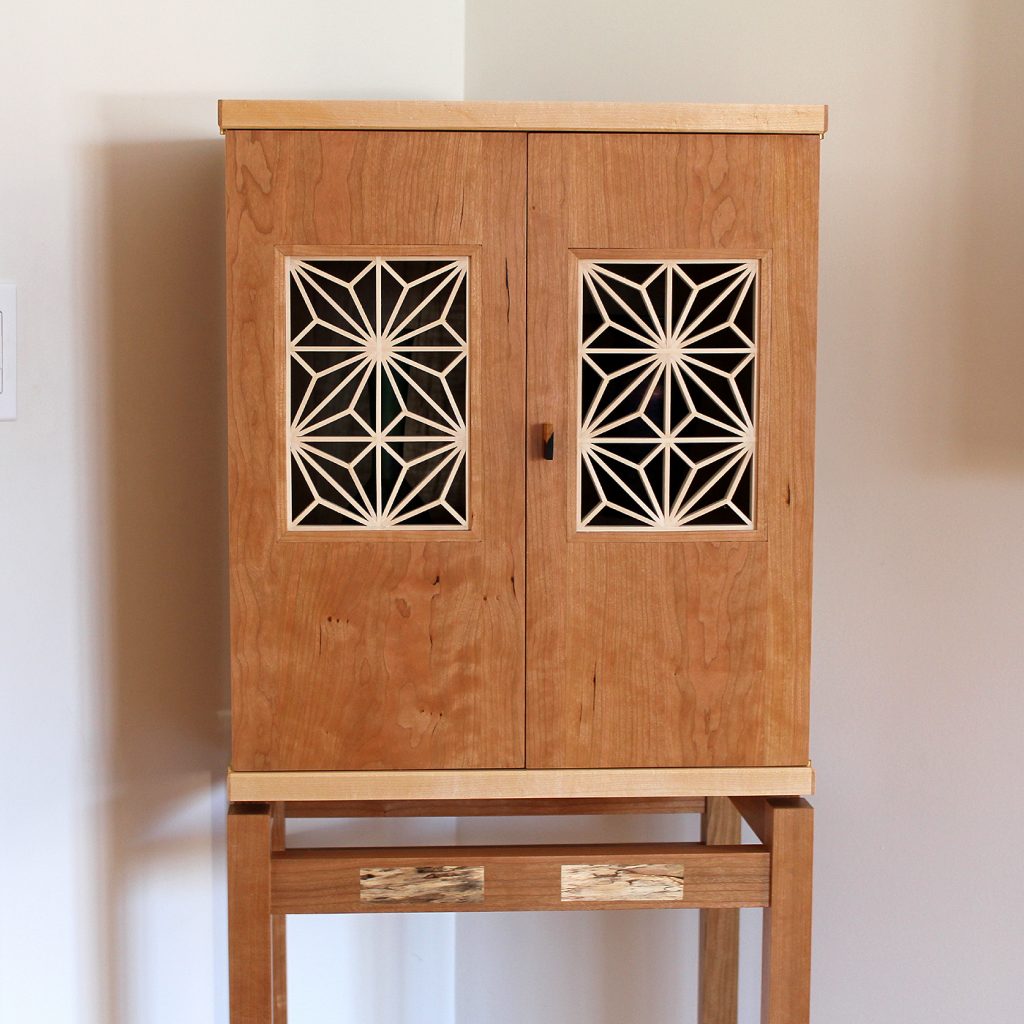
 Kumiko display cabinet with solid cherry doors and Kumiko inserts, cherry drawers, and two-tone cocobolo door and drawer pulls. Exterior of the cabinet is composed of hand cut maple veneers whereas the interior is composed of hand cut soft maple veneers. Solid brass knife hinges used. The cabinet has a large component of hand work and fitting involved. The contrasting cabinet stand is made with hand selected black cherry with contrasting inlay. The interior is partitioned into two halves that are individually accessible when either door is open. The doors have embedded Kumiko panels to transfer light from within cabinet and to see art objects from outside. Surfaces are hand scraped and formed. Drawers are assembled using dovetail joinery. Meticulous attention provided to detail and finishing. The wood is its natural color. Cabinet is finished with multiple coats of thinned shellac, polished and waxed.
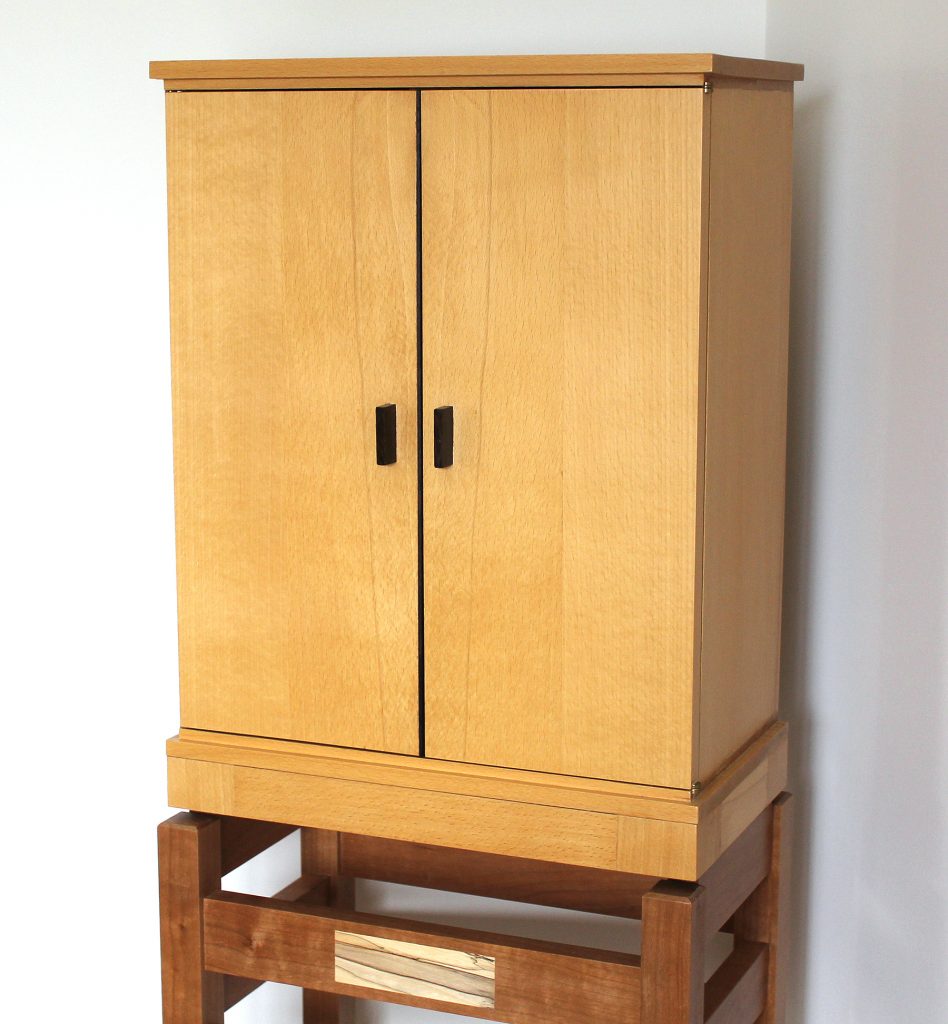
 Solid beech display cabinet with figured wood drawer fronts and blackwood pulls on doors and drawers. Solid brass knife hinges. The cabinet has a large component of hand work and fitting involved. The interior is partitioned into two drawers and a shelf to hold art objects, sculptures or objects of value. The beech doors are uniform in appearance adding to a clean, contemporary aesthetic. Surfaces are hand scraped and formed. The drawers are assembled using dovetail joinery. Meticulous attention provided to detail and finishing. The wood is its natural color. Cabinet is finished with multiple coats of thinned shellac, polished and waxed.
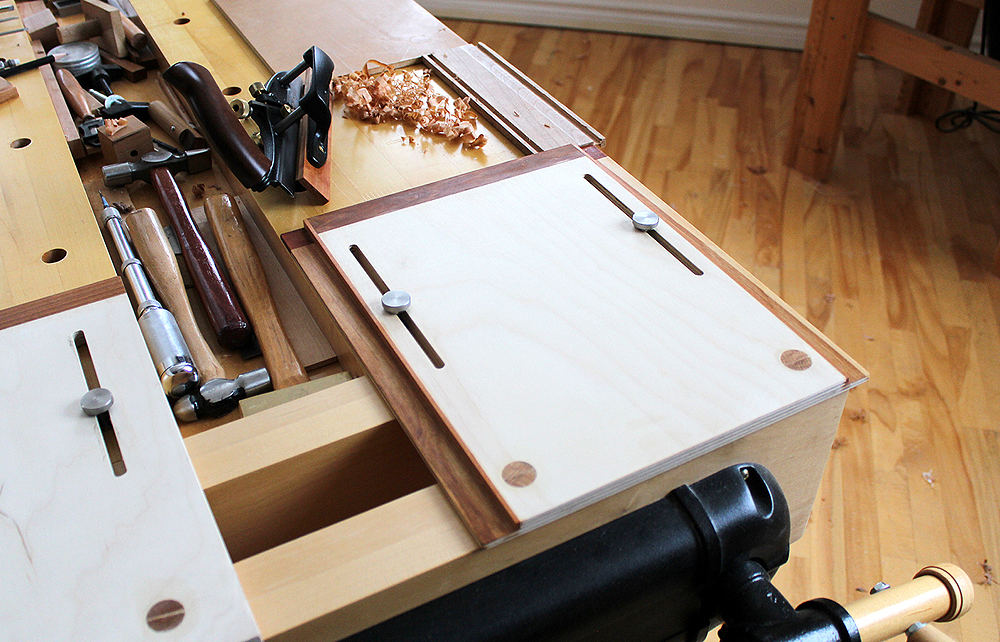
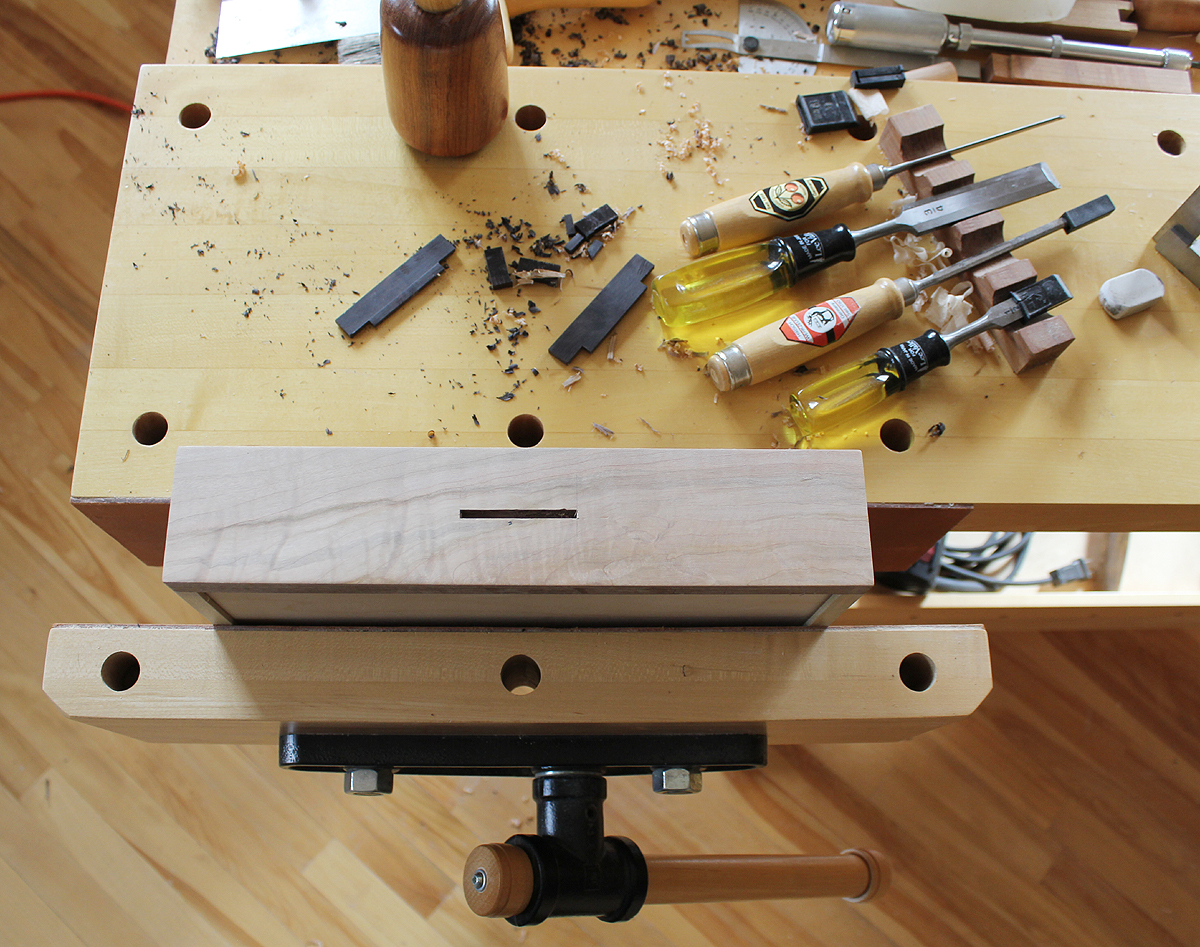
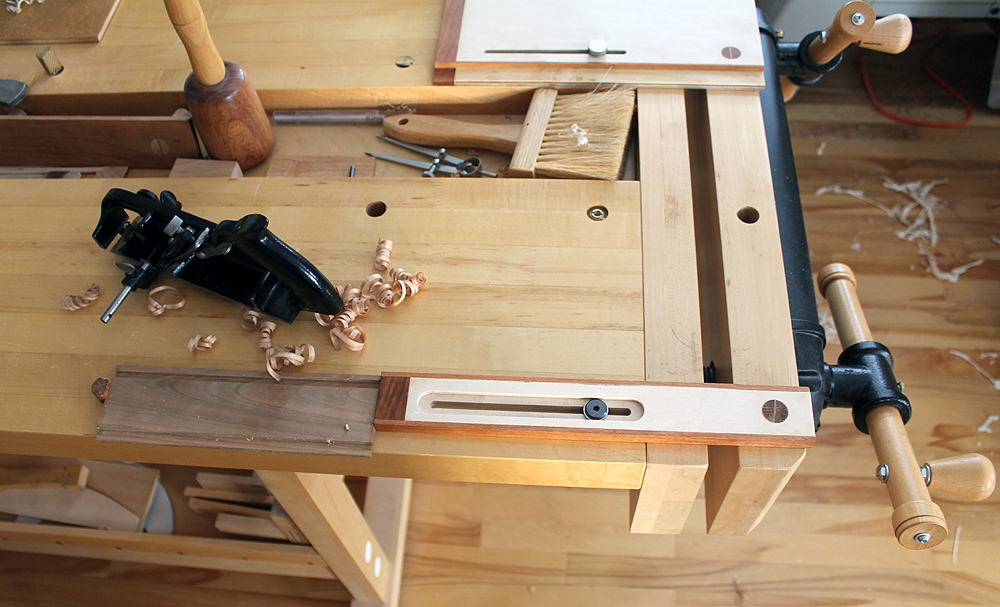 Narrow version of sliding tail vise seen in the image above and below. Works with a single bench dog hole in end vise. Locks workpiece firmly in place to allow handplaning along the grain or creating profiles along edge of boards. Can be easily removed and installed. Bolt is optionally tightened for larger workpieces.
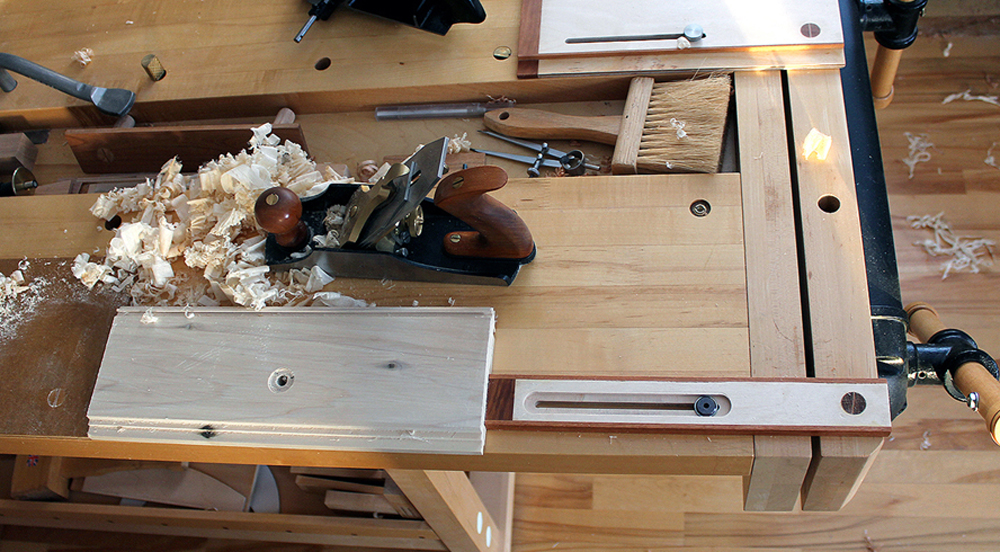
The sliding tail vise works either with a twin screw vise or end vise. Through use of one or two dog holes in the jaw of the twin screw or end vise, the sliding tail vise engages and clamps a workpiece to the bench. The sliding tail vise is designed to move effortlessly along the surface of the workbench. The workpiece is then secured at the opposite end through a bench dog or batten between bench dogs (for wide workpieces). This is seen in the images. The design of the sliding tail vise originated with frustration in successfully clamping both narrow and wide boards to a workbench top.
When creating grooves or rabbets along a long edge of a board, it is critical that the board overhang the workbench surface for a plow plane or rabbet plane to operate correctly. It is often a challenge to properly secure the workpiece so it does not shift while handplaning. Racking is also introduced since narrow boards such as drawer sides can only be clamped with minimal surface area at the ends. The sliding tail vise aids tremendously in this type of clamping through a wide clamping surface, attachment at either two or four points, and a locking mechanism. Two thumbscrews or recessed hex-head bolt lock sliding tail vise to workbench surface eliminating racking stresses.
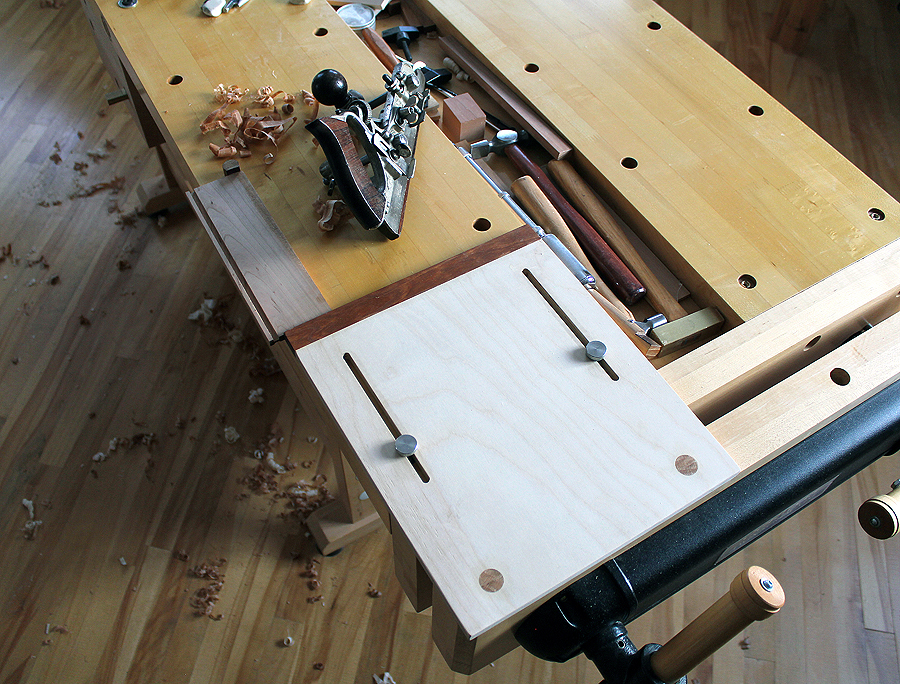
When handplaning large, wide boards there is a tendency for the board to rack and shift away from the twin screw or end vise. This occurs when flattening a board in a diagonal direction or across the grain. The sliding tail vise solves this dilemma through a locking mechanism. Once the sliding tail vise is securely clamped to the large, wide board, two thumbscrews are tightened. This relieves pressure on the twin screw vise and creates a solid, wide clamping area for the workpiece. The sliding tail vise now resists racking since it is attached firmly to the workbench surface at two points and locked at two points in the twin screw vise jaw.
The sliding tail vise is designed to be portable and can be installed on either side of a workbench surface, as seen in the images. This feature addresses the handedness of the woodworker. As a left-handed woodworker, I can relate to the many challenges of handplaning at a workbench. The sliding tail vise, when installed on either side of the workbench, addresses any concerns with direction of handplaning. Handplaning will always be directed away from the vise. Left or right-handed woodworkers can now work equally well at a workbench.
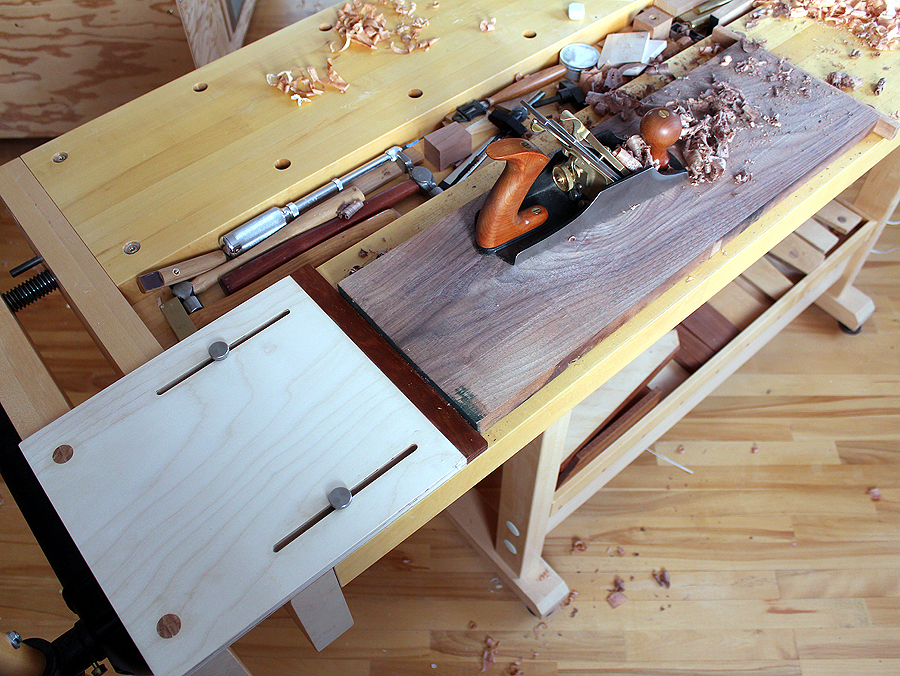
Modifications are included in the plan for a rabbeted ledge along both long edges of the sliding tail vise. This allows plow and rabbet planes to better clear the workpiece. The rabbeted ledge is seen in the image below. Two rabbeted ledges allow the sliding tail vise to be mounted on either side of the workbench top. The narrow, single dog version can be seen in the top (2) images. Build instructions, CAD diagrams and hardware list for both the wide (two dog) and narrow (single dog) sliding tail vise are included in plan.
Sliding Tail Vise Plan $14
I have been immersing myself into the world of Kumiko over the past year. The intricate patterns or motifs draw you in and the possibilities are endless to the application of the panels in furniture. Another interesting fact is that Kumiko is a traditional Japanese form of craft. To be able to recreate the same motifs that were designed centuries ago intrigued me. At first I thought the delicate technique would be difficult to achieve since the scale of the components in Kumiko is quite small. Kumiko can be intimidating to a novice. Upon further research, I decided to further explore and experiment. As a woodworker, I enjoy challenges and this would be yet another in a long string of challenges over the years. How else do we grow as woodworkers if we don’t embrace new skills and techniques.
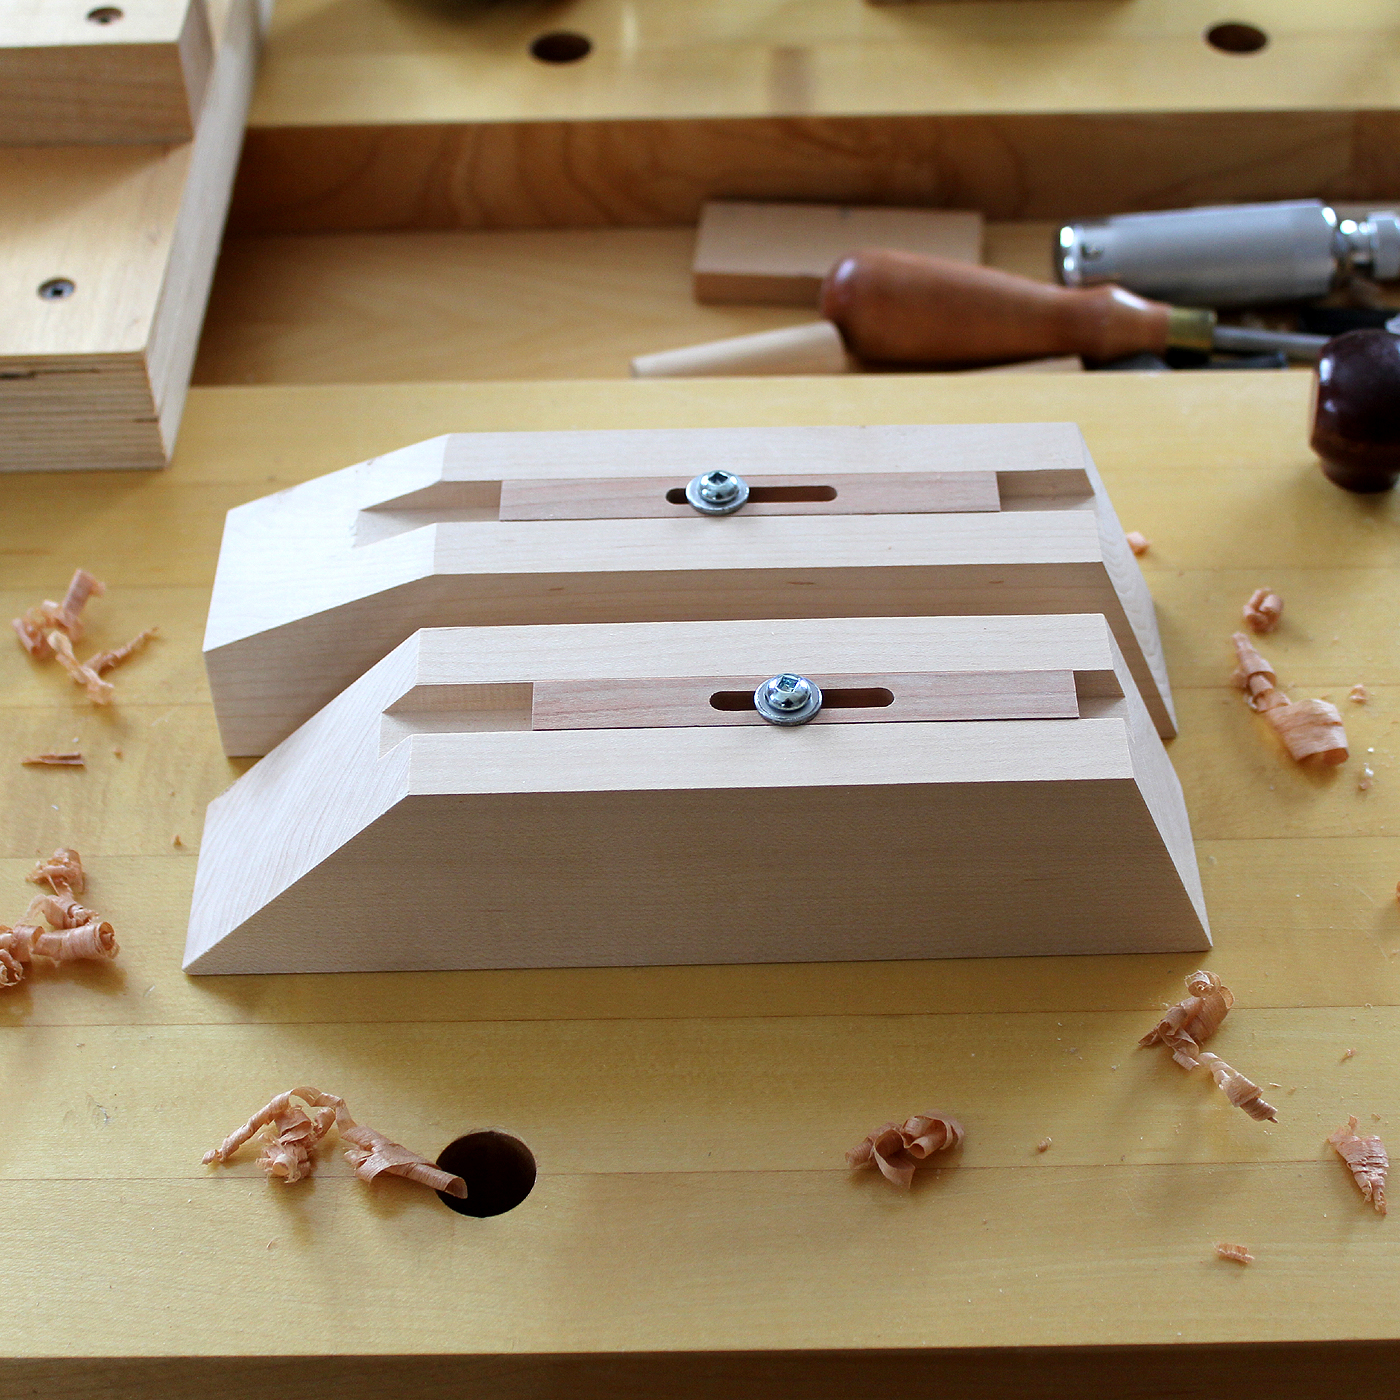
So one thing led to another and after a few early failures and struggles, I was successful at mastering the Kumiko process of creating intricate lattice-like patterns within a grid or frame. The prerequisite to even beginning Kumiko is to create a couple of guide blocks. The blocks have preset bearing surfaces shaped at various angles. These angles are instrumental to the components within a Kumiko grid. Through the judicious application of a chisel to the miniature Kumiko components, precise angles that interlock the pieces are shaped or beveled. The process is methodical but enjoyable. Small or large grids of components can be created, where time and patience are the only variables.
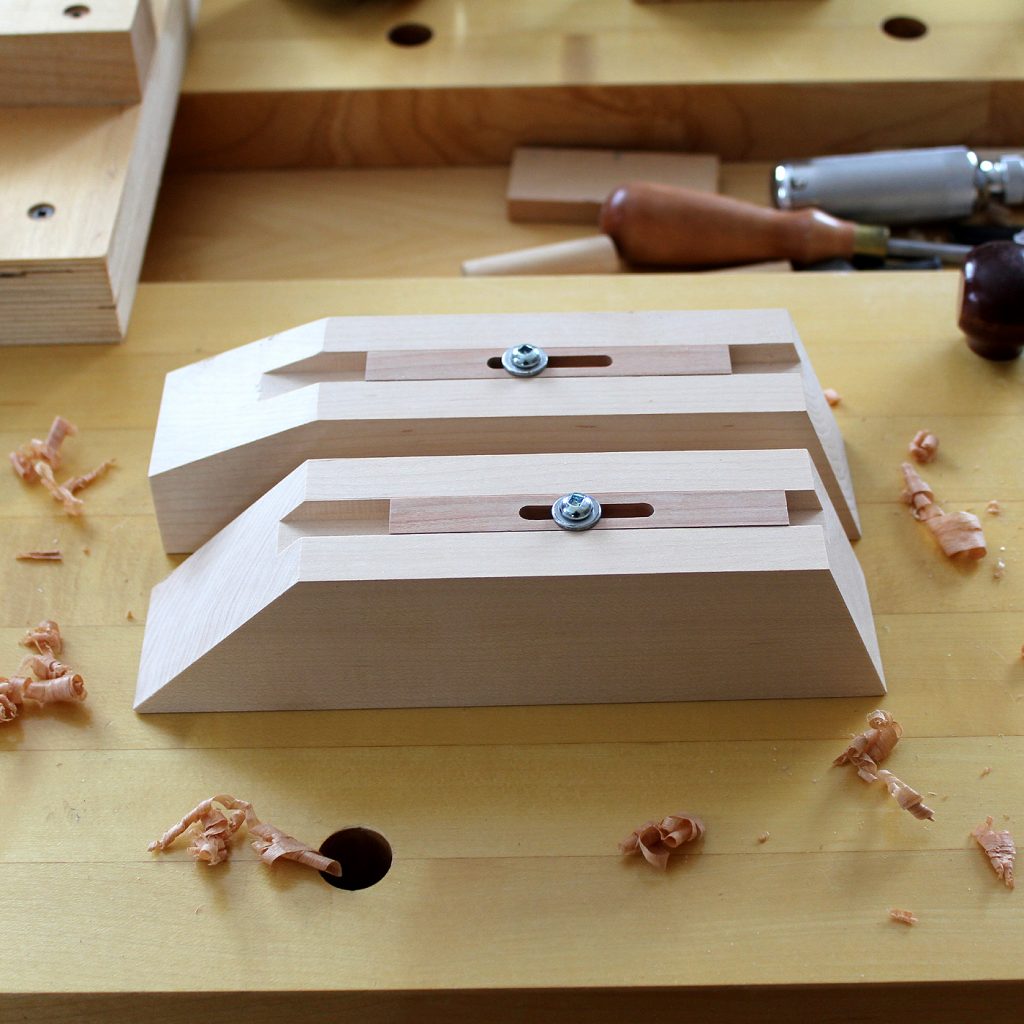

Most recently, I packaged together several instructional video on how to make Kumiko. The videos show the detail involved and how to create the grids from rough blanks. Other videos focus on creating the small parts within the grid forming the intricate patterns. I also realized that creating the guide blocks is a prerequisite to Kumiko and this step kept many people from experimenting with Kumiko. So other videos describe how to create guide blocks in detail (from rough blanks). Guide Block plans are also included in the Kumiko Course.
Link: Kumiko Course (WoodSkills)
Link: Kumiko Course ( Refined Edge Design)
– Kumiko Course is streamed
– over 2 hours includes Guide Block plans
– modules can be followed in any order
– modules can be stopped and repeated
– seven modules included in $40 price
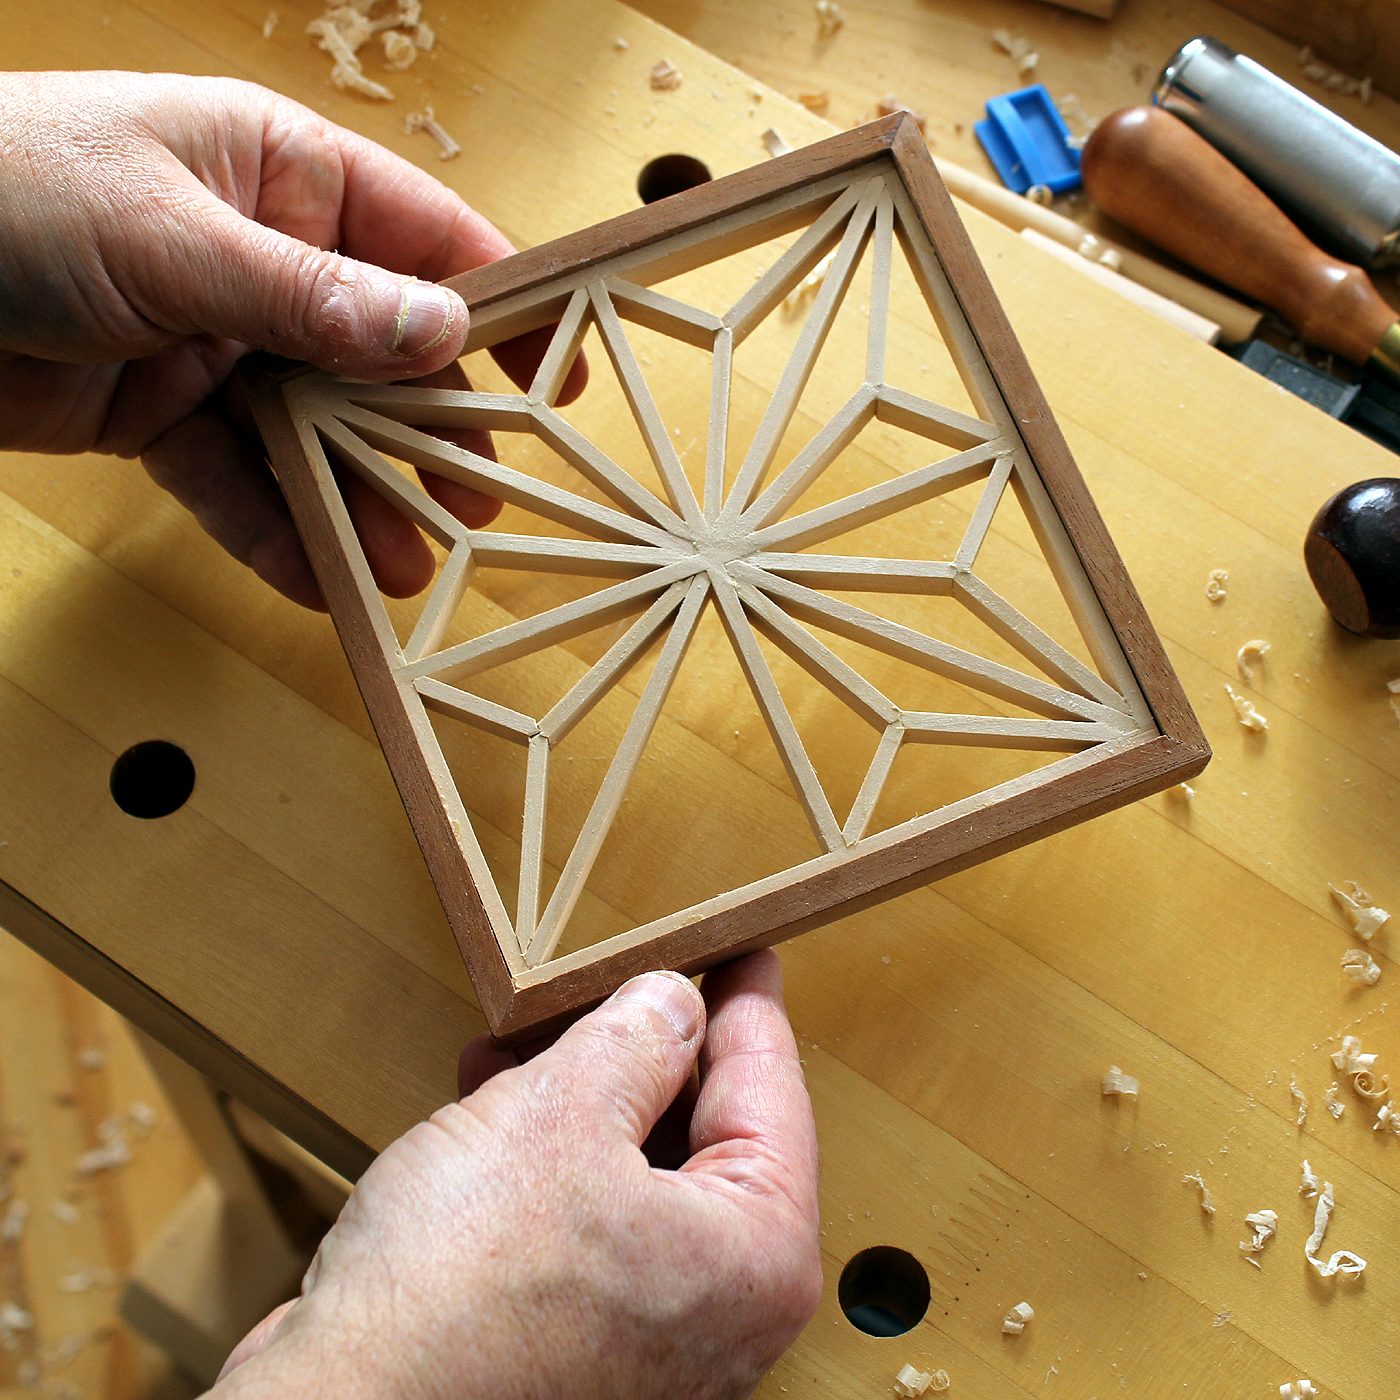
In this video course, the traditional Japanese craft of Kumiko is discussed. The course introduces you to Kumiko and its history. Kumiko has origins in Japan and is used extensively in homes and furniture. The video segments guide you through the creation of a Kumiko panel. The pattern or motif used in the course is the asa-no-ha pattern, a more common pattern. The course is composed of seven video segments, a Kumiko article from my recent book, and plans for (2) guide blocks. Guide blocks are an important tool in creation of Kumiko panels. Each step of creating a panel is covered from preparing a rough blank to final assembly. Many techniques and best practices covered.
The Kumiko panels in this course are created using hand tools, although some machinery is used in the initial wood preparation. The hand tools consist of a wide chisel, a smoother plane and a block plane. Follow me as I describe the steps involved in creating a striking Kumiko panel you can incorporate in a piece of furniture, wall panel, or Shoji screen.
The following topics are covered in this 7 part Kumiko course:
1. Introduction and history of Kumiko
2. Overview of Kumiko panel components
3. Wood prep for Kumiko components
4. Detailed Kumiko creation process
5. Detailed video to create (2) guide blocks
6. Techniques to simplify Kumiko making
7. Incorporate a Kumiko panel in furniture
Tips and techniques acquired over several months of creating Kumiko panels are shared in this course. You will be comfortable at tackling your first Kumiko panel after this course. All steps are covered in great detail.
START WOODWORKING (eBook, 115 pgs., $15) included with this course
Kumiko Course. HD Video modules + Guide Block Plans $40
Norman maintains a blog of ongoing projects in his studio at Pirollo Design Blog as well as having written and published six books in recent years. Some of the books and magazines where authors furniture, work methods and philosophy have been featured:
Craftisian Interview (Norman Pirollo)
HackSpace Magazine – Make With Wood April 2020
Woodworking: From Design To Making (New Art Press)
The Wood Artist: Creating Art Through Wood (New Art Press)
From Hi-Tech to Lo-Tech: A Woodworker’s Journey (NAP)
Start Your Own Woodworking Business (New Art Press)
Rooted: Contemporary Studio Furniture (Schiffer)
IDS15 (Studio North)
Canadian Woodworking magazine Jan. 2015
Our Homes magazine Fall 2014
IDS14 (Studio North)
NICHE Magazine Winter 2013
Fine Woodworking Magazine 4 Bench Jigs for Handplanes
Fine Woodworking Magazine Essential Shopmade Jigs
Woodwork magazine
Wood Art Today 2 (Schiffer Books)
500 Cabinets ( Lark Books)
Studio Furniture: Today’s Leading Woodworkers (Schiffer)
Canadian Interiors Design Source Guide
Ottawa Life magazine (Profile,work) 2012
Panoram Italia magazine
Our Homes magazine
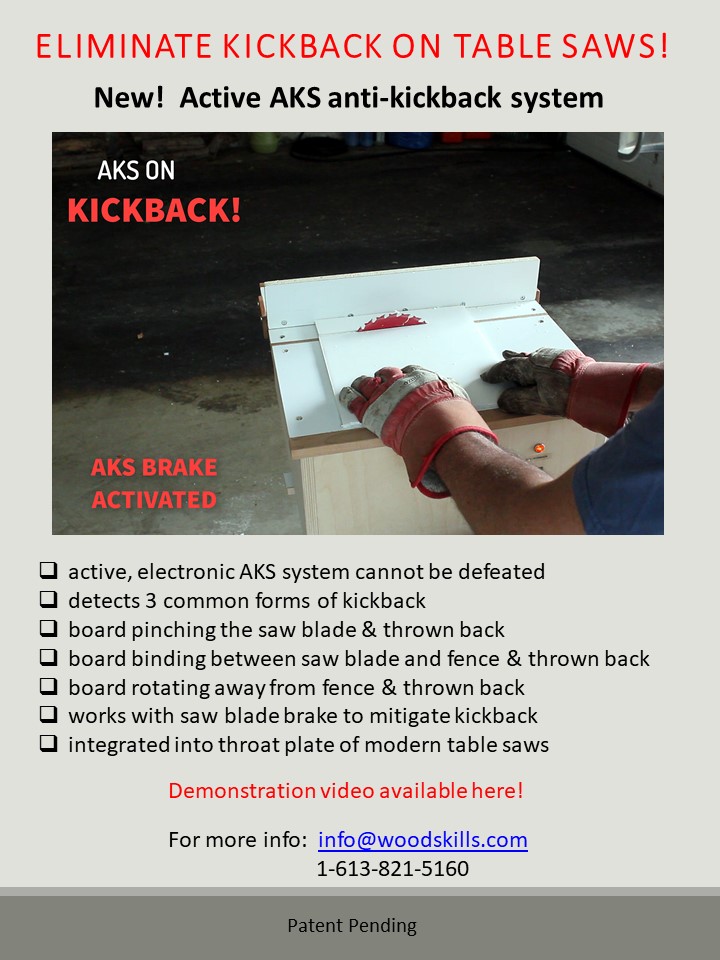
Filed with the USPTO recently, so I can disclose it. A project important to me as I have experienced kickback a few times and made it a mission to fully understand it. New AKS system addresses table saw safety and the pervasive problem of dangerous and violent table saw kickback. The AKS system actively mitigates kickback. It electronically senses the 3 common kickback conditions and activate a braking system. The table saw in video is a purpose-built prototype for testing the AKS system. A considerable amount of time went into development of this technology with several unforeseen problems. As typical of any invention, partway through and the complexity can be overwhelming. So after a few setbacks, the results looks positive. The AKS system can be integrated into any new table saw. Testing has exceeded expectations!
After many weeks of writing, editing and photography. the new book is complete and published. The premise for this new book is to provide insight into the craft of woodworking and more specifically the making of furniture. The book is composed of sections, each of which is critical to your woodworking journey. Acquiring a well-rounded knowledge of woodworking can be accomplished through vocational schools and part-time studies. Looking back at the decades of involvement in this craft, I often ask myself if I would have done anything differently. The answer is almost always no. So much has changed since I began woodworking in the mid 1980’s. It is difficult to compare resources available today to what was available then. Learning is more convenient today.
Although home computers existed then, the Internet connectivity we enjoy today had not been established. Acquiring skills and knowledge in the last century involved taking classes, reading books or mentoring with a knowledgeable woodworker. Today, there is a wealth of knowledge available through the Internet. What is lacking however, is the hands on aspect of the craft of woodworking. Learning involves making. I know of no one that learned a craft by simply reading and not applying themselves. It is critical to embrace the often lengthy learning curve involved. The book includes articles focusing on aspects of woodworking in a contemporary world.
The book is composed of four sections. Each section contains articles that a woodworker or furniture maker will need to embrace as they evolve. The first section introduces basic woodworking skills. A large part of this book is devoted to hand tool skills. Although machines are combined with hand tools in my furniture making, I advocate that woodworkers should embrace hand tools. It is necessary to form a connection between hand and wood medium prior to seeking efficiency and a production mindset. Hand tools often get a bad rap as being slow and tedious. Instead, what hand tools offer is control, dexterity, quiet and a close connection to the wood medium. In a one person furniture making studio, hand tools offer a healthy balance to the use of machines.
The second or furniture maker section provides a glimpse into furniture making as a vocation. Woodworkers often aspire to become furniture makers or go into business for themselves. As a furniture maker for several decades, I share knowledge and insight acquired over the years. Some articles will inspire you to take the leap and become a full time furniture maker. Topics in the section include setting up shop, the furniture maker journey, the furniture maker lifestyle, social media and insight into diverging from furniture making to other forms of woodworking.
The third section is devoted to furniture design. Furniture design forms a large part of woodworking. Often, it is necessary to design a complete piece of furniture or modify an existing design. The design process has evolved over past decades with the advent of computer software (CAD). Pencil and paper are now combined with CAD. Articles include how to create and refine a design, the concept of form & function and how it applies to furniture.
The fourth or advanced woodworking section delves into techniques to further your woodworking and furniture making. Veneering techniques, both manual and vacuum veneering are described. The process of creating a jewelry box is discussed in one article. The Japanese art of Kumiko is described in a final article.
In this 16 part video class, the design and build of the striking Krenov-inspired display cabinet above is discussed. The contemporary styled display cabinet features veneered sides and doors. The veneers selected are highly figured although they can be substituted with alternative veneers. The frame and panel back adheres to the Krenov principle of properly finishing the back of the cabinet. James Krenov is widely known for his classic cabinets on stand as well as the incredible attention to detail he brought to furniture making. He also brought a unique philosophy and vision to furniture making of which I heed and practice. A large part of this veneered display cabinet has been created using an assortment of hand tools although some machinery is used in the initial wood preparation stage. Follow me as I describe the steps involved in creating a masterpiece veneered cabinet on stand.
The following topics are covered in detail in this 16 part design and build class:
Each video segment addresses one component of the cabinet build. The design process and methodology behind the build are discussed. This is not simply a class on how to build a cabinet on stand. The class will inform you of the design process that James Krenov used in his work. As an ardent follower of James Krenov, the techniques used in this cabinet build closely follow those of James Krenov. Discussions and demonstrations describe how the design of this display cabinet originated and the design considerations in its build. Information on wood selection and preparation as well as joinery used are covered in detail. Techniques acquired over several years of creating this style of cabinet are shared in this class. The process of creating + applying veneers is covered as well as discussion on installation of knife hinges.
Includes 16 separate video modules. Each video module addresses a component of the cabinet build. Detailed video sequences and methodology on how to build this display cabinet are included when you purchase the cabinet build class.
– Separate Introduction module
– 16 video modules from design, veneering, edging, joinery, back panel
– Video modules can be followed in any order and stopped or repeated at any time
– All 16 video modules (2.7 hours) included in the single $50 price
– Complete set of plans included
Cabinet Build Class $50
Includes corresponding display cabinet plan. Over 35 detailed computer designed illustrations (CAD) on building display cabinet included with Cabinet Build Class. Includes detailed photos and information.
 Norman maintains a blog of ongoing projects in his studio at: Pirollo Design Blog as well as having written and published four books in the past year. Some of the books and magazines where authors furniture, work methods and philosophy have been featured:
Craftisian Interview (Norman Pirollo)
HackSpace Magazine – Make With Wood April 2020
Woodworking: From Design To Making (New Art Press)
The Wood Artist: Creating Art Through Wood (New Art Press)
From Hi-Tech to Lo-Tech: A Woodworker’s Journey (NAP)
Start Your Own Woodworking Business (New Art Press)
Rooted: Contemporary Studio Furniture (Schiffer)
IDS15 (Studio North)
Canadian Woodworking magazine Jan. 2015
Our Homes magazine Fall 2014
IDS14 (Studio North)
NICHE Magazine Winter 2013
Fine Woodworking Magazine 4 Bench Jigs for Handplanes
Fine Woodworking Magazine Essential Shopmade Jigs 2009
Woodwork magazine
Wood Art Today 2 (Schiffer Books)
500 Cabinets ( Lark Books)
Studio Furniture: Today’s Leading Woodworkers (Schiffer)
Canadian Interiors Design Source Guide
Ottawa Life magazine (Profile,work) 2012
Panoram Italia magazine
Our Homes magazine
Craft Journal
The idea was hatched a year or so ago. A new magazine catering to the discerning, fine woodworking enthusiast. It was an idea that slowly developed and at one point became a reality. So a small team and I have been working at this and are happy to announce that the latest issue of WOODSKILLS woodworking and furniture making magazine is now available. Some of the features in this Furniture Maker Edition include furniture maker articles, profiles of accomplished furniture makers, best studio practices, contemporary furniture design, gallery, vacuum veneering, Moxon vise build, sharpening + woodworking strategies, wood selection strategies and social media for furniture makers. The terms studio and workshop are used interchangeably throughout the magazine. WOODSKILLS is a semi-annual publication, published twice yearly in late spring and fall.
As a follower and practitioner of James Krenov style of work and methodology, both hand tool and some machine techniques are included. Although the vast majority of articles refer to hand tools, machinery is not excluded. I find this to be a more realistic approach in this day and age. Machines can do the grunt work whereas hand tools are used to create joinery, shape and finesse furniture components, smoothing surfaces, etc. Advertising is at an absolute minimum and consists of curated advertising, a term gleaned from the art world. Advertising must reflect practices and products that our readers and the team at WOODSKILLS could use or include in their own workshops and studios. Available through woodskills.com (digital) or Amazon (print version) or Blurb (premium print version).
Furniture Designer + Maker Profiles
Darrell Peart, Craig Thibodeau, Jan Lennon, Brian Greene
Workshop Setups & Best Practices
Furniture Maker Articles
Vacuum Veneering
Furniture Design Gallery
Contemporary Furniture Design
Moxon Vise Build
Sharpening + Woodworking Strategies
Social Media for Furniture Makers
 WOODSKILLS Issue 02 (digital)
WOODSKILLS Issue 02 (standard print)
WOODSKILLS Issue 02 (premium print)
Instagram: woodskillsmag
Twitter: WoodSkills
Facebook: WoodSkills
Web Site: www.woodskills.com
Not long ago, woodworking was considered to be in a downward spiral of diminishing followers and practitioners. The pundits were proclaiming the demise of woodworking as a hobby and how fewer young people were taking up woodworking and interested in building their own furniture. Why bother, with so much commercially mass-produced furniture available at reasonable prices. In addition, style trends come and go and being saddled with an out of style furniture piece became an issue. Staying on top of style trends has become instilled in us through the proliferation of interior design and renovation shows on television. Furniture has slowly become a disposable or recyclable object instead of a heirloom piece to be handed off to future generations. When you think about it, this trend flies in the face of environmentalism and celebrates the creation of even more trash. Out of all this doom and gloom rose the maker movement.
This younger generation of makers has slowly begun to appreciate the creation of things with their hands. The increased waste going to landfills brought awareness to the never-ending cycle of consumerism. Let’s face it, people are much less likely to throw out something they have created themselves. The virtues of designing and making an object has returned people to their heritage of being self-sufficient, inventive and to not be reliant on industrially produced goods. Through handcrafting, people could imprint their own mark on an object and customize the design to reflect their own aesthetic. The current maker movement is simply an evolution of the arts & crafts movement which has defined creative people for countless decades. The maker movement is an updated form of the craft movement where new materials, technology and ideas are incorporated into craft.
 A spin off of the maker movement has been the return to creating one’s own furniture. In fact, a large and growing segment of the maker movement revolves around designing and building furniture. The best part of this is how young people have once again embraced the creation of their own furniture for reasons different than in the past. In the past, the younger consumer could not afford furniture so instead built their own. Today, the reasons for building your own furniture revolve around handcrafting, channelling creativity into a furniture design, and the process of creating an object. It isn’t so much about the result but the experience of getting there. Younger makers today are turning furniture design on its ear by shunning age old design constructs and paradigms, and instead embracing a fresh outlook on furniture design.
 In the past, bolder and radical furniture designs were the product of reclusive studio furniture makers with limited means of communicating with one another. Today instead, younger makers are informed primarily through social media. Practicality and functionality of design have become the new criteria for furniture design. The furniture of this new generation of makers embraces universality and democratizes design. Social media plays an important part in design today within the maker movement. Through social media, furniture designs have become instantly available to both inform and influence other makers. Through social media, makers can quickly adapt an existing design to their own aesthetic or style. The process of fleshing out designs is considerably accelerated through social media and democratization.
 So from what I observe, things are looking up for furniture making and woodworking in general. There is a resurgence occurring in this decades old creative outlet. A new awareness of the virtues and benefits of creating objects using wood as a medium is occurring. I am fairly active on social media and an often awed by radical new furniture designs from this new maker movement. Along with this, the democratization of design will hopefully benefit us all as we can extract elements of shared designs to incorporate into our own work.
Norman Pirollo
WOODSKILLS Magazine
www.woodskills.com
@woodskillsmag
Norman Pirollo, successful founder of White Mountain Design, White Mountain Toolworks, WoodSkills, Refined Edge Design and Pirollo Design; guides you through the process of starting and setting up your own woodworking business. Learn from an experienced business person in this field. Norman provides the necessary expertise and answers questions about starting your own woodworking business in this information filled book.
A few of the topics covered in the book are:
01. Is self-employment for you?
02. Converting a hobby into a business
03. Part time vs. Full time?
04. Finding a niche for your woodworking
05. Legal considerations of a woodworking business
06. How much space do you need for a woodworking business?
07. What equipment and tools do you need?
08. Finding or creating a market for your woodworking
09. Creating a portfolio of your work
10. Marketing your woodworking on the Internet
11. Woodworking and making furniture on commission
12. Coping with the ups and downs of a woodworking business
13. Separating your woodworking business from personal life
14. Maintaining the passion and motivation
15. Diversifying and Expanding
16. Do you need to hire an additional employee?
17. Technology in woodworking

The authors furniture and wood art are featured in various international books and magazines. His furniture and wood art have won awards both in furniture and art shows. The unique, studio furniture which the author designs and creates can be seen at: Pirollo Design. Norman is also the founder of White Mountain Design, maker of fine jewelry boxes, humidors and wood hand planes since 1996.
Norman also maintains a blog of ongoing projects in his studio at: pirollodesign.com as well as having written and published three books in the past year. Books and magazines featuring the authors furniture, work methods and philosophy:
From Hi-Tech to Lo-Tech: A Woodworker’s Journey (New Art Press)
Start Your Own Woodworking Business (New Art Press)
Rooted: Contemporary Studio Furniture (Schiffer Publishing)
IDS15 (Studio North)
IDS14 (Studio North)
Canadian Woodworking magazine Jan. 2015
Our Homes magazine Fall 2014 IDS14 (Studio North)
NICHE Magazine Winter 2013
Fine Woodworking magazine
Woodwork magazine
Wood Art Today 2 (Schiffer Books)
500 Cabinets ( Lark Books)
Studio Furniture: Today’s Leading Woodworkers (Schiffer Books)
Fine Woodworking Shopmade Jigs 2009 2012
Canadian Interiors Design Source Guide
Ottawa Life magazine
Panoram Italia magazine
Our Homes magazine
Craft Journal
![]()
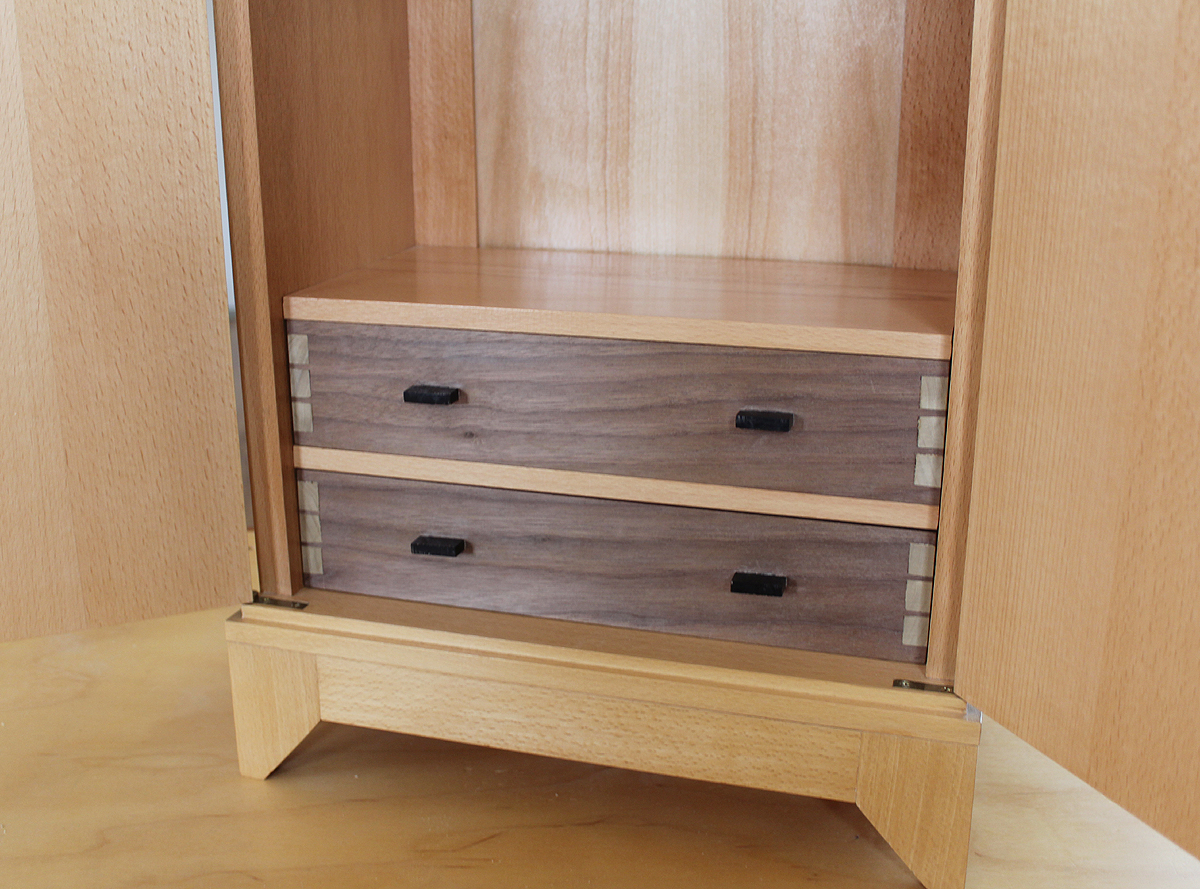
I have a small Krenov-inspired cabinet which I have enjoyed for the most part. The drawers not so much. The cabinet is solid beech but long ago the decision was made to make two stacked drawers with walnut fronts to provide contrast to the beech. I realized at the time that the contrast was not ideal, but for the sake of expediency, went ahead to see if it would grow on me. Well it hasn’t. Another idea at the time was to have through-dovetails to attach the drawer fronts to the sides. This provided another level of contrast and introduced yet another wood to the mix. Overall, I wasn’t pleased. So recently I decided to give the drawers a makeover and replace the drawer fronts with something more aesthetically pleasing and to provide not so harsh a contrast. Pic below of original drawer fronts.
 My first attempt was to use some highly figured veneer I had stored away. It is commercial veneer so very thin. The veneer itself is beautiful, light in color and would make the interior of the beech cabinet pop. First step was to scrape down the surface of the drawer fronts and glued a piece of this veneer to each. Did this successfully and began to create the mortises for the new pulls. However, there is something about commercial veneer that doesn’t sit well with me and I was not able to get past this. The thickness of the material is paper (thick paper) thin and brittle, too fragile for my taste.
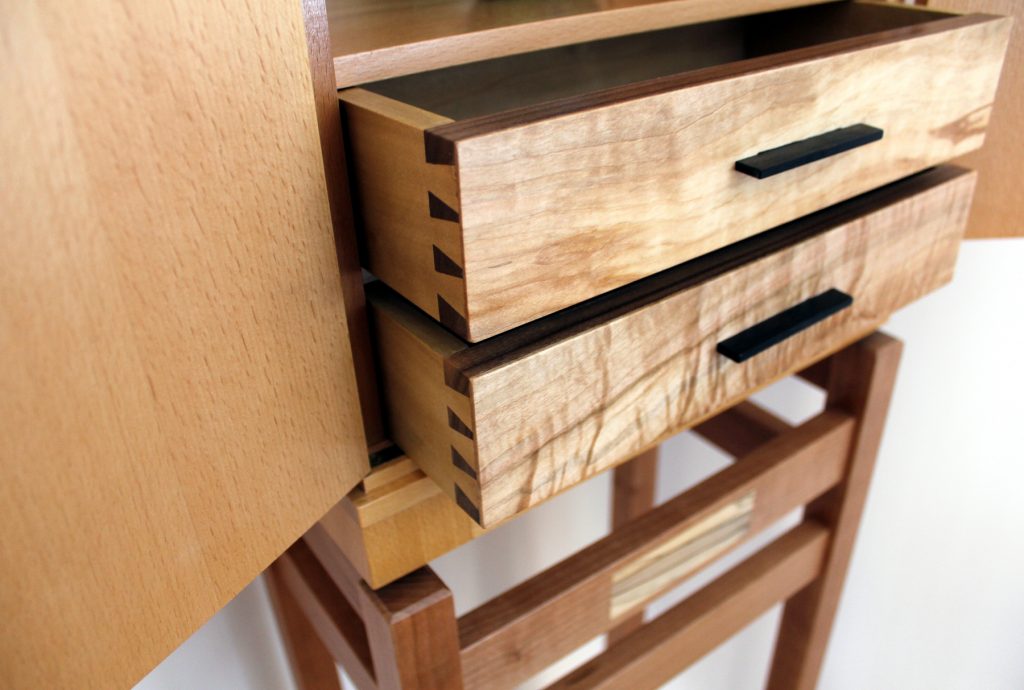
Since it would be necessary to scrape the surfaces to get a polished aesthetic, this was entirely not possible with this thin, brittle veneer. I typically use shop-sawn resawn veneers in my work. Instead, I created some band-sawn ambrosia maple with beautiful figure between 1/16 and 3/32 in. thick. I decided to go ahead with this shop-sawn veneer instead. Next I band sawed the drawer front to the thickness of this shop-sawn figured ambrosia. Applied the veneer to the drawer fronts and I could not be more pleased with the outcome. Shop-sawn veneers are more workable and forgiving with hand tools.
I then created two new wide pulls out of blackwood. A single pull instead of two in the original drawer front. Also decided on eliminating the upper and lower shoulders of the pulls to be able to have them thinner. This would not take away from the figured fronts as much. This step introduced a level of risk in creating the mortises, since there is no drawer pull shoulder to rely on to hide an imperfect mortise.
 After some judicious mortising using chisels and a mallet,, then some paring, the drawer pull mortises were created as seen above. The most critical part of this step is to remove the top-most layer of wood; it is so easy to tearout the surrounding wood if the chisel cuts are not clean. Then it is simply a matter of cutting and paring to the correct depth of the tenon for the drawer pull. Contemporary-styled blackwood pull temporarily inserted below.
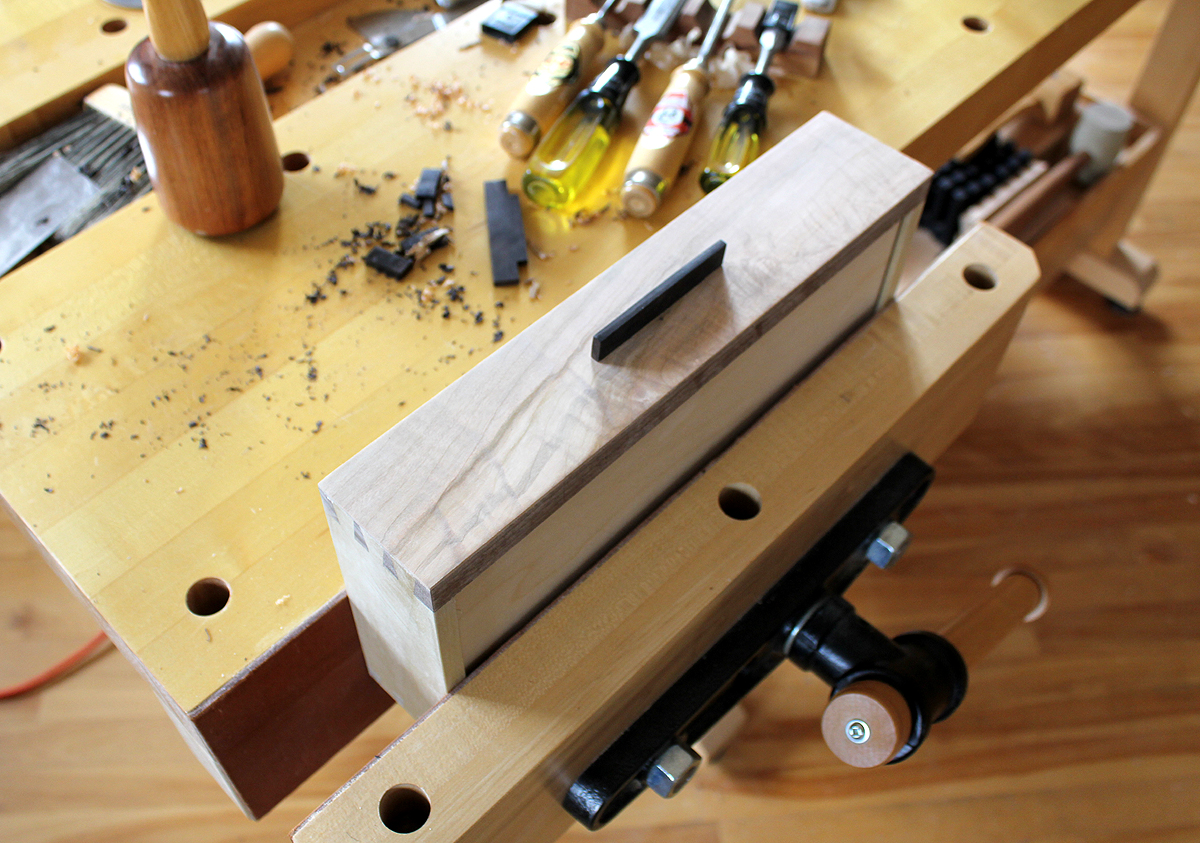 So very happy with the outcome and will be completely replacing the doors of the cabinet next. I intend to use veneered figured wood for the doors, similar wood (Ambrosia Maple) as the drawer fronts. I plan to write a detailed article about this in the next issue of WOODSKILLS Magazine
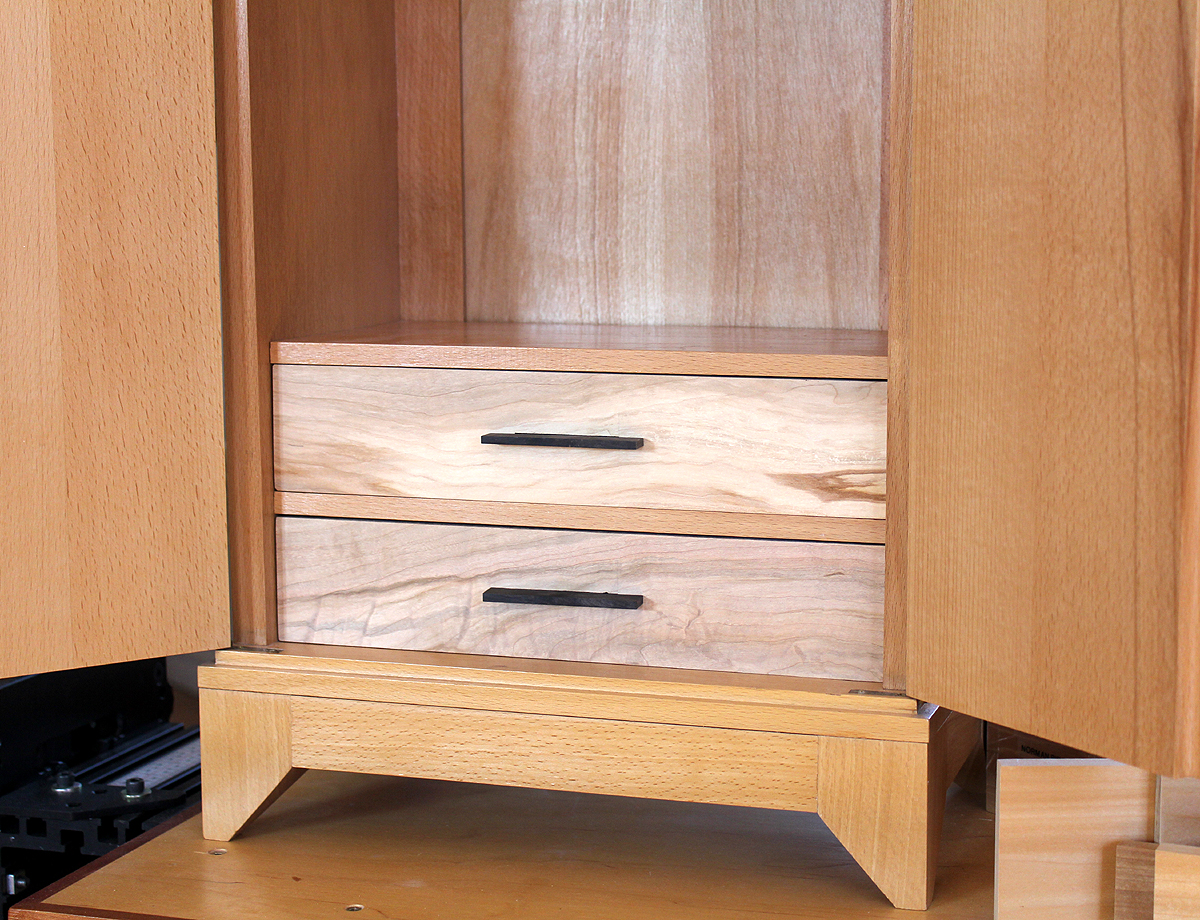
The idea was hatched a year or so ago but other projects came first. A new magazine catering to the discerning, fine woodworking enthusiast. It was an idea that slowly developed and at one point became a reality. So a small team and I have been working at this since the month of January and are pleased to announce that the latest woodworking and furniture making magazine WOODSKILLS is now available. Some of the features in the magazine are articles on hand tool use and techniques, profiles of accomplished woodworkers and furniture makers, best studio practices, contemporary furniture design, gallery, tool discussions. The terms studio and workshop are used interchangeably throughout the magazine.
As a follower and practitioner of James Krenov style of work and methodology, both hand tool and some machine techniques are included. Although the vast majority of articles refer to hand tools, machinery is not excluded. I find this to be a more realistic approach in this day and age. Machines can do the grunt work whereas hand tools are used to create joinery, shape and finesse furniture components, smoothing surfaces, etc. Advertising will be at an absolute minimum and consists of curated advertising, a term gleaned from the art world. Advertising must reflect practices and products that our readers and the team at WOODSKILLS could use or include in their own workshops and studios.
Instagram: woodskillsmag
Twitter: WoodSkills
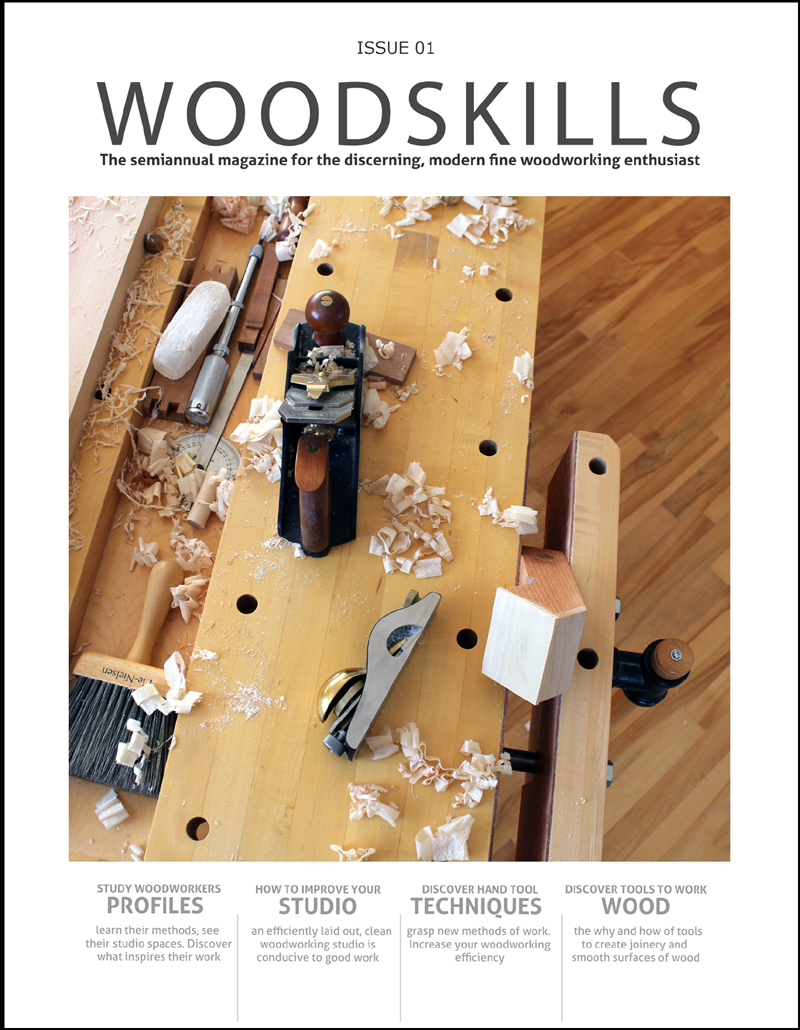 Available here: WOODSKILLS Issue 01 Magazine
After completing and successfully testing the portable board jack in the previous post, I decided to continue on with workbench workholding accessories. At this point, two clamping attachments came to mind. The first, an edge dog, alternatively known as a bench puppy, was modelled after a College Of The Redwoods derived design. This particular design was gained from a Timothy Coleman article on this type of workholding device, also derived from a College Of The Redwoods design.
The premise of the edge dog is to use both the edge of a workbench top and one dog hole to hold a board on edge. This is performed through a unique design that hangs off the edge of the workbench top. When used in conjunction with a tail-vise, the edge dog excels at clamping the free end of a long or wide board along the edge of a workbench for jointing or other bench operations.
The edge dogs are customized to the spacing of the dog holes on a workbench, this would be the distance from the edge of the workbench to the leading row of dog holes. The measurement I refer to can be seen in the following images. I applied a leather face to the edge dogs and also drove a reinforcing wedge into the 3/4 in. dowel. The edge dogs are a combination of beech and maple, essentially what I had lying around in these dimensions.
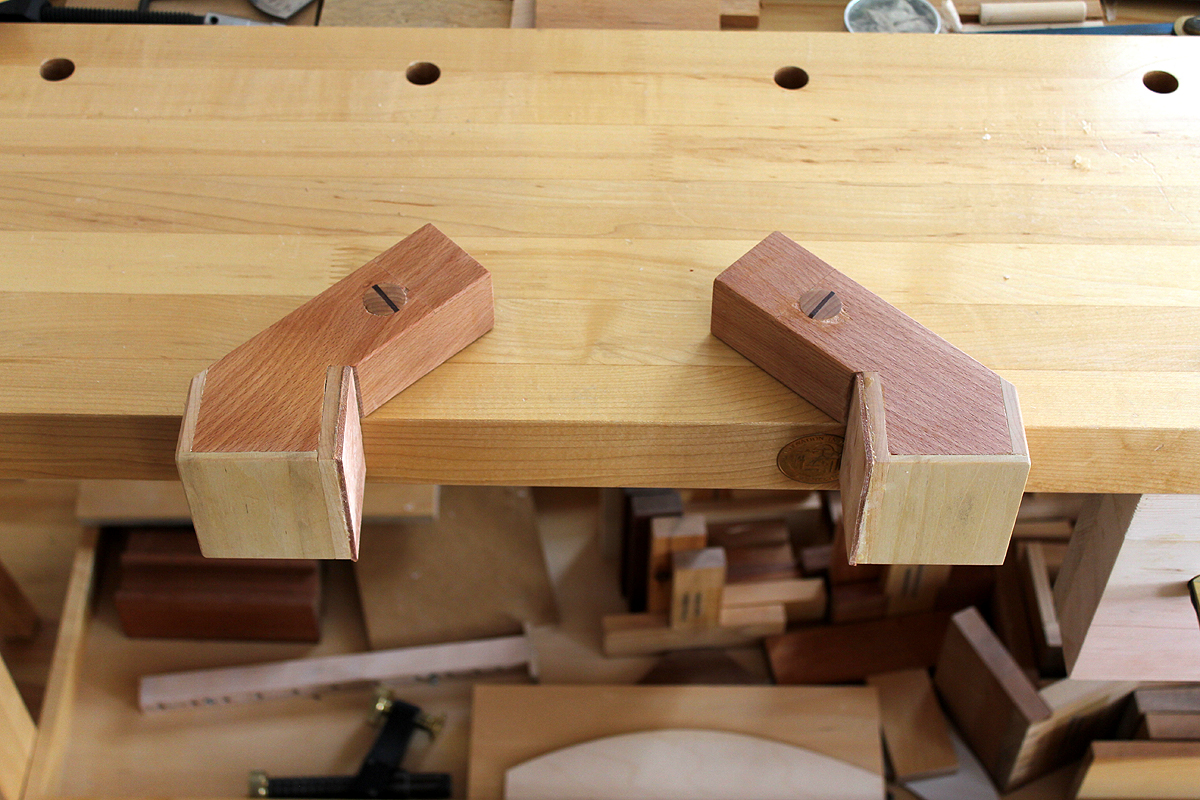 A good example of how an edge dog can be used to hold a board on edge can be seen in the following image. One end is held by a edge dog whereas the other end is an add-on to a twin-screw vise which I discuss next. Instead of clamping a board to the surface of a workbench, the edge dog is used to clamp the board along the workbench edge and therefore at a more reasonable and lower height suitable for handplaning. Having a pair of these edge dogs allows either side of the workbench to be used. The edge dogs are created with opposing configurations as shown above.
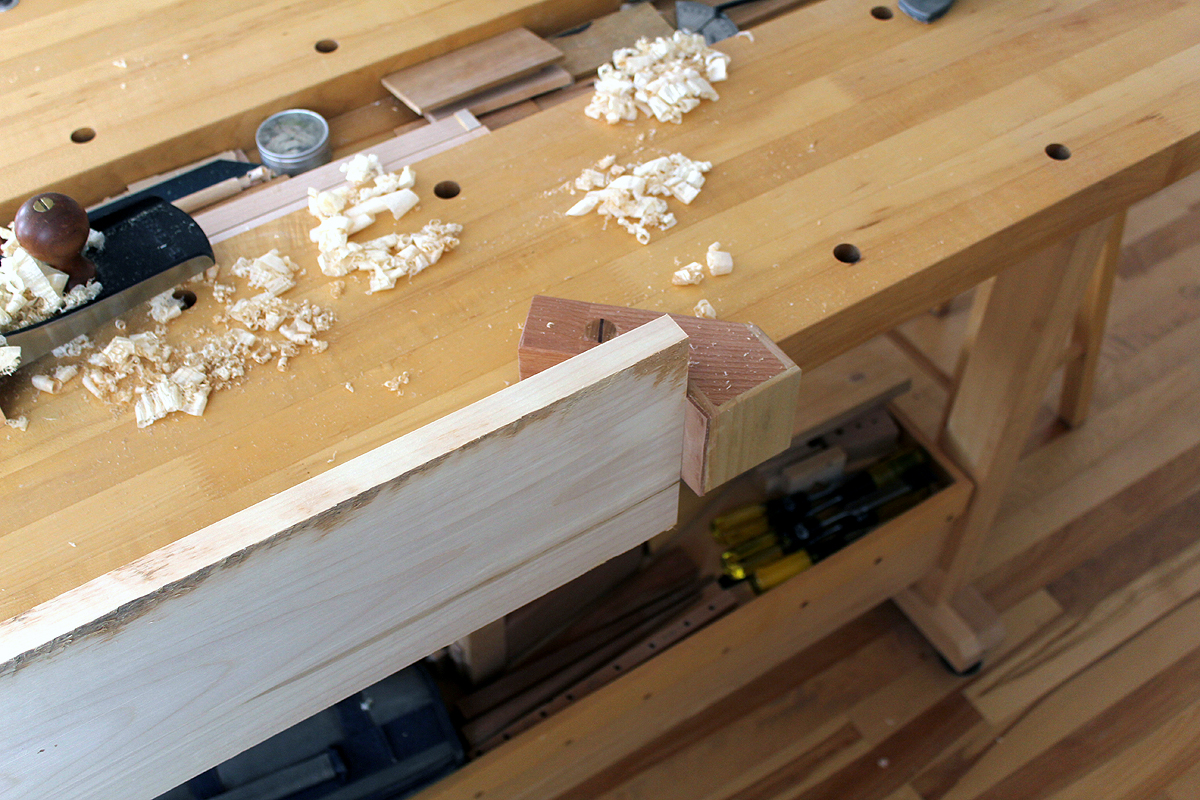 My current workbenches do not incorporate dedicated tail vises. In place, I use a Veritas Twin-screw vise which performs as a tail vise when clamping boards on their face. When it comes to clamping boards on edge, the twin-screw vise can also be used along with bench dogs. The edge of the workpiece would be then sitting on the workbench top. However, this raises the height of the board considerably and is not very conducive to handplaning or jointing an edge of a board. Ideally, the edge of a board should be slightly higher than the workbench surface to effectively perform handplane operations. With this in mind, I created this outboard add-on to the twin-screw vise which extends the width of the vise movable jaw past the edge of the workbench.
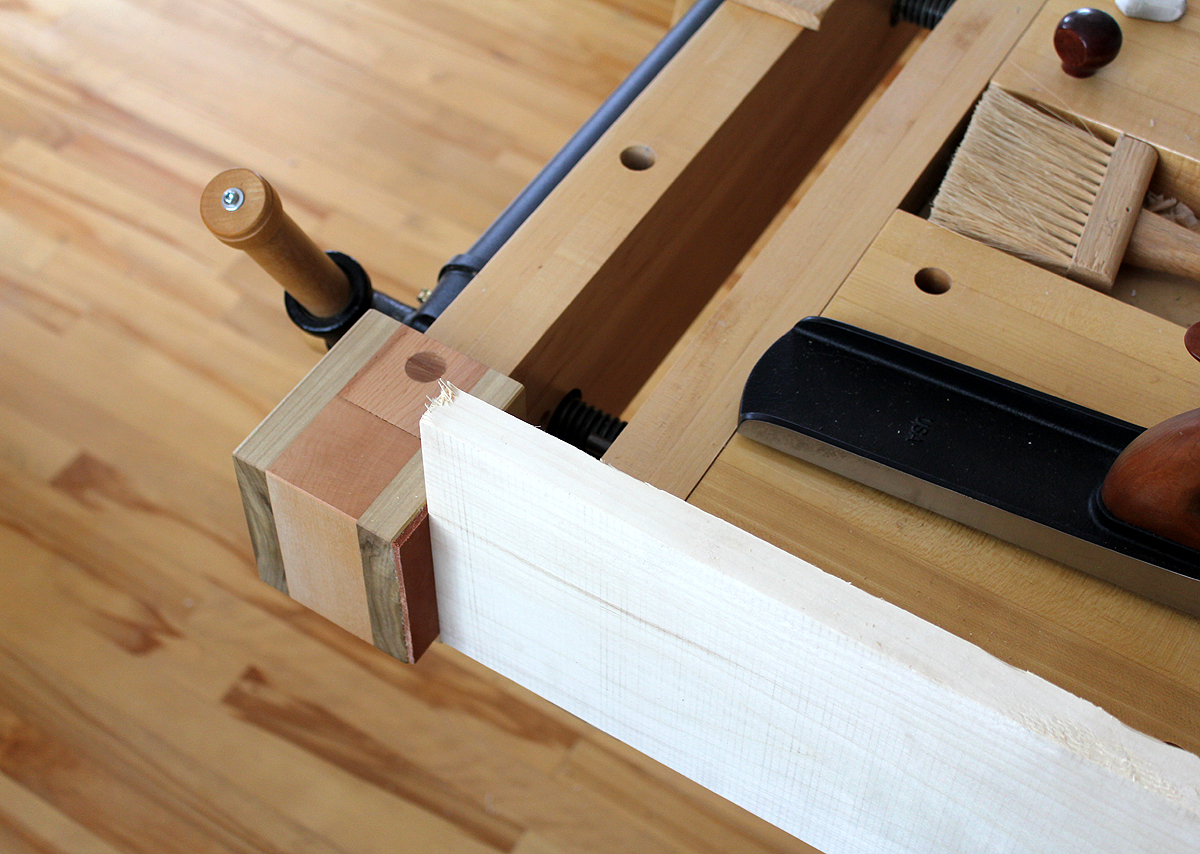 Shown above, this newly designed outboard add-on accessory is an addition to the twin-screw movable jaw. In effect, the vise now becomes an enhanced tail vise capable of clamping boards on edge along the side of a workbench. The clamping is done in conjunction with the previously mentioned edge dog. Images of a board being clamped between these two accessories are shown below.
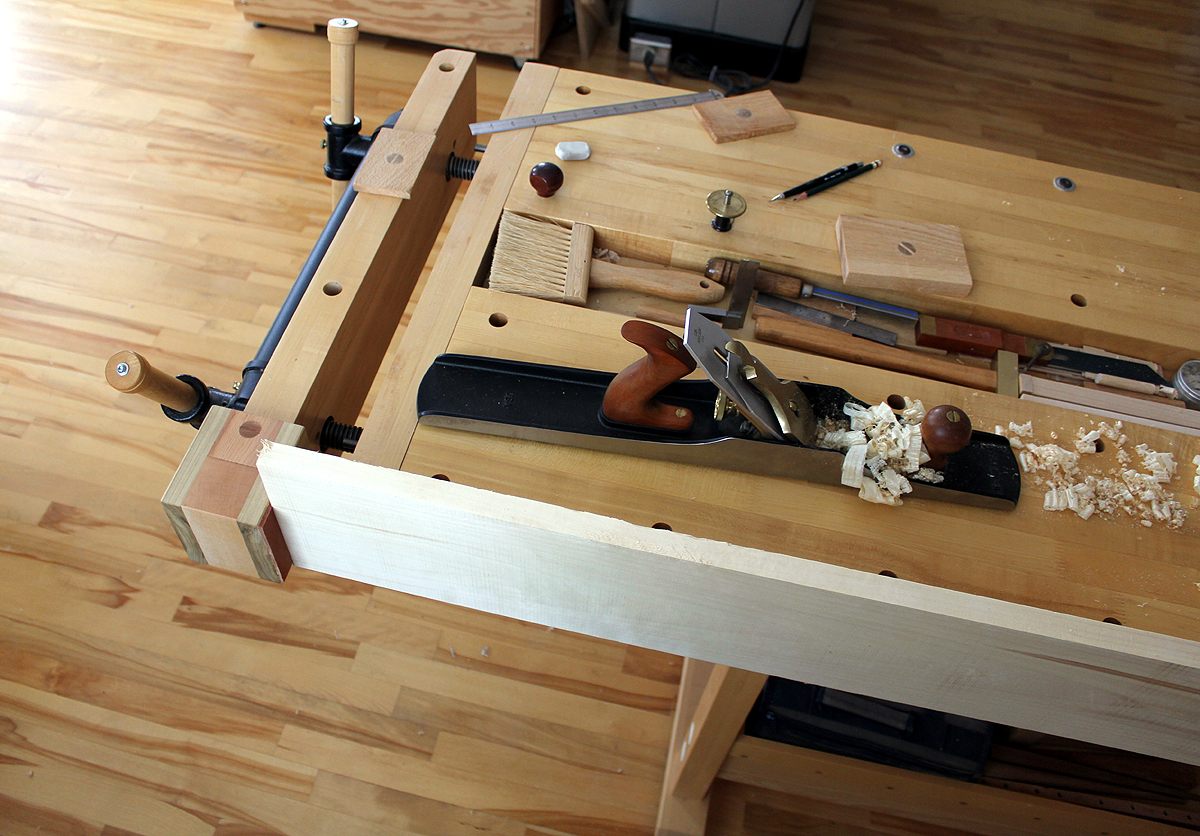 In these photos I am jointing the edge of a white ash board. I was surprised at how tightly the board is clamped with minimal tension applied to the twin screw vise. The friction from the leather pads contribute to this as slightly more tension was necessary before applying the leather pads. The outboard extension to the twin-screw vise is removable and can be adapted to either side of the twin-screw vise. I am left-handed so having it located to the right of the vise as shown, is more practical. For right-handed use, the opposite edge of the workbench would be used for jointing. As an added bonus, there is no racking of the twin-screw vise regardless of the clamping pressure I apply to the outboard extension.
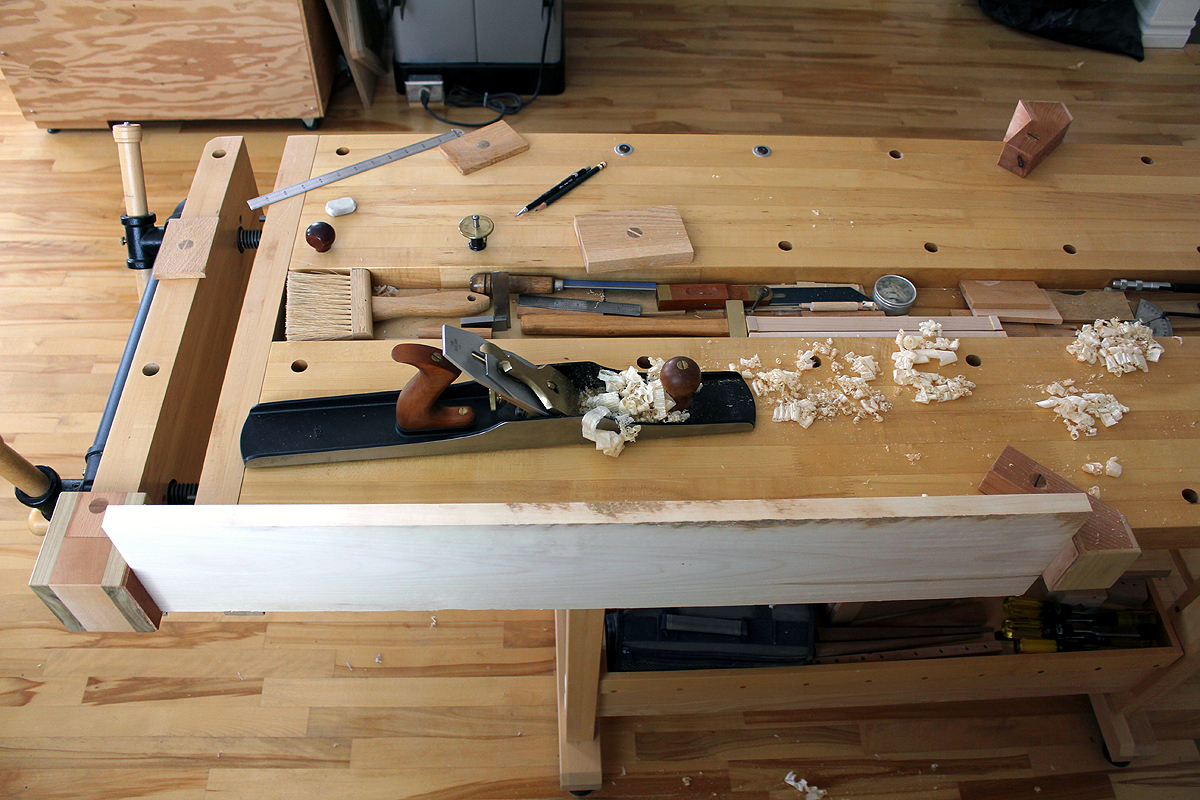
Soon after completing the Moxon Vise project and creating the illustrated drawings, build steps, images, video… I decided to work on a few other workbench accessories.
Workbench accessories – any workbench add-ons that facilitate the holding and clamping of boards or panels. Boards or panels can be mounted on their edge and along their length. You get the idea…
Workbenches can be large in size, massive in weight and beautiful looking but their ability to hold and clamp boards is one of their most important criteria. So holding or clamping a long, wide board along its length can be a challenging tasks of a workbench. In an earlier workbench I incorporated a sliding board jack that worked in conjunction with the face vise. This has and continues to work well since I had built this workbench from the ground up and allowed for the addition of the sliding board jack. With two of my newer slab-type workbenches, adding a sliding board jack was much more of a challenge. I did not want to modify the workbenches or drill screw holes through the tops. Adding an apron or skirt with dog holes along the length of the workbench top was an option, but this involved modifying the workbench itself.
Enter the portable board jack. I designed it to easily attach to the underside of a slab-type workbench top where it serves to support the free end of a long plank or board. It can either be left attached to the workbench or removed when no longer necessary. It can also be moved across the length of the workbench, relocated to the opposite side of a workbench, or moved to another workbench. The nice part is no modifications are necessary to the workbench.
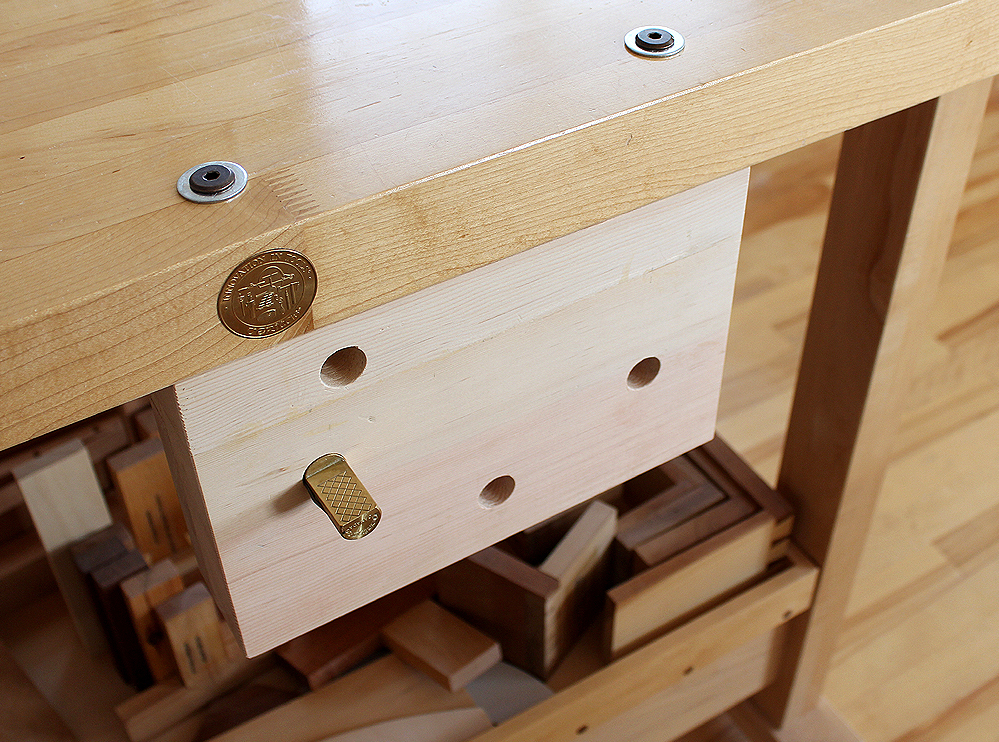 After a period of testing, I was pleasantly surprised at how well it works. It is completely unobtrusive and designed to accept standard 3/4 inch or 20 mm accessories such as surface clamps, bench dogs and shop-made planing stops. The portable board jack can be adapted to any slab-type workbench top without an existing apron or skirt as can be seen in the images. A face vise at one end keeps the board securely clamped on edge. Jointing the edge of long boards has become so much easier and second nature to me now.
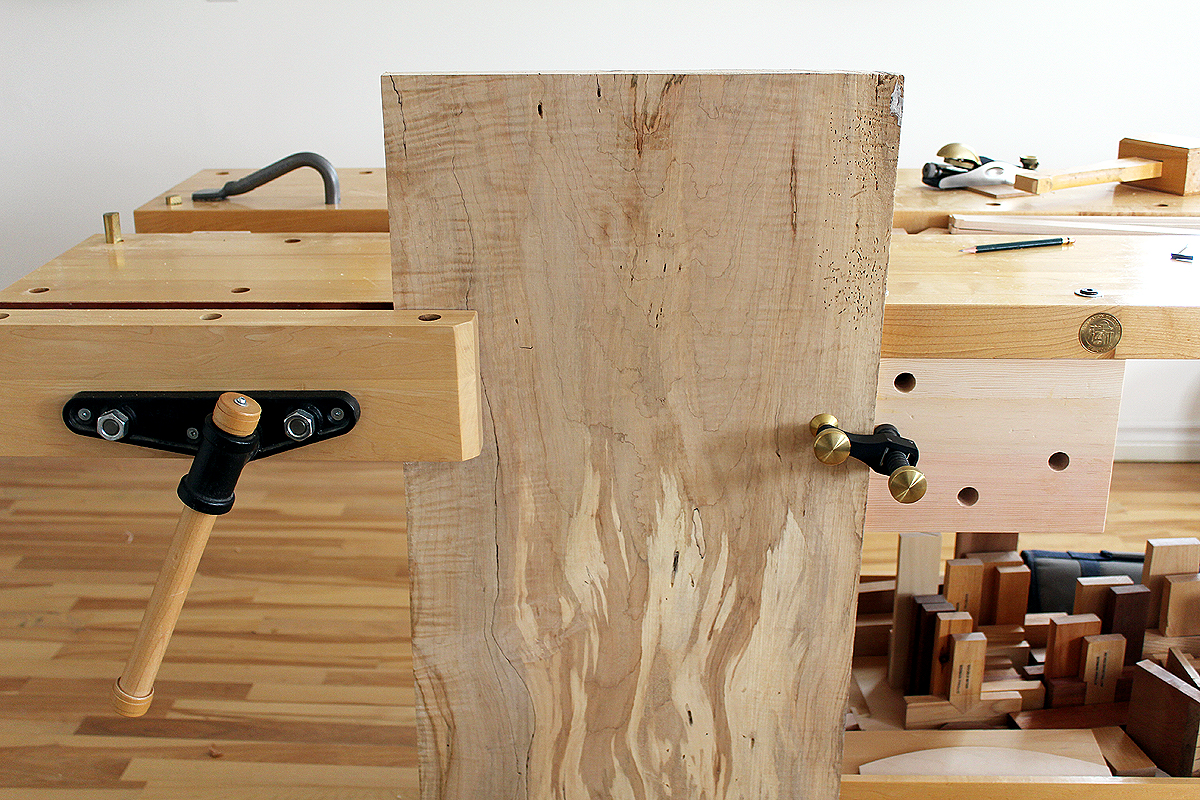 The hole arrangement on the portable board jack is optimized for the work I do but can be modified if necessary. I no longer give any thought to attaching or clamping a long board on edge and along its length to my workbenches. Often, I simply need a peg to be able to rest the free end of a board on. This allows me to quickly and easily flip the board around to work both long edges.
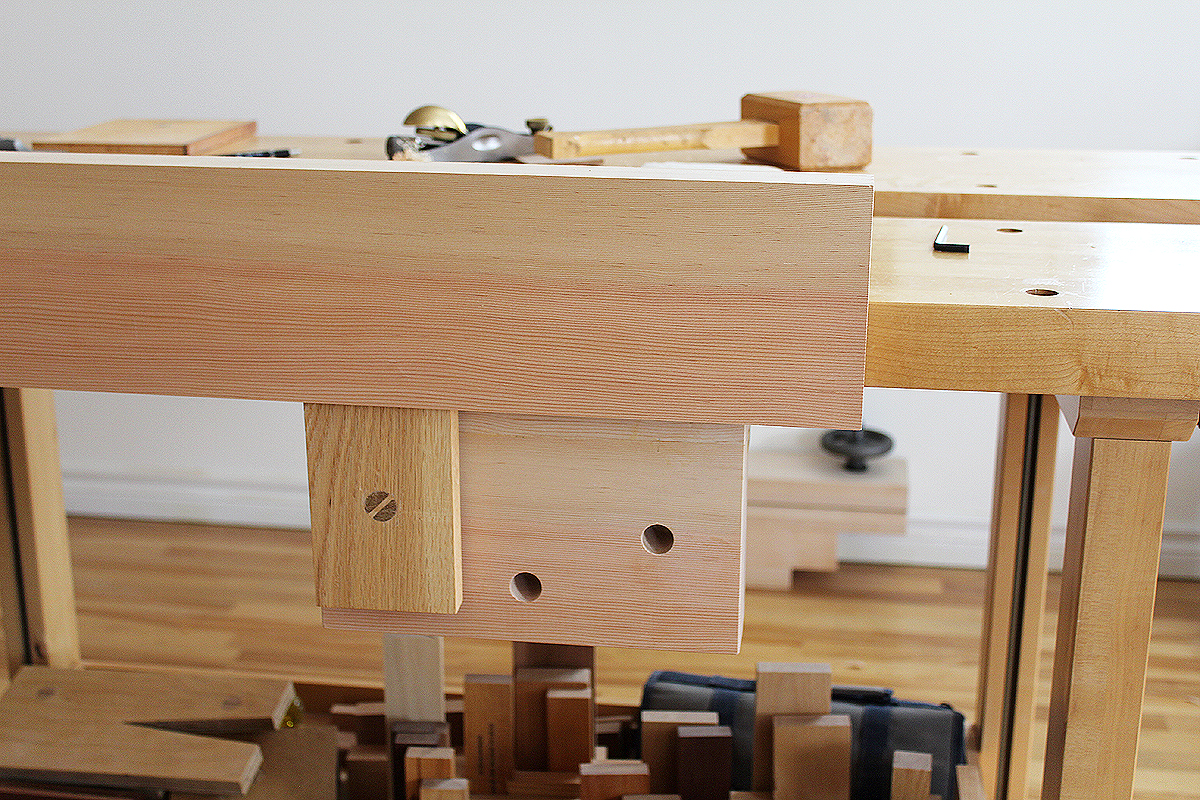 Now, I just selected my most-often used side of a workbench to work on and leave the portable board jack attached. In the future, I will possibly be creating another board jack for my other, similar workbench. This adds to the versatility since it will no longer be necessary to move the board jack from bench to bench.
 Next up in the forthcoming installment or Part 2, a couple of cool bench accessories that continue with the theme of attaching and clamping long boards to a workbench. These are boards that are too long to simply clamp to a face vise. It just makes it so much more pleasant to perform handplaning or hand tool tasks once a board or panel is securely clamped. I like for this to be straightforward so I can focus on the task I need to perform instead of spending needless time on securely attaching and clamping a board to a workbench.
Follow our Board Jack Plan and build your own portable board jack. The portable board jack is designed to hold work along the front edge of a workbench. The board jack works in conjunction with a face vise to hold long boards or panels for handplaning or other bench operations. The board jack is both versatile, portable and self-aligns to the workbench top. It attaches to the underside of any workbench top with a slab top. It is easily adaptable to a workbench top with a thickness between 1 1/2 inches to 3 1/2 inches.
The board jack is easily positioned along a workbench surface. The position depends on the length of board to be supported on edge. The board jack design originated from a need to clamp the opposite end of a board along its edge while handplaning. With a long board clamped in the face vise of a standard workbench, there is no support at the other end of the board. Unless your workbench is designed with a horizontal apron or skirt and dog holes, it is difficult to support the end of a long board along its edge. When not in use, the board jack is quickly and easily removed and stored beneath a workbench.
An alternative is to incorporate a sliding board jack beneath the edge of a workbench top. Although this is an option, it is necessary to design the workbench with this complex feature. The portable board jack is instead designed to attach to the underside of a slab type workbench without any modifications to the workbench. All that is necessary are at least two dog holes close to the front edge of the workbench. You will also be able to easily clamp long, wide panels along the front edge of a workbench using the portable board jack. The portable board jack is designed to be versatile. It can be placed anywhere along a workbench top where dog holes are accessible.
The portable board jack is attached to the workbench top using standard bolts. Quick-connect bolts allow the board jack to be quickly removed or installed, as well as attached to another area of the workbench. Several bench holding accessories can be used with the board jack including bench dogs and surface clamps.
Comprehensive information, board jack techniques, large photos and (16) detailed computer designed diagrams (CAD) included with the board jack plan purchase. Images and illustrations of attaching the portable board jack to a workbench are also included.
Board Jack Plan $14
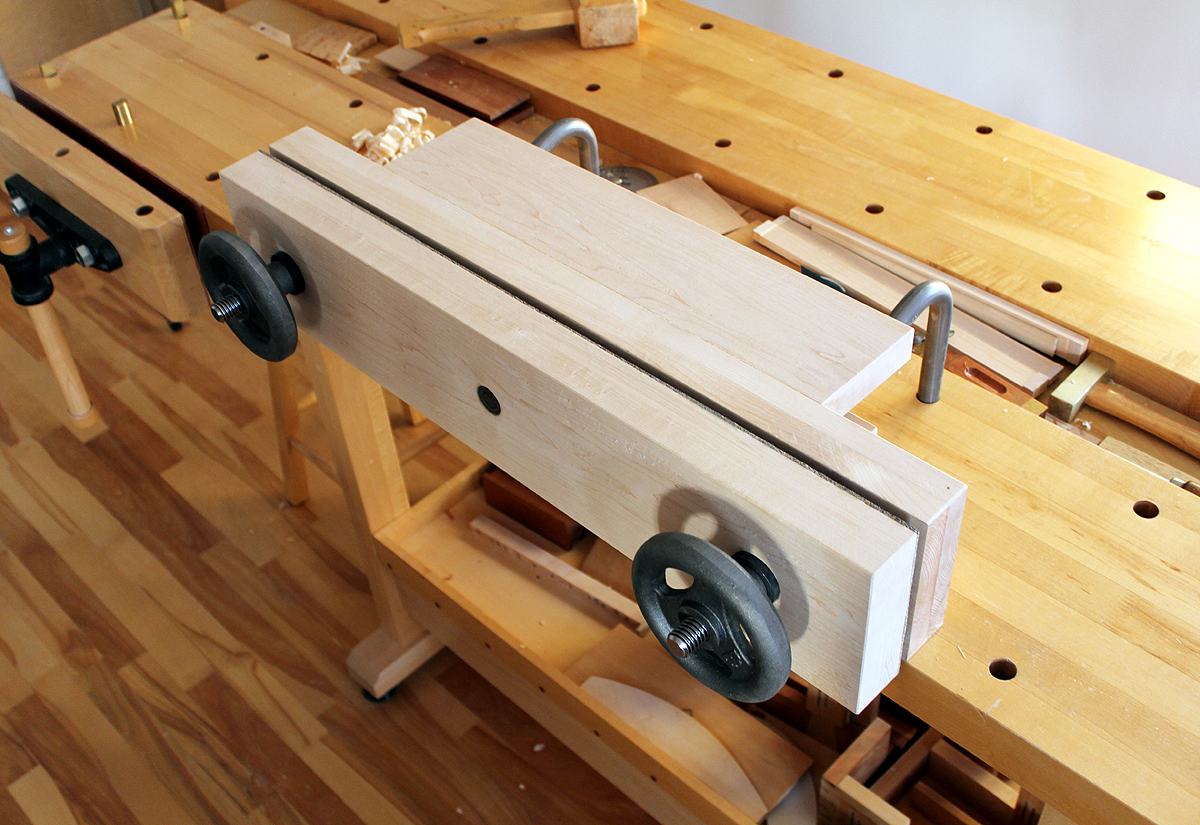 Follow our Moxon vise plan and build your own portable Moxon twin-screw vise. The portable Moxon vise is designed to hold work above the standard height of a workbench. The Moxon vise design is widely attributed to a Joseph Moxon. Joseph Moxon (1627 – 1691), was the hydrographer to Charles II English printer specialising in mathematical books and maps. Moxon’s 17th century book The Art of Joinery first described the double-screw vise. In this historical publication the Moxon vise was documented – a double-screw held to a workbench top with clamps or holdfasts in order to facilitate certain work.
A regular bench height at 35-36 inches is optimized for handplaning operations. When performing fine sawing and other detail work, a higher work surface is preferred. An elevated height of the workpiece enables you to have a clearer view of the wood that is being sawn. Instead of having to stoop down to a workpiece on a regular height workbench, the Moxon vise raises the height of the workpiece to where it is comfortable to work on without strain. You will also be able to easily clamp long, wide panels to the side of a workbench using this vise. The Moxon vise is designed to be both versatile and portable. It can be placed anywhere on a workbench top where dog holes are accessible. When not in use, the Moxon vise can easily be stored upright against a wall.
A normal bench height is in the area of 35-36 inches. With the Moxon vise clamped on to the surface of the workbench, an increased height of 41 inches is achieved. The additional height is a game changer when performing detail work. This Moxon vise design also has a small table set up as an extension in the rear. The small table can be used for mallet work and to rest tools. This Moxon vise design is attached to the workbench top using holdfasts and dog holes. Holdfasts excel at quickly clamping down jigs and workpieces to a workbench surface. The Moxon vise has been adapted to allow for holdfasts to clamp it down as can be seen in these images. Alternative methods exist to clamp a Moxon vise to a workbench, but this is the quickest, cleanest and most unobtrusive method.
Although the hardware and holdfasts used in this Moxon vise build is off the shelf, the plan can be modified for your own hardware and your own holdfasts. Once you have an understanding of Moxon vise concepts, adapting the design to suit your specific work methods is entirely possible.
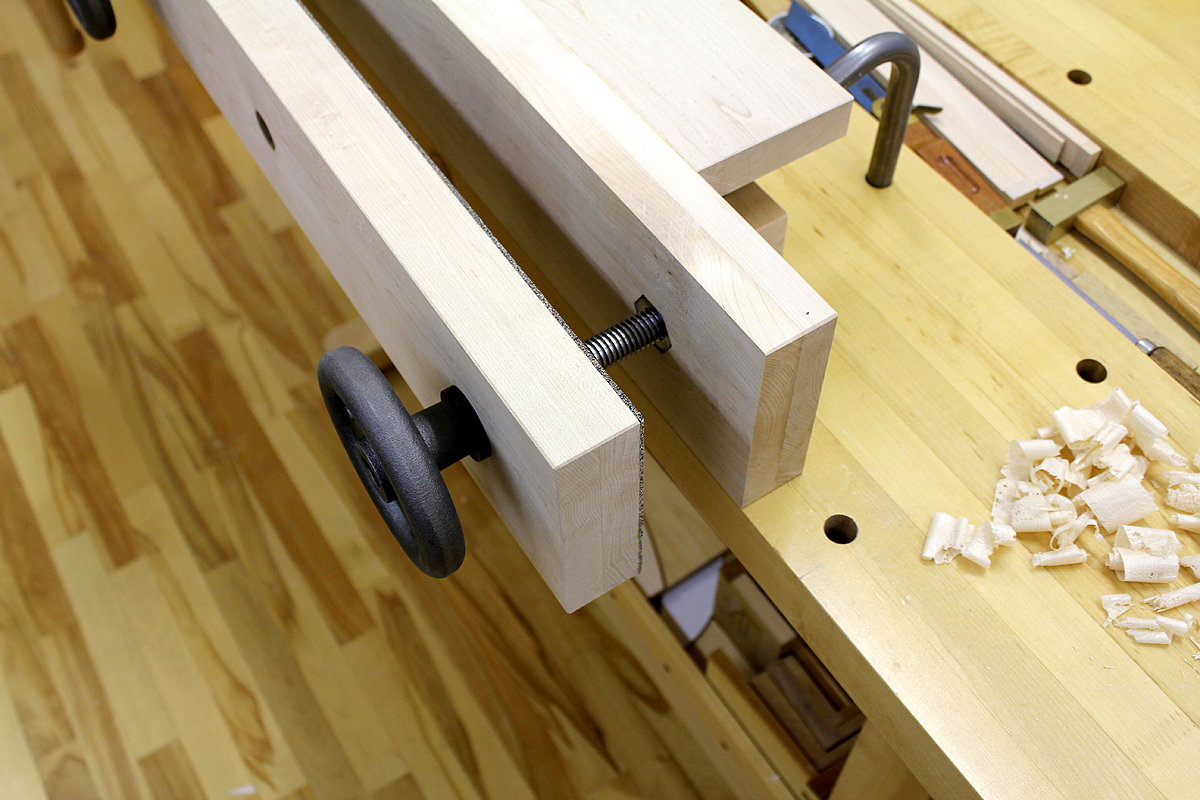 Comprehensive information, Moxon vise techniques and video, large photos and (14) detailed computer designed diagrams (CAD) included with the Moxon vise plan purchase. Images, video and illustrations of attaching the Moxon vise to a workbench are also included.
Moxon Vise Plan $14
The Moxon vise build continued and the vise was completed a couple of days after beginning the project. There was a considerable delay in determining the optimum length of the vise. This actually held me back since making it too short is essentially non-correctable later. Too long and there is a weight penalty as these Moxon vises tend to be heavy, especially with the Benchcrafted solid iron handwheels. Although the extra mass and weight can be your friend when clamping boards down, portability of the unit is also a consideration. I would need to determine the size of panels I most often worked with. In my work, I never go over about 20 inches in width so I set this as optimal distance between the screws. Then, using guidelines on screw hole placement provided in the Benchcrafted instructions, a final length of 28 inches was decided on. I did follow the suggested screw hole placement in the Benchcrafted instructions, this saved some time. Next was to mark the 3/4 inch screw holes and begin drilling, careful to have the holes in the front and rear jaws perfectly aligned.
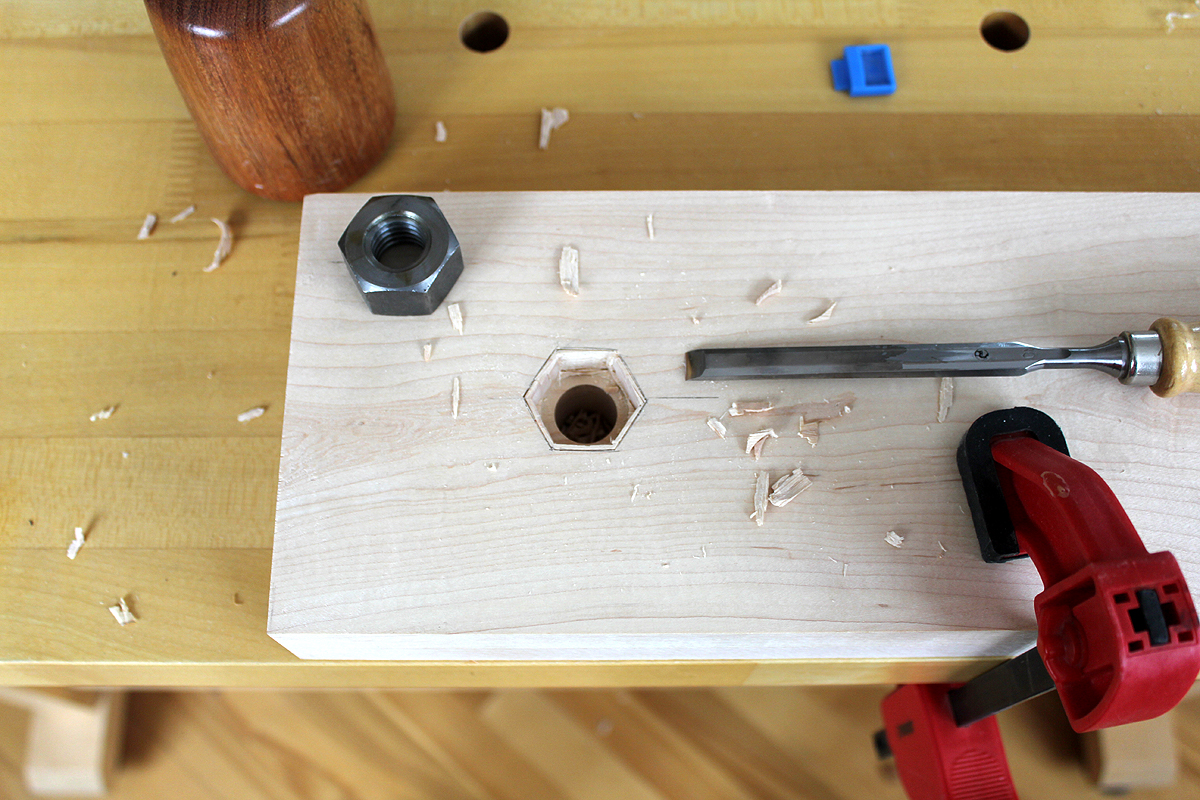 Mortising for the captive nut in the rear jaw inside face was performed using bevel-edge and mortise chisels. Hard maple is well.. hard! In this case, the mortise chisels excelled at hogging out material from the 3/4 inch deep mortise. With a softer hardwood, lighter bevel-edge chisels would have been sufficient. I also oriented the nut so it would align well with the long edges of the rear jaw, mostly an aesthetic consideration.
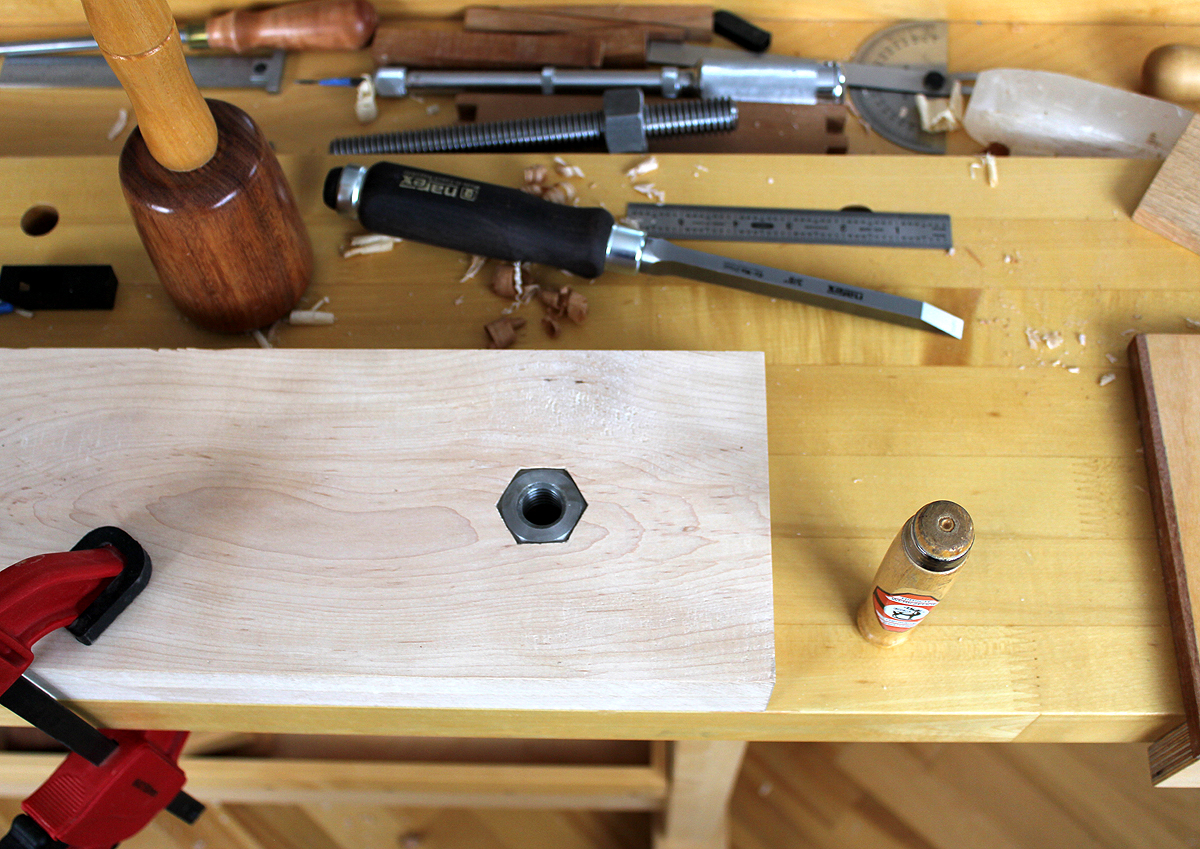 After test-fitting the Benchcrafted hardware and ensuring it worked smoothly, the next step was to attach a large block of wood to the rear. This block of wood would both stabilize the vise assembly and allow holdfasts to be used to clamp the Moxon vise to the workbench top. Several other intermediate steps were performed, always careful to get alignments exactly correct. There is almost no room for error in making these vises since replacing either of the jaws is both time and material consuming. A more in-depth article on how I made this Moxon vise will be available at the web site soon.
A table extension and vertical support was then added after ensuring the stabilizer was effective at clamping down the Moxon vise to the workbench. The table allows me to extend horizontal boards for marking..i.e. dovetails. I customized the design to use an extra row of dog holes in the center area of my workbench. I have two of these workbenches set as my primary workbenches, so the Moxon vise will be completely portable between benches. The vise can also be located almost anywhere on the workbench surface as the holdfast locations are optimized to clamp the stabilizer block of wood at rear of the vise. I am using Gramercy holdfasts but any holdfasts can be set up for use with the vise.
More detail of the handwheel, screw, and captive nut can be seen above. The table is reinforced below both long edges for maximum support, this to allow for any mallet work. i.e. chopping out dovetails. A large design consideration was to not make the Moxon vise too heavy as I would often be removing it from the workbench top and/or moving it between workbenches. The table size was optimized for this vise and the type of work I do. When designing your own Moxon vise, you will need to determine the size of boards and panels you most often work with. The overall length of the Moxon vise is the most important consideration in its design, it is best to get it right the first time!
I am in the process of writing a more extensive article on this Moxon vise build and will publish it soon at the web site.